WordPress – Aggiungere un Search Box

Wordpress – Aggiungere un Search Box

Aggiungiamo automaticamente un Search Box all’interno di ogni articolo pubblicato:

1. Apriamo con un software FTP nel server la cartella che contiene il nostro tema WoprdPress, ad esempio:
blog/wp-content/themes/miotema

2. Apriamo il file:
blog/wp-content/themes/miotema/single.php che contiene il template per il singolo articolo e aggiungiamo le righe:

<! -- Search Form START -->
<form method="get" id="searchform" action="<?php bloginfo('home'); ?>/">
<div><input type="text" size="18" value="<?php echo wp_specialchars($s, 1); ?>" name="s" id="s" />
<input type="submit" id="searchsubmit" value="Search" class="btn" />
</div>
</form>
<! -- Search Form END -->

3. Uppiamo il file modificato sovrascrivendo quello vecchio

4. Dal browser apriamo un articolo qualunque per verificare la presenza del nuovo campo di ricerca.

By |WordPress|Commenti disabilitati su WordPress – Aggiungere un Search Box

WordPress – Posts – Lista dei post recenti

Wordpress – Posts – Lista dei post recenti

Lista dei post recenti | solo titolo

Aggiungiamo automaticamente una lista con i post recenti:

1. Apriamo con un software FTP nel server la cartella che contiene il nostro tema WoprdPress, ad esempio:
blog/wp-content/themes/miotema

2. Apriamo il file:
blog/wp-content/themes/miotema/single.php che contiene il template per il singolo articolo e aggiungiamo le righe:

<! -- Get Recent Posts START -->
<?php wp_get_archives( array( 'type' => 'postbypost', 'limit' => 10, 'format' => 'html' ) ); ?>
<! -- Get Recent Posts END -->

limit’ => 10 : il numero massimo di post da visualizzare

Il risultato sarà un elenco puntato dal post più recente a quello più vecchio.

Lista dei post recenti | titolo + sommario

<! -- Get Recent Posts START -->
<ul>
<?php $the_query = new WP_Query( 'showposts=5' ); ?>
<?php while ($the_query -> have_posts()) : $the_query -> the_post(); ?>
<li><a href="<?php the_permalink() ?>"><?php the_title(); ?></a></li>
<li><?php the_excerpt(__('(more…)')); ?></li>
<?php endwhile;?>
</ul>
<! -- Get Recent Posts END -->

showposts=5 : numero di post mostrati

By |WordPress|Commenti disabilitati su WordPress – Posts – Lista dei post recenti

WordPress – Link a una Categoria

Wordpress – Link a una Categoria

Una categoria intera di articoli può essere richiamata facilmente con un link HTML – a href –

Supponiamo di avere una categoria ‘sponsor’ con ID= 12

1. Creiamo una nuova pagina dalla schermata di Admin di WP:
wp-admin> Pages> Add New

2. Attiviamo il tab ‘Text’ perchè vogliamo scrivere direttamente con la sintassi HTML e acriviamo:

<a href="http://www.lucedigitale.com/blog/?cat=12" title="">Richiama tutta la categoria con ID 3</a>

NOTARE:

http://www.lucedigitale.com/blog/?cat=12

Per ricavare questo link posso utilizzare 3 metodi:

ONE

1. dalla schermata di Admin di WP:
wp-admin> Appeareance> Widgets> Categories, inserire il Widget Categories nel nostro blog

2. Aprire il blog, posizionarsi su una delle voci generata dal Widget Categories, RMB> Copia Indirizzo Link

TWO

1. dalla schermata di Admin di WP:
wp-admin> Posts> Categories> posizionare il cursore del mouse sopra una categoria, RMB> Copia Indirizzo Link

2. il codice copiato sarà:

http://www.lucedigitale.com/blog/wp-admin/edit-tags.php?action=edit&taxonomy=category&tag_ID=12&post_type=post

Il codice sarà 12, notare la porzione di codice:

ID=12

THREE

1. Aprire dal CPanel> PhpMyAdmin> Data Base di WordPress> tabella wp_terms
2. Individuare la colonna ‘name’ – individuare il corrispondente valore della colonna ‘term_id’ che sarà 12

wp-categorie-creare-link

By |WordPress|Commenti disabilitati su WordPress – Link a una Categoria

Unity – Input.GetAxis – Movement Behaviour

Unity – Input.GetAxis – Movement Behaviour

MOVEMENT BEHAVIOUR

NOTICE:
-> Input.GetKey e Input.GetButton -> return a BOOLEAN VALUE true or false
-> Input.GetAxis of keyboard and joystik -> return a VALUE from 1 to -1

The value will be in the range -1…1 for keyboard and joystick input. If the axis is setup to be delta mouse movement, the mouse delta is multiplied by the axis sensitivity and the range is not -1…1.

1. Create virtual Axes and buttons can be created in: MAIN TOP MENU> Edit> Project Settings> Input.

2. Setup Virtual Axis from right column.

unity-geyaxis

How does it works:
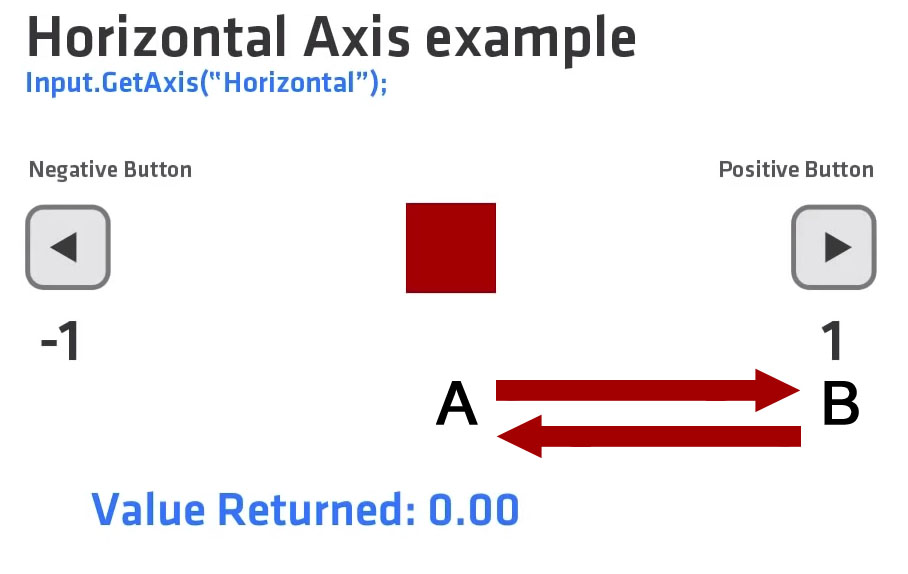
1. A position, the joy is not being pressed -> value returned 0.00
2. When we first press the key, in the first frame -> value returned is 0.01
3. We progress througth frames holding down the button (mantengo premuto) -> value returned increase
4. Holding down the button at the end -> value returned is 1
5. We release the button, in the first frame -> value returned is 0.99
6. We progress througth frames (button is released) -> value returned decrease
7. At the end -> value returned 0.00

Parameters of MAIN TOP MENU> Edit> Project Settings> Input> Horizon:

– Setup Axis
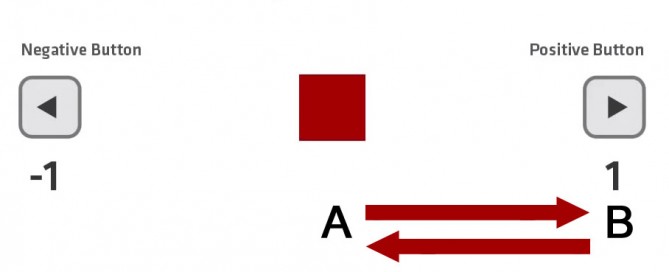
Positive Button: right ()

– Assign buttons:
Alt Positive Button: d
End users can configure Keyboard input in a nice screen configuration dialog

– Gravity, how fast the scale return to 0 after the button has been released (B -> A)
> gravity > fast return
< gravity < fast return 0.1: slow 3 : default 100: fast - Sensitivity, how fast the scale reaches 1 (A -> B) – unity x seconds
> sensitivity > responsive > fast
< sensitivity < resposnsive < fast 0.1: slow 3 : default 100: fast - Dead (to prevent unwanted little joystick movement) > dead zone < joystick sensibility < dead zone > joystick sensibility

– Snap
If enabled, the axis value will be immediately reset to zero after it receives opposite inputs. Only used when the Type is key / mouse button.

3. DRAG AND DROP the script over an object in the Hierarchy
Example: move an object using GetAxis – Horizontal

#pragma strict

function Start () {

}

function Update () {

 var horiz : float = Input.GetAxis("Horizontal");
 Debug.Log(horiz);
 transform.Translate(Vector3(horiz,0,0));
}

Statement: static function GetAxis(axisName: string): float;
axisName -> Virtual Axes names

Horizontal and Vertical Control – Complete Example

#pragma strict

function Start () {

}

var speed : float = 10.0; // to change speed

function Update () {

 var horiz : float = Input.GetAxis("Horizontal");
 var vert : float = Input.GetAxis("Vertical");

 // Make it move 10 meters per second instead of 10 meters per frame...
 horiz *= Time.deltaTime;
 vert *= Time.deltaTime;
 
 transform.Translate(Vector3(horiz*speed,vert*speed,0));
}
By |Unity3D|Commenti disabilitati su Unity – Input.GetAxis – Movement Behaviour

Unity – 2D Vector Math

Unity – 2D Vector Math

2D Vector Math uses Pythagoras’s Theorem.
It has 2 components, x and y, that rapresent the point from origin 0,0 to any point on a 2D plane.

A vector has:
– Magnitude, it is the lenght of the vector
– Direction, it is the direction of movement

Below an example to calculate the distance between 2 characters

unity-vector-math-img-001

unity-vector-math-img-002

Vector Math can be used to predict position of moving objects.
Below the character has a velocity o 12,5 per hour, it means it moves 12 units in x and 5 units in y per hour.
You can calculate the final position after one hour with vector math:

unity-vector-math-img-003

Unity has vector math functions.

Official guide at: http://docs.unity3d.com/Documentation/ScriptReference/Vector2.html

Calculate distance between two objects

var distance = Vector2.Distance(object1.transform.position, object2.transform.position);

Statement: Vector2.Distance(a,b) is the same as (a-b).magnitude.

By |Unity3D|Commenti disabilitati su Unity – 2D Vector Math