3D-Coat – UV Mapping

3D-Coat – UV Mapping

3D Coat is an interesting 3D software, easy to use and very good to improve our productivity.
It can be used near 3DSMax, Maya or others big brands to speed up the workflow.
In this article I will explain how use 3D Coat to UV Unwrapping operations.

UV Map Unwrapping cause me a lot of pain because the classic UVWUnwrap modifier of 3DSMax is very boring and not so easy to use.
Even if you are a UVWUnwrap modifier-genie you will spend a lot of time to create a good work. If you work in the game industry, the pain will be increased by texture optimization needed, them… let’s go on to discover 3D Coat UV Tools :)

3DS Max – Exporting

1. Create a 3D model – Editable Poly inside 3DS Max
2. Select the model> RIGHT COLUMN> Modify> Modifier List> UVW Mapping Clear> RMB> Collapse All
3. Select the model> RIGHT COLUMN> Utilities> Reset XForm> Reset Selected
In this way we will clear all old UV Maps and transformations
4. MAX> Export> Export Selected> .fbx

3D Coat – Importing

1. Run 3D Coat, into Wizard window select ‘UV Map Mesh’
2. In the Import Object window select:

– Normal Map Software Preset: Unknown
– Initial Subdivision: No Subdivision
– UV Map Typing: Keep UV
– UV Sey Smooting: No Smoothing

Texture Width: 1024
Texture Height: 1024

press ‘OK’ button.

3. File> Save As, then save your project

3D Coat – Auto Seams

1. LEFT COLUMN> Commands> Auto Seams
3D Coat will create all required seams automatically, calculating distortion, shape etc…
2. LEFT COLUMN> Commands> Unwrap
Fit all clusters onto the texture
3. LEFT COLUMN> Commands> Auto Scale
Auto scale all island to have equal propotions between square in space and square in UV set

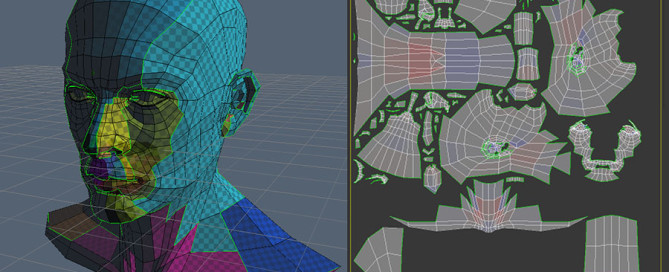
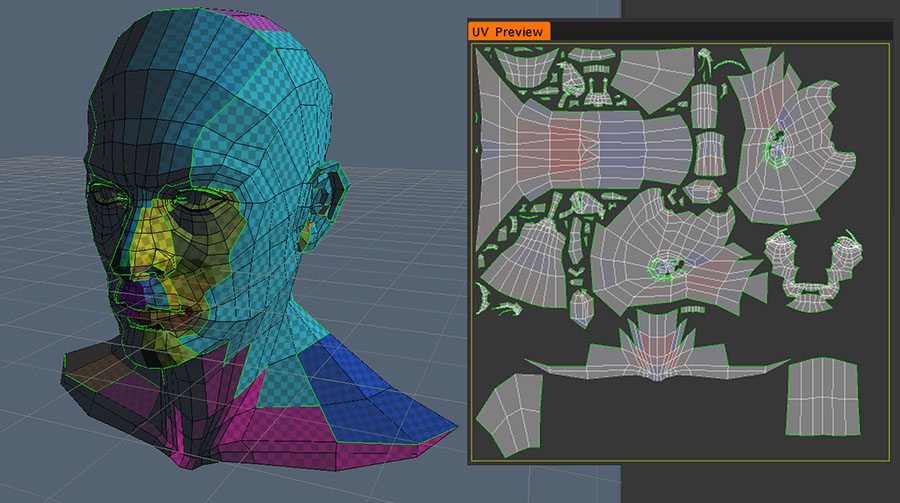
The final result here:
3dcoat-001

Notice that in the 3d mesh the size of the squares are the same for all islands.

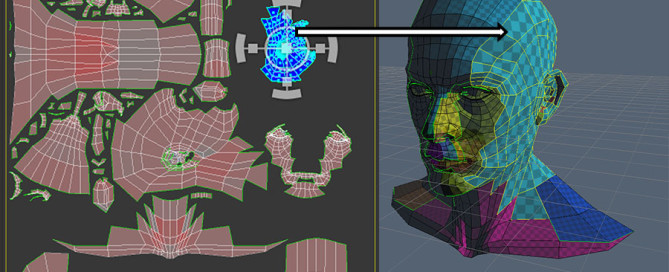
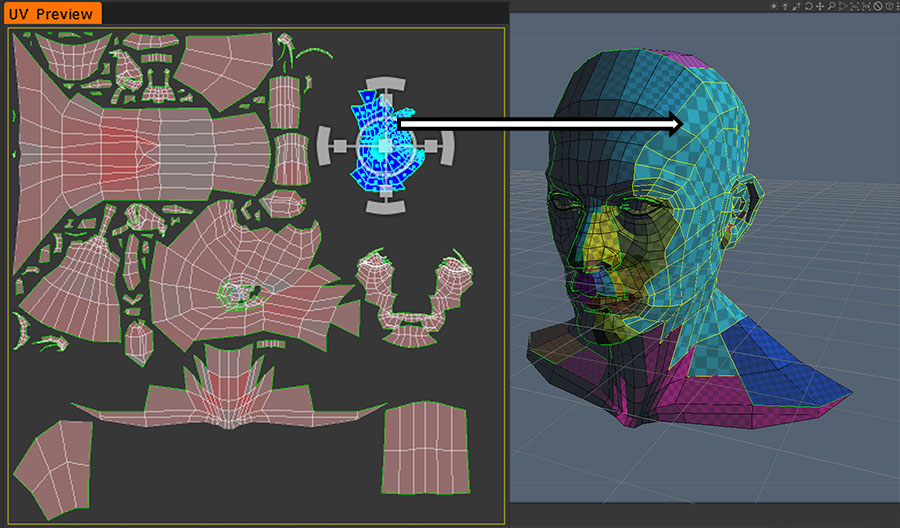
4. In the ‘UV Preview’ click over an island and resize it down, see the result below, the squares of this island will be bigger.
3dcoat-002

3D Coat – Export

1. LEFT COLUMN> Commands> Apply UV-set
2. File> Export Model> .fbx
3. ‘OK’

3DS Max – Importing

1. MAx> Import> .fb
2. Select the object> RIGHT COLUMN> Modify> Modifier List> Unwrap UVW
3. Select Unwrap UVW modifier> Edit UVs> Open UV Editor…, then you will see the work you have done using 3D Coat

3D Coat – Mark Seams Manually

To create a good texture map for a game character you need an island for the head and separated islands for the rest of the body.
‘Auto Seam’ command is good, but if you have an organic model, 3D Coat can’t understand where is the head, the hands, the torso etc… without your help! Let’s try to help it!

1. Import your 3D Mesh

2. LEFT COLUMN> Modes> Edge Loops
3. Over the 3D Mesh> LMB and select edges OR CTRL+LMB to deselect

AND/OR

2. LEFT COLUMN> Modes> Mark Seams
3. Over the 3D Mesh>LMB select edges OR CTRL+LMB to deselect

4. LEFT COLUMN> Commands> Unwrap
5. LEFT COLUMN> Commands> Auto Scale

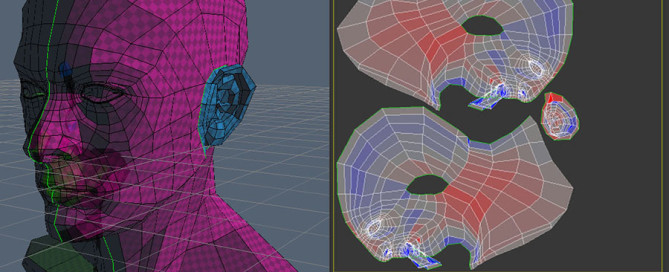
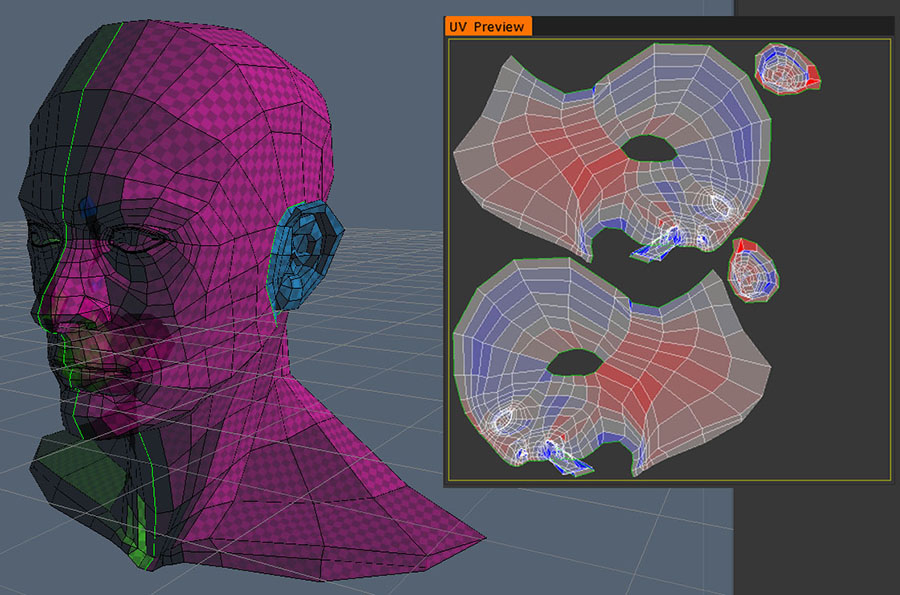
An example of marking manual seams, it is not a good work, it is only an example.
3dcoat-003

Compare colors of 3d mesh in ‘3D View’ and islands in ‘UV Preview’ to better understand.

Relax

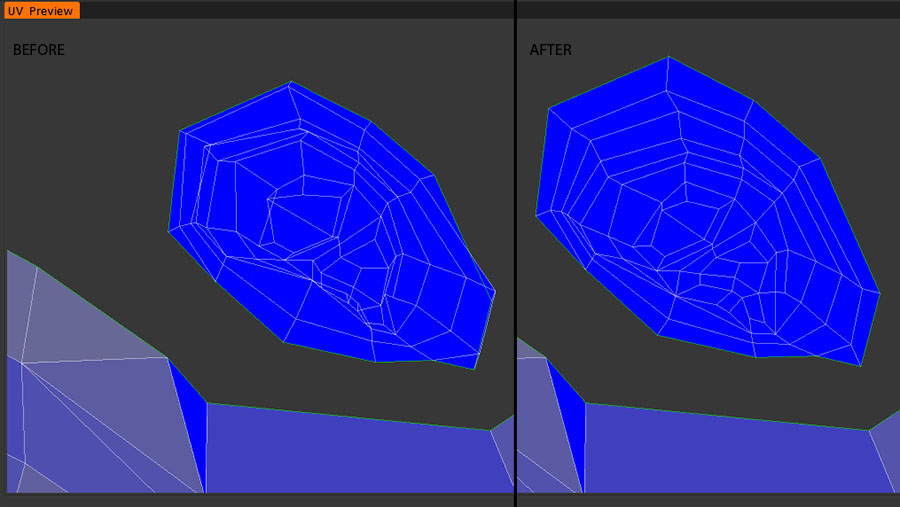
You will relax UV if you need to redure square trash. Relax UV introduces additional stretching.
You should choose what is better for you: square trash or strech.

1. MAIN TOP MENU> ‘Islands’ to enable the islands selection
2. UV Preview> MMB to move the view AND RMB to scale the view
3. UV Preview> select an island and scale if you need
4. RIGHT COLUMN> Selected> Relax

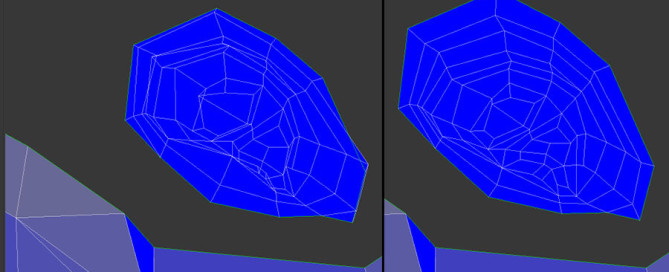
See the image below: before and after ‘Relax’ command
3dcoat-004

Manipulate UV Vertices

1. MAIN TOP MENU> Vertices
2. UV Preview> MMB to move the view AND RMB to scale the view
3. UV Preview> select an island scale if you need
4. UV Preview> LMB+single click select one vertice OR LMB+maintain pressure+slide over vertices for multiple selection
5. Manipulate using the handles
6. LEFT COLUMN> Selected> Clear to end the selection

Planar Mapping

1. MAIN TOP MENU> Island
2. UV Preview> MMB to move the view AND RMB to scale the view
3. UV Preview> select an island and scale if you need
4. RIGHT COLUMN> Selected> To Planar

Other Algorithms for Mapping

1. MAIN TOP MENU> Island
2. UV Preview> MMB to move the view AND RMB to scale the view
3. UV Preview> select an island and scale if you need
4. RIGHT COLUMN> Selected>

> To GU: 3D-Coat’s proprietary unwrapping algorithm, Globally Uniform. Great for all types of meshes, be they organic or hard surface. Try it Love it!

> To LSCM: LSMC algorithm

> To ABF: ABF++ algorithm

Hide Islands

1. MAIN TOP MENU> Island
2. UV Preview> select an island
3. RIGHT COLUMN> Selected> Hide / Unhide

Clear All

1. LEFT COLUMN> Commands> Clear Seams, clear all seams
2. LEFT COLUMN> Commands> Upd. Islands, to refresh the UV Preview
3. LEFT COLUMN> Commands> Restore UV, restore original UV

By |3D Graphic, 3DS Max|Commenti disabilitati su 3D-Coat – UV Mapping

3D-Coat – Retopo

3D-Coat – Retopo

Great ‘Retopo’ and ‘Low Poly Modeling’ tools inside 3D-Coat that work seamless with ‘UV Unwrapping’ tools and ‘Paint Textute’ tools; What more do you want?

3DS Max – Exporting

1. Create a 3D model – Editable Poly inside 3DS Max
2. Select the model> RIGHT COLUMN> Modify> Modifier List> UVW Mapping Clear> RMB> Collapse All
3. Select the model> RIGHT COLUMN> Utilities> Reset XForm> Reset Selected
In this way we will clear all old UV Maps and transformations
4. MAX> Export> Export Selected> .fbx

3D Coat – Importing

1. Run 3D Coat, into Wizard window select ‘Perform Retopology’> Import Reference Mesh

Setup Viewport

1. MAIN TOP MENU> setup lights
2. Push in the keyboard ‘4’ to show/hide wireframe
3. MAIN TOP MENU> Symmetry> Symmetry>
– on Enable Symmetry
– Show Symmetry Plane
– Symmetry Type: X – Axis

IMPORTANT: You will be able to edit 3d model ONLY on the left side, to change side: MAIN TOP MENU> Invert Mirror

NOTICE: in the bottom of the window there are statics

1. Push in the keyboard ‘4’ to hide polygons, you can be distracted by polygons

Top Left Up Views

– Hold down SHIFT+LMB DRAG on the right to see Left View
– Hold down SHIFT+LMB DRAG on the up to see Front View

Square selection, lasso etc…

Press E> draw a lasso> ENTER

Low Poly Modeling

Add

NOTICE: the white ball represent the snap

LEFT COLUMN> Add/Split
– LMB create new polygons
– LMB split polygons
– RMB tweak (pizzicare/spostare) edges/vertices

LEFT COLUMN> Split Rigs

LEFT COLUMN> Quads

LEFT COLUMNS> Strokes: draw freehand strokes and press ENTER -> Try it and love it!

Selection

1. LEFT COLUMN> Select
2. MAIN TOP MENU> Faces
– LMB adds elements
– CTRL+LMB removes elements
– DOUBLE LMB over an empty area of the hires mesh to deselect all
3. LEFT COLUMN> Store Sel./Recall Sel.
4. LEFT COLUMN> Clear Sel

Extrude

Extrude

1. LEFT COLUMN> Select
2. MAIN TOP MENU> Faces
– LMB adds elements
– CTRL+LMB removes elements
3. LEFT COLUMN> Normal Extrude> use the handles> ENTER

1. LEFT COLUMN> Select
2. MAIN TOP MENU> Faces
– LMB adds elements
– CTRL+LMB removes elements
3. LEFT COLUMN> FREE Extrude> use handles> ENTER

Subdivide

1. LEFT COLUMN> Select
2. MAIN TOP MENU> Faces
– LMB adds elements
– CTRL+LMB removes elements
3. LEFT COLUMN> Subdivide> use the handles> ENTER

Move

RMB to move edges/vertices

1. LEFT COLUMN> Move Vertices
2. MAIN TOP MENU> select Vertices/Edges/Faces/Edge Loops/Edge Rings
3. click over the 3d model and DRAG to move elements

1. LEFT COLUMN> Slide Edges

1. LEFT COLUMN> Brush

1. LEFT COLUMN> Transform to move/rotate/scale> ENTER to apply

1. LEFT COLUMN> Relax: relax the whole mesh or a subset

Remove

1. LEFT COLUMN> Tweak> Del. Polygons / Del Edges

1. LEFT COLUMN> Basic> Select
2. MAIN TOP MENU> Vertices/Edges/Faces
– LMB adds elements
– CTRL+LMB removes elements
3. LEFT COLUMNS> Commands> Delete

1. LEFT COLUMNS> Collapse

Hide / Unhide

1. LEFT COLUMN> Basic> Select
2. MAIN TOP MENU> Vertices/Edges/Faces
– LMB adds elements
– CTRL+LMB removes elements
3. LEFT COLUMNS> Commands Hide/Invert Hidden/Unhide
4. MAIN TOP MENU> Hide

Export

1. MAIN TOP MENU> Symmetry> No Symmetry
2. MAIN TOP MENU> Retopo> Apply Symmetry to Current Layer
If you do not do point 1 and 2 you will export only one side
3. MAIN TOP MENU> File> Export Retopo Mesh> .fbx

By |3D Graphic, 3DS Max|Commenti disabilitati su 3D-Coat – Retopo

3DSMax – PhoenixFD – Overview

3DSMax – PhoenixFD – Overview

Aren you thirsty?
Would you like a (digital) beer?
Phoenix FD is the right tool for you!

Joking aside, Phoenix FD is a powerful tool for fluid simulations.

It has a lot of strong points:
– easy simulate fire, smoke, explosions as well as liquids, foam and splashes
– flexibility and speed
– GPU accelerated preview
– fully multi-threaded displacement algorithm
– filly compatible with V-Ray (the producer is Chaos Group, creator of V-Ray)

Let’s take a look to menus and main functions

Objects

RIGHT COLUMN> Create> Geometry> PhoenixFD

– PHXSimulator
– PHXFoam

Helpers

RIGHT COLUMN> Create> Helpers> PhoenixFD

– PHXSource
– PHXTurbolence
– PHXMapper
– PRTObject
– PHXLiquid

Materials

MAIN TOP MENU> Rendering> Material/Map Browser> Maps> Standard>

– PhoenixFD Particle Texture
– PhoenixFD Particle Texmap
– PhoenixFD Particle OceanTex

Environment

MAIN TOP MENU> Rendering> Environment> Atmophere> PhoenixFD

By |3D Graphic, Mudbox|Commenti disabilitati su 3DSMax – PhoenixFD – Overview

3DSMax – Ray Fire – Overview

3DSMax – Ray Fire – Overview

Do you feel like the incredibile Hulk, you want destroy everything?
Ray Fire is the right tool for you!

RayFire Tool gives you the ability to shoot, destroy, demolish, wreck, break down, wreak havoc, blow up, burst, detonate, explode and do other similar things. I can’t hesitate, I need to try it now!

The main tools are located in:

Geometry

RIGHT COLUMN> Create> Geometry> RayFire>

– RF Cache
– RF Trace
– RayFire: it calls the RayFire floating window
– Shooting

Helpers

RIGHT COLUMN> Create> Helpers RayFire>

– RF Bomb
– RF_PhysX

Modifiers

– RayFire Apherity
– Clusters
– Cracks
– Slice
– Voronoi
– Voxels

Sphere that crashes over pavement – Voronoi

Create Geometry

1. RIGHT COLUMN> Create> Geometry> Standard Primitivies> Box, create a box as a pavement ‘Box001’

2. RIGHT COLUMN> Create> Geometry> Standard Primitivies> Sphere, Create a Sphere 2 meters over ‘Box001’

Cracks the Sphere

1. Select Sphere001> RIGHT COLUMN> Modifier List> RAyFire Voronoi

2. RayFire Voronoi> Point Cloud> scale, move to change the cracks will be generated Fragment
The green dots represent the center of every fragment

3. RayFire Voronoi> ‘Fragment’ button

4. RayFire Voronoi> Click over the ‘Play’ near ‘Fragment’ and setup Point Cloud again

5. RayFire Voronoi> Display> Assign Vertex Colors

Simulate

1. RIGHT COLUMN> Create> Geometry> RayFire> ‘RayFire’> Opnen RayFire Floater, this opens the RayFire floater window

2. RayFire floater window>

– Dynamic/Impact Objects> ‘Add’ Sphere001
— Simulation geometry Concave
— Material: Dense rock

– Static & Kinematic Objects> ‘Add’ Box001

– Fragments> Fagmentation Options> ‘Fragment’

– Physics> Physical Options> Bake

For italian people: procedura e funzionamento del software.

1. Viene applicato un modificatore di frammentazione all’oggetto per poter gestire con l’utilizzo dei gizmo il tipo di rottura da applicare

2. Dalla finestra di Ray Fire> Fragments> ‘Fragment’ viene diviso usando un algoritmo booleano la mesh a cui è applicato il modificatore di frammentazione di Ray Fire.
ATTENZIONE: dopo questa operazione il numero delle Mesh nella scena aumenterà notevolmente, infatti verrà generata una singola mesh per ogni frammento! E’ bene organizzare la scena in livelli ben definiti separando le mesh di Ray Fire dalle altre.

3. Dalla finestra di Ray Fire> Objects> vengono definiti gli oggetti da coinvolgere nella simulazione come statici, dinamici etc…

4. Dalla finestra di Ray Fire> Physics> ‘Bake’ viene avviata la simulazione e piazzati i singoli keyframe

By |3D Graphic, 3DS Max|Commenti disabilitati su 3DSMax – Ray Fire – Overview

3DSMax – V-Ray – Overview

3DSMax – V-Ray – Overview

What is V-Ray?
V-Ray is a render engine you can use inside 3DSMAx.

In 3D art, and in life in general :) light is important and this render plugin has all digital lights you need to create a render-masterpiece!
The software is not really easy to use, because of complex features and advanced management of parameters but it’s worth it.
Let’s take a first look!

Tools

MAIN TOP MENU> Tools> ‘V-Ray Light Lister’
NOTICE: you can’t see V-Ray Lights inside standard ‘Light Lister’

MAIN TOP MENU> Tools> VRay .vrmat converter

Rendering Setup

MAIN TOP MENU> Rendering> Render Setup> Common> Assign Renderer> Production

– V-Ray Adv: rendering software using CPU
– V-Ray RT : rendering real time using GPU

Usually the standard setup is:

Production: V-Ray Adv
Material Editor: V-Ray Adv
ActiveShade: V-Ray RT

Effects

MAIN TOP MENU> Rendering> Environment> Effects> Add…

– VRay Lens Effects
There are Bloom, Glare, Mask, etc…

MAIN TOP MENU> Rendering> Environment> Atmosphere> Add…

– VRayEnvironmentFog
– VRaySphereFade
– VRayToon

Objects

RIGHT COLUMN> Create> Geometry> VRay

– VRayProxy
– VRayClipper
– VRayFur
– VRayMetaball
– VRayPlane
– VRaySphere

Modifiers

RIGHT COLUMN> Modifier List>

– VRayDisplacementMod
– VRayHairFarm Mod

Lights

NOTICE: if you want see VRayLight in action you will need assign V-Ray Adv in ‘Render Setup’ window.

RIGHT COLUMN> Create> Lights> VRay

– VRayLight
– VRayIES
– VRayAmbientLight
– VRaySun

Camera

RIGHT COLUMN> Create> Camera> VRay>

– VRayDomeCamera
– VRayPhysicalCamera: really great with bokeh effects!

Helpers

RIGHT COLUMN> Create> Helpers> VRay>

– VRayBPTracer
– VRayLightMeter
– VRayStereoscopic (see also Systems)

Systems

RIGHT COLUMN> Create> Systems> VRay>

– VRayStereoRig (see also Helpers)

Materials

MAIN TOP MENU> Rendering> Material Rendering> Slate Material Editor> Material/Map Browser> V-Ray

– VRayColor
– VRayCompTex
– VRayEdgesTex
– VRayFakeFresnelTex
– VRayHDRI
– VRayICC
– VRayLut
– VRayMultiSubTex
– VRayOCIO
– VRaySoftbox
– VRayUserColor
– VRayUserScalar

By |3D Graphic, 3DS Max|Commenti disabilitati su 3DSMax – V-Ray – Overview