Allegorithmic – Substance Designer – Basic Tutorial

Allegorithmic – Substance Designer – Basic Tutorial

With Substance Designer you can create great materials for your favourite 3D application.
A ‘Substance’ is a file with the .SBSAR extension that can be used into 3DS Max, Maya, Unity3D, Unreal Engine.
Let’s go on!

Where can you use Substance Designer in your pipeline?
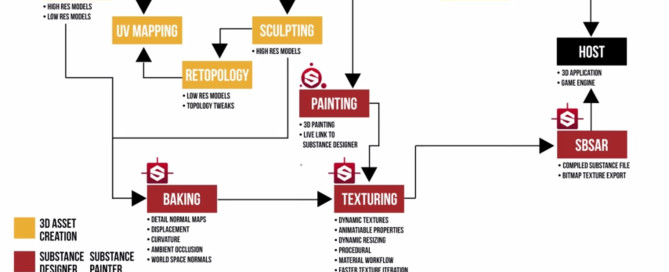
You need create a model and the UV Map using for example 3DSMax or MudBox, then import the mesh inside Substance Designer and here create the maps, see the workflow below:
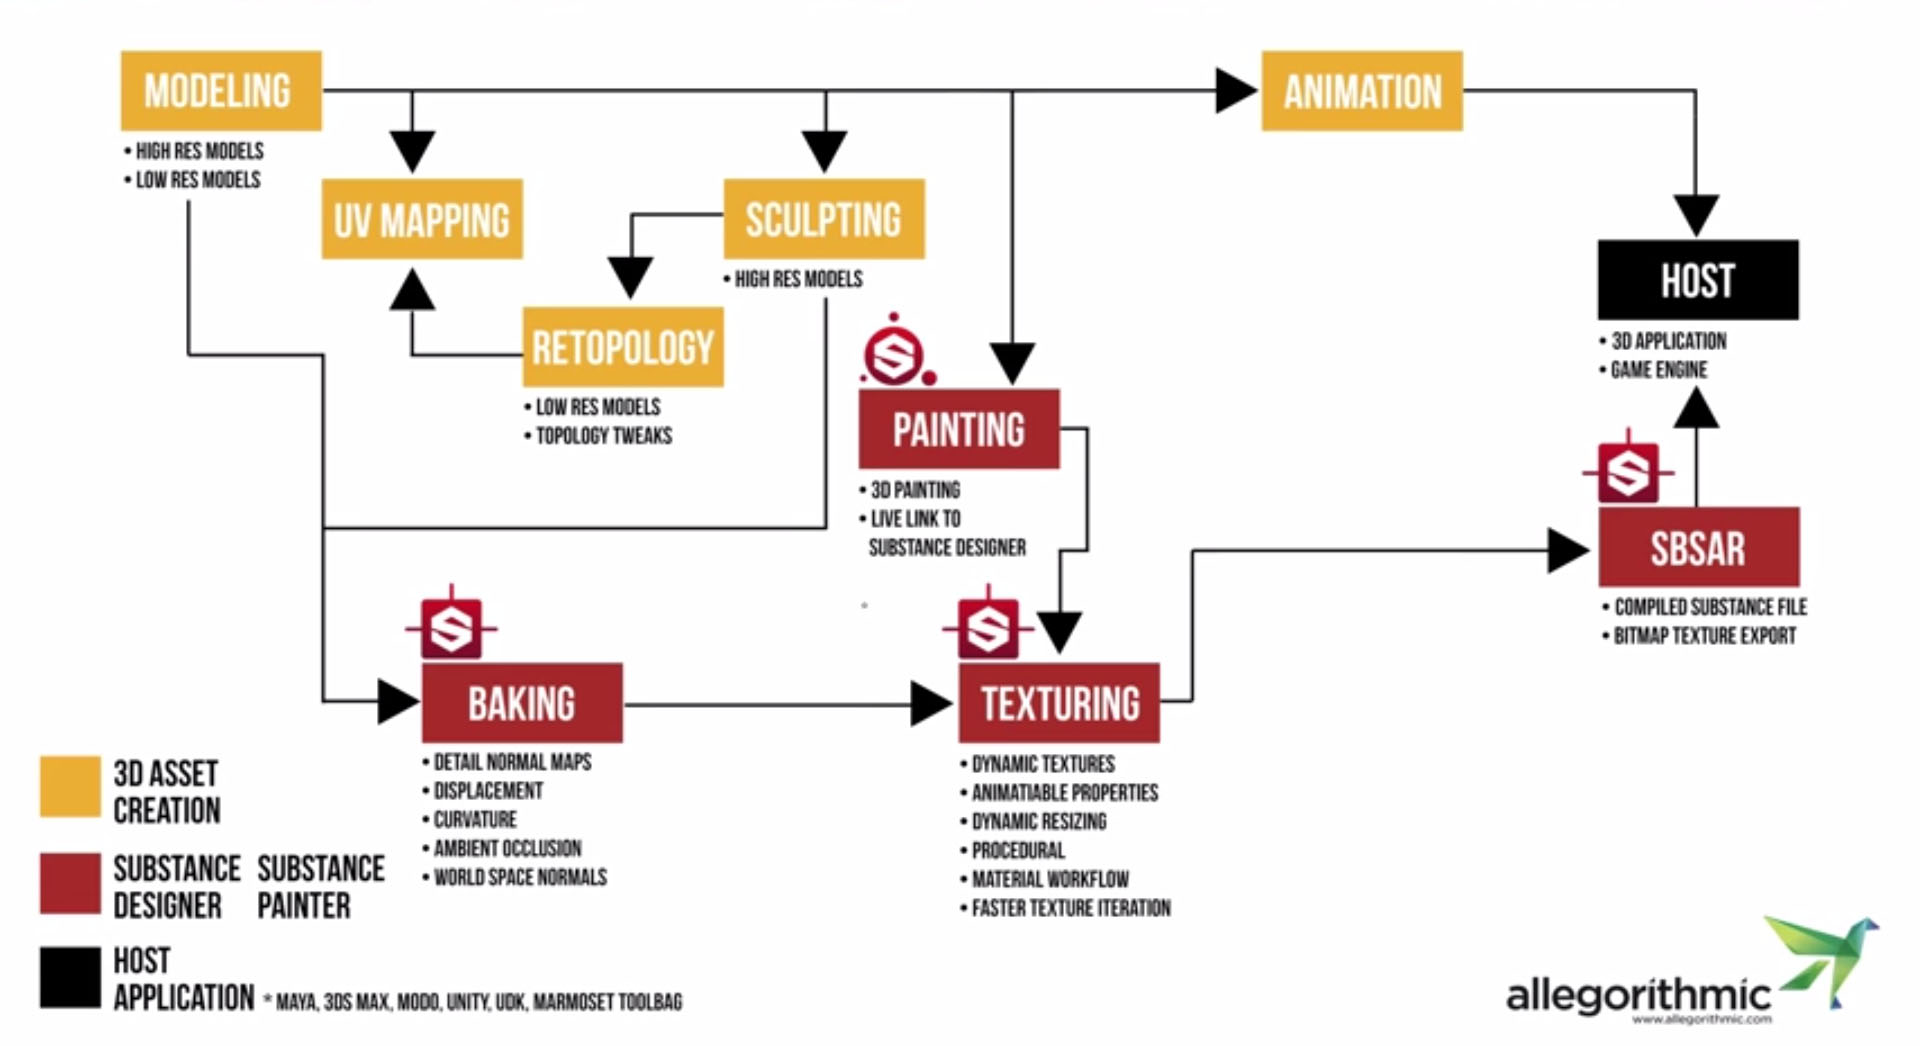
substance-designer-workflow

Initial setup

1. Open Substance Designer

2. 3D View> Materials> Default> Shader> physically_based
– LMB to rotate View
– SHIFT+LMB to move light

3. Tools> Switch Engine…> Direct3D or SSE2

Create new substance

1. MAIN TOP MENU> File> New Substance…

2. ‘New Substance’ Window> ‘Outputs’ label> BOTTOM RIGHT ‘Add Output’ to add a channel, expard the roolout of the channel to select the type of maps that can be:
– diffuse
– baseColor
– opacity
– emissive
– ambient
– ambientOcclusion
– mask
– normal
– bump
– height
– dispacement
– specular
– specularLevel
– specularColor
– glossiness
– roughness
– anisotropyLevel
– anisotropyAngle
– transmissive
– reflection
– refraction
– environment
– IOR
– scattering
– any
– metallic
– panorama

Not bad!

3. DRAG AND DROP a bitmap file over New_Graph Window> Import resource(s)

4. DRAG AND DROP from BOTTOM LEFT Library> Material Filters> 1-Click> ‘Bitmap to Material Light’ over New_Graph Window

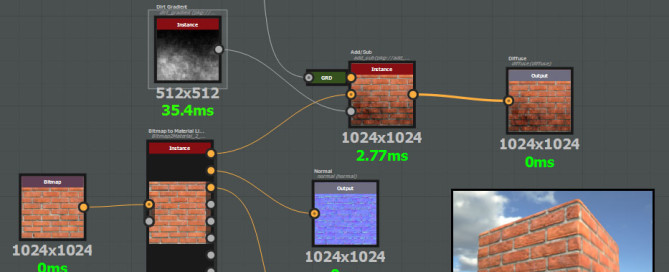
5. Connect the Input/output values as you can see in the graph below
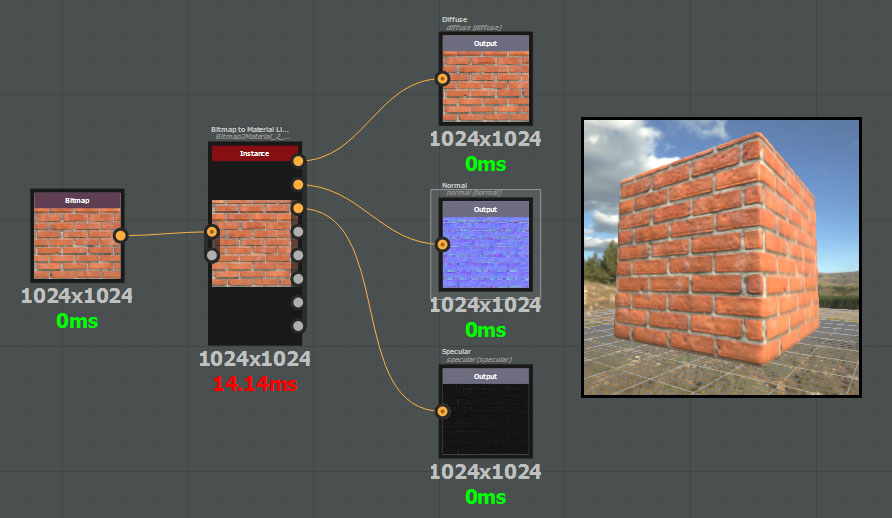
substance-designer-material-diagram-1

6. Click over Bitmap to Material Light Box, setup parameters on the right box

Add simple dirt

See the diagram below
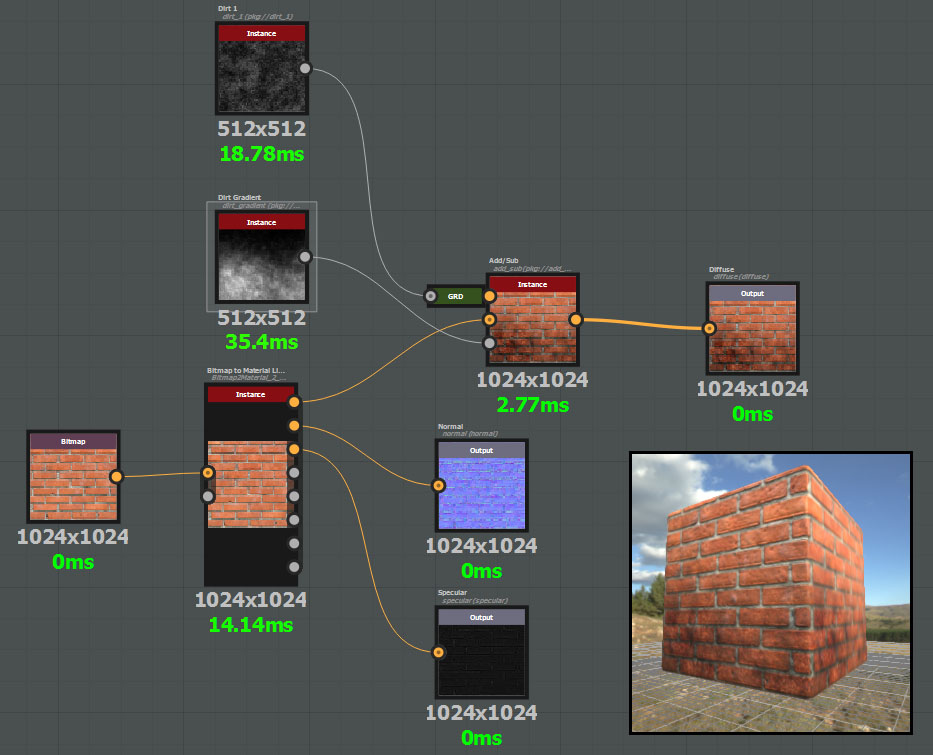
substance-designer-diagram-2

Notice the blocks:

Library>Generators> Dirt ———————————> | Filters Add/Sub Foreground |
Library>Material Filters>Bitmap to Materia Light -> | Filters Add/Sub Background | -> Diffuse Output
Library>Noises> Dirt Gradient —————————> | Filters Add/Sub Mask |

Make tileable

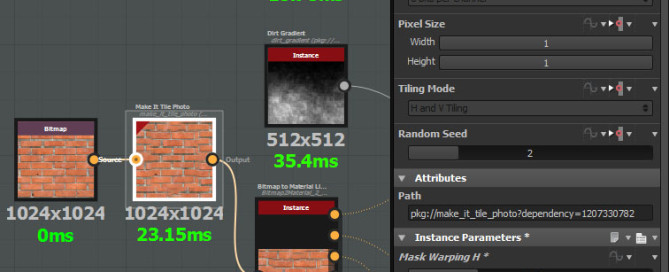
See the diagram below
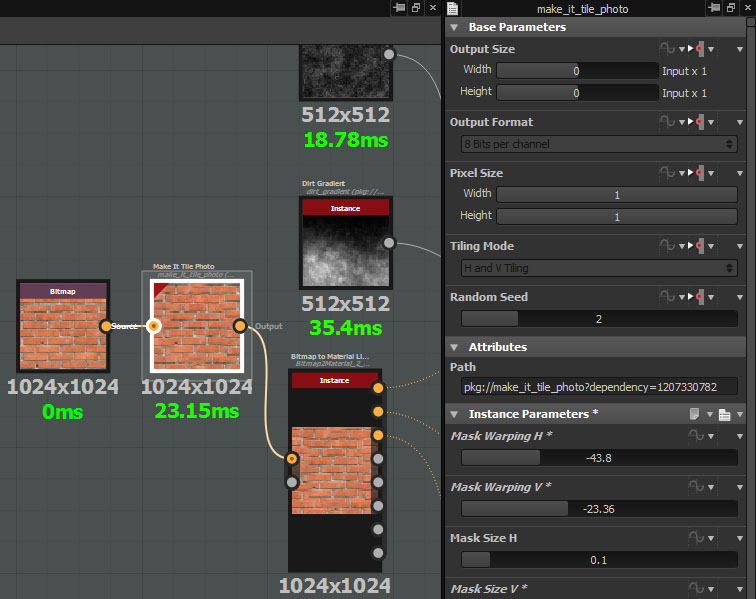
substance-designer-diagram-3

Notice the blocks:

Bitmap -> | Library> Filters> Tiling> Make It Tile Photo | -> etc…

Save the project

1. TOP LEFT> Explorer> RMB over ‘New_Graph’> Rename> Bricks

2. TOP LEFT> Explorer> RMB over ‘Unsaved Package’> Save As…> Bricks.sbs
This is our project file. In order to edit a substance, you must then have its .sbs file.
In your hard drive you will find Bricks.sbs + Bricks.resources Folder with bitmap files.

Export the substance

1. TOP LEFT> Explorer> RMB over Bricks.sbs> Publish…> Bricks.sbsar
SBSAR files are heavily optimized for performance and contain only the data required to render the Substances they contain, thus SBSAR nodes cannot be opened for editing. This file is created to be imported in your 3D Software (3DSMax, Unity3D etc…).
In your hard drive you will find ONLY Bricks.sbsar, all resouces and code are embedded in this file.

Import the substance in Unity3D

1. Open Unity3D> Project> RMB> Import New Asset> Bricks.sbsar Done!!!

2. Setup in Inspector if you want.

Import a mesh of 3DS MAX

1. Inside 3DS Max create:
– a mesh
– assign UV
– assign a material from using Material Editor

Export in fbx format.

1. Open Substance Designer> File> New Substance

2. DRAG AND DROP the .fbx file over Substance Designer> Unsaved Package
It will be created a Folder Resources> Your Mesh> RMB> Open

3. 3D View> Geometry> Display UVs in 2D View
3D View> Materials> Your Mesh Material

4. DRAG AND DROP the bitmap texture of the Mesh over New_Graph Window and create your substance

5. RMB over New_Graph> View outputs in 3D View

By |3D Graphic|Commenti disabilitati su Allegorithmic – Substance Designer – Basic Tutorial

Allegorithmic – Bitmap2Material – Basic Tutorial

Allegorithmic – Bitmap2Material – Basic Tutorial

With Bitmap2Material you can easily convert a simple bitmap texture as for example a .jpg image into a complex material with a lot of different channels as Base Color, Roughness, Metallic, Normal, Height, Ambient Occlusion. This is a must have tool for every 3D Graphic! It looks like great also in games development! Let’s go on!

Create a material

Start your standalone copy of Bitmap2Material

MAIN TOP MENU> Options> Switch engine…> choose between DirecX (Microsoft Engine) or SSE (PhysX Engine)

3D View>
> Geometry> Primitive List or Load a Mesh
> Materials> Default> Shader> physically_based

1. Bitmap2Material needs a power of 2 square image in order to work. Create it.

2. DRAG AND DROP the bitmap over the area that says: ‘Drop a bitmap here’> Load in ‘Main Input tweak’

3. Outputs roolout> activate Diffuse, Normal and all channels you need to show in 3D Preview Window

4. Bitmap2Material roolout> setup Output Size

Relief setup

1. 2D Window> Height label to focus about height map

2. Global roolout> Method> Slope Based> Light Angle> setup the light selector on the right to improve the height map. Tips: better results can be obtained if ‘Light Angle’ is the same of the image in the photography.

3. 2D Window> Normal label to focus about height map

4. Relief roolout>
a. setup Normal Intensity
b. setupRelief Balance
c. setup Relief Pinch and Relief Radius

IMPORTANT: sometimes the normal map will be inverted, if this happens use Global roolout> Invert Relief

Make it tileable

1. Global roolout> Make it Tile> Edges Quincunx, Linear (good for bricks), Linear X, Linear Y, Random (good for ground, rocks etc…)

Diffuse setup

1. Diffuse | Base Color roolout>
> Luminosity, Hue Shift, Contrast and so on…
> Light Cancellation, to remove darkest shadows

Roughness setup

1. 2D Window> Roughness label to focus about roughness map

2. Roughness | Glossiness roolout> setup Roughness Value and others

Tips: 3D Window> LMB+SHIFT to rotate light in the scene

3. Grunge roolout> Grunge On> Grunge Choice> select a grunge map to add dust, dirt and scratches

Metallic setup

1. 2D Window> Metallic label

2. Metallic | Specular roolout> Metallic Creation Method> From Metallic Input
3. Bitmap2Material roolout> Matallic (optional) slot> load your specular texture

OR

2. Metallic | Specular roolout> Metallic Creation Method> From Main Input
3. Metallic | Specular roolout
> Metal From Diffuse Keying Type> RGB
> Metal From Diffuse Keying Color> pick color box on the right> Pick> pick color, white color in the map will be a metallic material
> Metal Fron Diffuse Keying Settings> setup Range / Softness

Tips: 3D Window> LMB+SHIFT to rotate light in the scene

Export

Export> Export as Bitmap… Done!

Presets

TOP RIGHT CORNER> Presets> New File

Export to Unity3D

Bitmap2Material> MAIN TOP MENU> Export> Export as Bitmap…>
– Substance metadata: Enabled (embedded)
– Tweaks values: Embedded
– SBSAR file: Embedded (only once)
– Format: jpg

‘Export’ button

Unity3D> Project Window>
– create a folder and put inside all maps were generated
– RMB over Project Window> Create> Material> Inspector> Shader Type> example: Bumped Diffuse
– DRAG AND DROP Texture over empty slots
– select the Normal Map> Inspector> setup Bumpiness and click ‘Apply’ in the BOTTOM RIGHT of Inspector Window.

By |3D Graphic|Commenti disabilitati su Allegorithmic – Bitmap2Material – Basic Tutorial

Reciprocal Links

Why do we put links on our website?

Because all these collaborations allow our blog to be one step further beyond our competitors; we are morally obliged to pay them the credits they deserve.

Directory Lists & Search Engines

Daduru.com

LinkPedia Web Directory

1Abc Directory

Tsection Web Directory — Add your URL today!

Submit URL – Submit A Site

Free Web Directory – Deep Links OK!

BusinessSeek.biz Business Web Directory – International business directory offering express directory inclusion services, sponsored listings, article submission, and extensive business information on all entries.

The Web Directory

WWWi.co.uk

All Links Directory

Popular List

Firmpay Web Directory

By |Links|Commenti disabilitati su Reciprocal Links

3D Graphic into Photoshop

3D Graphic into Photoshop

0. Open Photoshop

Import a 3D Model

1. MAIN TOP MENU> New 3D Layer from File…
You can import:
– 3D Studio (.3DS)
– Collada (.DAE)
– Flash 3D (.FL3)
– Google Earth 4 (.KMZ)
– Universal 3D (.U3D)
– Wavefront (.OBJ)

2. Photoshop will switch to 3D mode (TOP RIGHT> rollout menu 3D/Photography and others work area type)

BOTTOM RIGHT you will find 3 label:

A- 3D: your 3D view, here there are:

— Lights
— Camera

— Mesh
— Mesh Material (expand Mesh row to see material)

B- Layers: 2D layers window
C- Canals: 2D RGB canals window

TOP BAR Mod. 3D, you will find:
– Rotate X/Y
– Rotate Z
– Move X/Y
– Move Z

TOP LEFT, the navigator
– BOTTOM RIGHT CORNER to resize the window
– LMB to pan
– LMB + ALT to dolly

Move, Rotate Scale 3D Objects

WARNING: per modificare un oggetto 3D bisogna avere lo ‘Strumento sposta(V)’ attivo, se ho ad esempio lo ‘Strumento selezione rettangolare (M)’ gli strumenti 3D NON APPARIRANNO NELL’INTERFACCIA DI PHOTOSHOP

1. BOTTOM RIGHT> 3D> select your 3D object
Notice: a 3D file can store multiple 3D objects

2. TOP BAR> select Rotate X/Y, in the viewport CLICK AND DRAG OUTSIDE the box area of your selected object or the command will switch automatically to Move Z

Manage the Camera

Notice: è importante sistemare il piano dell’orrizzonte (piano terreno) correttamente perchè sarà utilizzato per proiettare le ombre.

1. BOTTOM RIGHT> 3D> select ‘Current View’

2. Properties window setup the FOV, CV:49 mm

2. TOP BAR> select Rotate X/Y, in the viewport CLICK AND DRAG over an empty area to rotate the camera view where ever you want.

Lights

1. BOTTOM RIGHT> 3D> select:
– Ambient: ambient light, setup it in ‘Properties’ window
– Infinite Light1: it is similar to sunlight

2. ‘Properties’> setup type (Infinite, Spotlight, Poitlight), Color, Intensity, Shadows etc…

3. BOTTOM RIGHT> 3D> BOTTOM RIGHT> New> Infinite Light, ‘Properties’> 0.5 (we are creating a fill light)

Materials

1. BOTTOM RIGHT> 3D> expand Mesh to see Material, select material

2. ‘Properties’> Diffuse> texture icon> Replace Texture> select your bitmap texture
Here you can setup Opacity, Bump etc…

Switch from 3D to 2D Layers

1. BOTTOM RIGHT> Layers

NOTICE:
– if you click a 3D Layer the image area switch to 3D view
– if you click a 2D Layer the image area switch to 2D view

Rendering

0. MAIN TOP MENU> Modify> Preferences> 3D…

1. BOTTOM RIGHT> 3D> Scene, ‘Properties’

2. BOTTOM RIGHT> Layers> RMB over a 3D Layer> Rendering

OR

2. MAIN TOP MENU> 3D> Rendering

By |Photoshop|Commenti disabilitati su 3D Graphic into Photoshop

Unity3D – Access GameObjects and Components – CSharp

Unity3D – Access GameObjects and Components – CSharp

In Unity3D GameObjects are all entities in Unity scenes.

MAIN TOP MENU> GameObject>
– Particle System
– Camera
– GUI Text
– GUI Texture
– 3D Text
– Directional Light
– Point Light
– Spot Light
– Area Light
– Meshes
– etc…

To manage GameObjects in code you have to use the ‘gameObject’ base class.

In Unity3D Components are all ‘modifiers’ you can attach to a Gameobject.

MAIN TOP MENU> Components>
– Mesh
– Effects
– Physics
– Physics 2D
– Navigation
– etc…

Accessing this GameObject

1. Create a Cube, go to Inspector and add the script ‘DestroyBasic.cs’ as component.

DestroyBasic.cs:


using UnityEngine;
using System.Collections;

public class DestroyBasic : MonoBehaviour
{
    void Update ()
    {
        if(Input.GetKey(KeyCode.Space))
        {
            Destroy(gameObject); // notice the keyword gameObject
        }
    }
}

Play, press Space to destroy it.

Notice: ‘Destroy(gameObject)’, you can use simple the keyword ‘gameObject’ and Unity3D will destroy the game object attached to the script.

Accessing this Component

1. Create a Cube, go to Inspector and add the scripts:
– ‘OtherScript.cs’ as component
– ‘example.cs’ as component

example.cs:


using UnityEngine;
using System.Collections;

public class example : MonoBehaviour {
    void Update() {
        // first declare the variable otherScript of type OtherScrip and store the component 'GetComponent'
        // type variablename = get <scriptname>
        OtherScript otherScript = GetComponent<OtherScript>();
        otherScript.DoSomething(); // manipulate the component
    }
}

Accessing Other GameObjects – Inspector assignable references

If you set a varible as ‘public’ you can assign it in Inspector, even while you are playing!


using UnityEngine;
using System.Collections;

public class example : MonoBehaviour {
    // scope type variablename
    public Transform target; // Setup in Inspector
    void Update() {
        target.Translate(0, 1, 0);
    }
}

Below you can drag a Gameobject that contains the ‘OtherScript’ on the target slot in the inspector.


using UnityEngine;
using System.Collections;

public class example : MonoBehaviour {
    // scope type variablename
    public OtherScript target; // Drag and Drop in Inspector a Gameobject with the script 'OtherScript' 
    void Update() {
        target.foo = 2;              // using OtherScript variables
        target.DoSomething("Hello"); // usibg OtherScript functions
    }
}

Located through the object hierarchy

1. Create the hierarchy:

Forearm (parent)
– Hand (child)

Attach to Forearm example.cs:


using UnityEngine;
using System.Collections;

public class example : MonoBehaviour {
    void Example() {
        transform.Find("Hand").Translate(0, 1, 0); // find childs with name
    }
}

Once you have found the transform in the hierarchy, you can use GetComponent to get to other scripts.


using UnityEngine;
using System.Collections;

public class example : MonoBehaviour {
    void Example() {
        transform.Find("Hand").GetComponent<OtherScript>().foo = 2;
        transform.Find("Hand").GetComponent<OtherScript>().DoSomething("Hello");
        transform.Find("Hand").rigidbody.AddForce(0, 10, 0);
    }
}

You can loop over all children:


using UnityEngine;
using System.Collections;

public class example : MonoBehaviour {
    void Example() {
        foreach (Transform child in transform) {
            child.Translate(0, 10, 0);
        }
    }
}

Located by name


using UnityEngine;
using System.Collections;

public class example : MonoBehaviour {
    void Start() {
        // type varname = find the gameobject SomeGuy
        GameObject go = GameObject.Find("SomeGuy"); // find in Project window the object with name 'SomeGuy'
        // manipulate SomeGuy 
        go.transform.Translate(0, 1, 0);

        GameObject player = GameObject.FindWithTag("Player");
        player.transform.Translate(0, 1, 0);
    }
}

Located by tag

To assign a tag go to Inspector> Tag> Add Tag


using UnityEngine;
using System.Collections;

public class example : MonoBehaviour {
    void Start() {
        // type varname = find a gameobject with tag Player
        GameObject player = GameObject.FindWithTag("Player");
        // get from Player the component OtherScript
        player.GetComponent<OtherScript>().DoSomething();
    }
}

Passed as parameters


using UnityEngine;
using System.Collections;

public class example : MonoBehaviour {
    // se il trigger entra in contatto con altri oggetti
    void OnTriggerStay(Collider other) {
        // se gli altri oggetti hanno un rigidbody
        if (other.rigidbody)
            // aggiungi una forza
            other.rigidbody.AddForce(0, 2, 0);
        
    }
}


using UnityEngine;
using System.Collections;

public class example : MonoBehaviour {
    // se il trigger entra in contatto con altri oggetti
    void OnTriggerStay(Collider other) {
        // se gli altri componenti hanno lo script OtherScript
        if (other.GetComponent<OtherScript>())
            // ottieni OtherScript e fai qualcosa
            other.GetComponent<OtherScript>().DoSomething();
        
    }
}

All scripts of one Type

Find any object of one class or script name.

FindObjectOfType


// Search object of class GUITexture

using UnityEngine;
using System.Collections;

public class ExampleClass : MonoBehaviour {
    void Start() {
        GUITexture texture = FindObjectOfType(typeof(GUITexture));
        if (texture)
            Debug.Log("GUITexture object found: " + texture.name);
        else
            Debug.Log("No GUITexture object could be found");
    }
}  

FindObjectsOfType

Il precedente era singolare ‘FindObjectOfType’, questo è plurale ‘FindObjectsOfType’


// When clicking on the object, it will disable all springs on all 
// hinges in the scene

using UnityEngine;
using System.Collections;

public class ExampleClass : MonoBehaviour {
    void OnMouseDown() {
        HingeJoint[] hinges = FindObjectsOfType(typeof(HingeJoint)) as HingeJoint[];
        foreach (HingeJoint hinge in hinges) {
            hinge.useSpring = false;
        }
    }
}

My website: http://www.lucedigitale.com

Ref: http://docs.unity3d.com/412/Documentation/ScriptReference/index.Accessing_Other_Game_Objects.html

By |Unity3D, Video Games Development|Commenti disabilitati su Unity3D – Access GameObjects and Components – CSharp