Unreal Game Engine – Blueprints – Toggle Light – OnActorBeginOverlap

Unreal Game Engine – Blueprints – OnActorBeginOverlap – Toggle Light

1. LEFT COLUMN> Modes> Light DRAG AND DROP a Point Light in the scene

2. LEFT COLUMN> Modes> Basic> DRAG AND DROP a Box Trigger in the scene

3. RIGHT COLUMN> Actor: TriggerBox> Blueprint> Add Level Events for TriggerBox> Add OnActorBeginOverlap> Blueprint Window appears

4a. 3D Viewport> select the Point Light
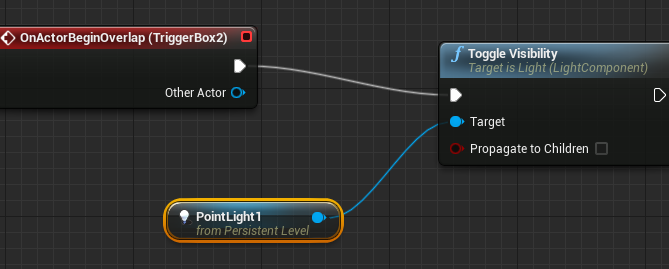
4b. Blueprint Window> RMB in a empty area> Call Function On Point light> Rendering> Toggle Visibility

5 Blueprint Window> connect OnActorBeginOverlap output—>input Toggle Visibility

6. MAIN TOP TOOLBAR> Play this level (the joypad icon), move the player over the Box Trigger to turn light on/off

unreal-blueprints-toggle light-OnActorBeginOverlap

By |Unreal Engine, Video Games Development|Commenti disabilitati su Unreal Game Engine – Blueprints – Toggle Light – OnActorBeginOverlap

Unreal Game Engine – Blueprints – Overview

Unreal Game Engine – Blueprints – Overview

Blueprints are the Visual Programming System of Unreal Game Engine.
They allow non-programmers to create features by themselves.
To create behaviours you will need only create relatioship between blocks of a flow chart!

How to create a simple Blueprint?
It is really easy and funny, in the next sample we toggle a light using Blueprints.

Object -> Create Blueprint

1. LEFT COLUMN> Modes> Light DRAG AND DROP a Point Light in the scene

2. LEFT COLUMN> Modes> Basic> DRAG AND DROP a Box Trigger in the scene

3. RIGHT COLUMN> Actor: TriggerBox> Blueprint> Add Level Events for TriggerBox> Add OnActorBeginOverlap> Blueprint Window appears

4a. 3D Viewport> select the Point Light
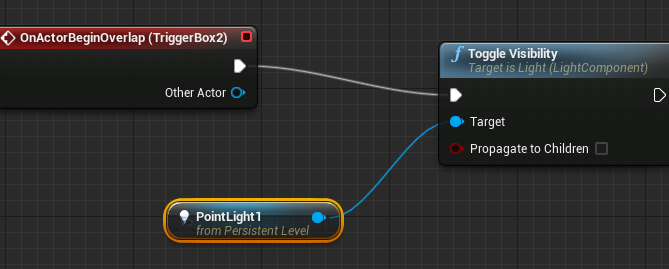
4b. Blueprint Window> RMB in a empty area> Call Function On Point light> Rendering> Toggle Visibility

5 Blueprint Window> connect OnActorBeginOverlap output—>input Toggle Visibility

6. MAIN TOP TOOLBAR> Play this level (the joypad icon), move the player over the Box Trigger to turn light on/off

unreal-blueprints-overview

Blueprint -> Attach Component

1. LEFT COLUMN> Content Browser> select Blueprints folder> New> ‘Actor’
2. name it MyBlueprint, DOUBLE click on it
3. Blueprint window> TOP RIGHT> Components
4. Blueprint window> LEFT COLUMN> Components> Add Component> Rendering> Billboard
5. Blueprint window> TOP RIGHT> Graph
6. LEFT COLUMN> MyBlueprint> +variable> name it MyVar
7. LEFT COLUMN> Details> Variable Name ‘MyVar’, Variable Type> bool
8. LEFT COLUMN> MyBlueprint> DRAG AND DROP MyVar into Event Graph> Get -> after that you can’t change the Variable Type

… and so on to create your Blueprint …

By |Unreal Engine, Video Games Development|Commenti disabilitati su Unreal Game Engine – Blueprints – Overview

Unreal Game Engine – Create New Project an New Levels

Unreal Game Engine – Create New Project an New Levels

Create

1. File> New Project
2. New Project Window> Blank
3. Check ‘Include starter content’
4. Name: yournameProject
5. on the right click over the button to expand window and choose a Folder
6. click ‘Create Project’ button

Setup

The project will be opened, after that:

1. MAIN TOP MENU> Edit> Editor Preferences>
– General Appearance> User Interface> check ‘Use Small Tool Bar Icons’
– Loading & Saving > uncheck Autosave

2. MAIN TOP MENU> Edit> Project Settings>
– Game> Supported Platforms
– Engine> Input
– Platforms> iOS / Windows

Viewports

Setup Viewport

1. Window> Viewports> Viewport2
2. DRAG AND DROP the viewport label under TOP Toolbar to create a new stable window in the workarea

Levels

A videogame project can be divided in different levels: Level1, Level2, Level3 etc…

To create new levels: MAIN TOP MENU> File> New Level
To save levels: MAIN TOP MENU> File> Save or Save As… -> Unreal will create the file ‘Level1.umap’ (Unreal Map)

By |Unreal Engine, Video Games Development|Commenti disabilitati su Unreal Game Engine – Create New Project an New Levels

Unreal Engine – Editor Overview

Unreal Engine – Editor Overview

Place New Objects

Window> Modes> Place> Geometry> DRAG AND DROP the game object thumb over the 3D Viewport

OR

Window> Content Browser> DRAG AND DROP the game object thumb over the 3D Viewport

Move/Scale/Rotate/Setup Objects

LMB select the object and use the top right small icons to select transformations tools, after that use the handles on screen

OR

1. Window> Scene Outliner> click over the object list to select
2. Window> Details> setup

Static Mesh Editor

RMB over a mesh> (home icon)Edityourmesh

Parenting objects

RIGHT COLUMN> Scene Outliner> DRAG AND DROP an object over another object, the dragged object will be the child of the second one.

Material Editor

RIGHT COLUMN> Details> Materials> DOUBLE CLICK over material preview

Move Camera View

LMB: rotate camera right left and move forward / backward

MMB: move left / right / up / down

Mouse Whell: zoom in / out

RMB: look at right / left / up / down

RMB + WASD: look and move like a FPS

ALT + LMB: orbit around the selected object

By |Unreal Engine, Video Games Development|Commenti disabilitati su Unreal Engine – Editor Overview

Unreal Engine – Installation and folder structure

Unreal Engine – Installation and folder structure

Installation

1. Install Visual C++ Redistributable Packages for Visual Studio 2013, you can find it at: http://www.microsoft.com/en-us/download/details.aspx?id=40784

Download and install vcredist_x64.exe for 64 bit OS

The Visual C++ Redistributable Packages install run-time components that are required to run C++ applications that are built by using Visual Studio 2013.

If you do not install the package you will have the message ‘MSVCP120.dll is missing from your computer’.

2. Install Unreal Engine

Installation Folder Structure

If you use the installation folder C:/UnrealEngine, you will find some important folders inside:

/Engine/Binaries/Win64/UE4Editor.exe -> execute this to start the editor

/Samples/StarterContent
/Architecture -> *.uasset (unreal assets) – risorse
/Audio
/Blueprints
/Maps
/Materials
/Particles
/Props
/Shapes
/Textures

/Templates
/TP_2DSideScroller -> based on C++ -> you need Visual Studio 2013 installed to compile
/TP_2DSideScrollerBP -> based on Blue Print -> visual scripting, do not require additional software
/TP_FirstPerson
/TP_FirstPersonBP

Project Folder Structure

If you store your project on D:/Unreal you will find

/Yourproject
/YourProject.uproject (unreal project)
/Config -> configuration files for Editor, Engine, Game, Input
/Content -> your *.uasset, Animations, Architecture, Audio etc…
/DerivatedDataCache
/Intermediate
/Saved

By |Unreal Engine, Video Games Development|Commenti disabilitati su Unreal Engine – Installation and folder structure