3DS Max

3DS Max – Unwrap UVW – Basic Tutorial

Use Simple Projections

How to unwrap a texture for games using 3DSMax.

1. Select an Editable Poly

2. RIGHT COLUMN> Modifier List> UVW Mapping Clear

3. RIGHT COLUMN> Modifier List> Unwrap UVW

a. Mapping the first group of polys

Unwrap UVW Modifiers> Selection> Polygon> select in the 3D viewport the polys

Unwrap UVW Modifiers> Projection> Planar, Align Options, try ‘Best Align’ or use XYZ buttons

Unwrap UVW Modifiers> Configure> uncheck ‘Normalize Map’

Notice: “Normalize Map” of 3DS Max will maintain the correct proportions for the various polygons.
Removing this means that in the “Edit UVWs” window polygons will be bigger and you will need to zoom out with the mouse wheel.

>Edit UVWs window> mouse whell to zoom out, the polys are red (selected)

>Edit UVWs window> in the bottom deselect ‘Polygon’ after that riselect ‘Polygon’, click in an empty area to unselect polys, after that select the polys

>Edit UVWs window> in the top select ‘Scale Selected Subobjects’, scale the polys to fit them inside the UV CheckerPattern (rotate Mouse Wheel to zoom out-in)

>Edit UVWs window> in the top select ‘Move Selected Subobjects’, move the polys over the UV CheckerPattern (press Mouse Wheel to pan)

b. Mapping the second group of polys

Unwrap UVW Modifiers> Selection> Polygon> select in the viewport others polys

> … return to point a. …

Welding UVWs points

Put the UVWs pieces in the right size and order, use the commands:

Edit UVWs window>

– To navigate in the window rotate Mouse Wheel to zoom out-in, press Mouse Wheel to pan

– To move UVWs pieces in the bottom select ‘Vertex, Edge, Polygon’, check/uncheck ‘select by Element’

Weld the Points:

Edit UVWs window>

– in the bottom select ‘Vertex’, select the vertex, you can see the vertex in the 3D viewport also.

– Main Top Menu> Tools> Target Weld, DRAG AND DROP a vertex over another one

Repack

>Edit UVWs window> Tools> Pack UVs

Create the Template

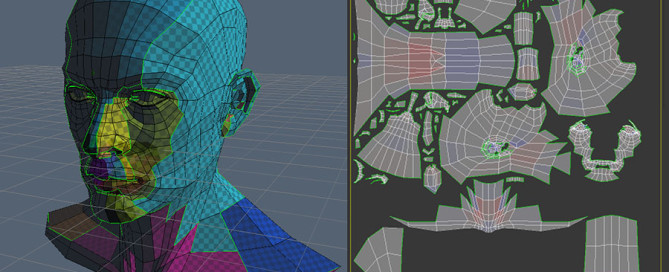
>Edit UVWs window> Tools> Render UVW Template, save the bitmap texture.

Seams

1. Create Seams

Loop Seams

Unwrap UVW Modifiers> Selection> Edge> select in the 3D viewport an edge

Unwrap UVW Modifiers> Selection> Modify Selection> Loop: XY Edges

Unwrap UVW Modifiers> Peel> Seams> Convert Edge Selection To Seams

Manual Seam Selection

Unwrap UVW Modifiers> Peel> Seams> Edit Seams, click in the 3D Viewport edges, LMB to add / LMB+Alt to remove seams

OR

Unwrap UVW Modifiers> Peel> Seams> Point-to-Point Seams, click in the 3D Viewport vertex

2. Expand Polygon Selection to Seams

Unwrap UVW Modifiers> Selection> Polygon> inside 3D Viewport select a poly

Unwrap UVW Modifiers> Peel> Seams> ‘Expand Polygon Selection to Seams’ button

Unwrap UVW Modifiers> Peel> Quick Peel

> … return to point a. …

By |3D Graphic, 3DS Max|Commenti disabilitati su 3DS Max – Unwrap UVW – Basic Tutorial

Game Dev – Normal Map – from Photoshop to Game Engine

Modeling real 3D Geometry can be a tedious task, sometimes it is more confortable paint secondary geometry using a 2D Software as Photoshop.

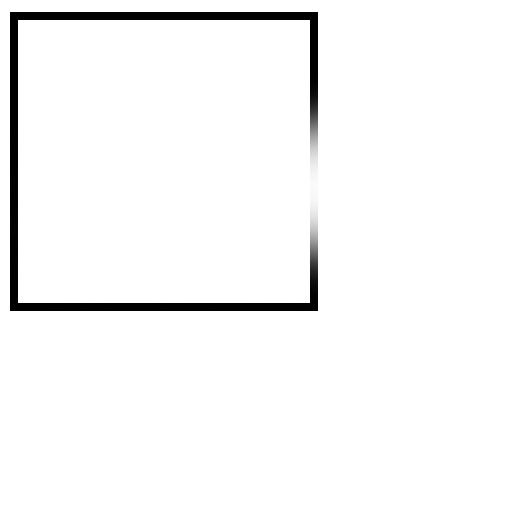
1. Open Photoshop, paint a picture like this:

001

NOTICE: white is the highest, black the lowest

Save in .PNG format to avoid compression artifacts

2. Open BitmapToMaterial> from Windows DRAG AND DROP the bitmap over BitmapToMaterial slot> ‘Load in the Main Input Tweak’

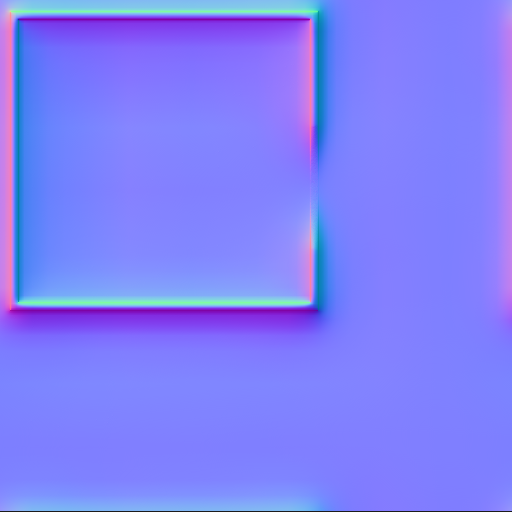
3. BitmapToMaterial select the label on top ‘Normal’ you will see the image below:

002

NOTICE: compare first and second image

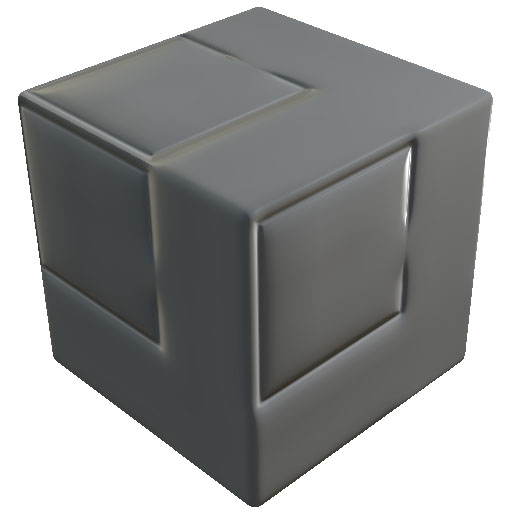
4. BitmapToMaterial> Right Column> Outputs> turn ‘Normal’ ON, disable the others, the result is:

003

5. BitmapToMaterial> Export> Export as a Bitmap> select .PNG format, Select Output(s) to export: check’Normal’, uncheck others

6. Load the nomal map inside the Game Engine, Unity, Unreal or others…

7. Done!

By |3D Graphic, 3DS Max, Video Games Development|Commenti disabilitati su Game Dev – Normal Map – from Photoshop to Game Engine

3D Low Poly Characters for Games – Basic Workflow

Hi all,
today I will write about my favourite workflow to create low poly characters for games.
I will use 3DS Max + 3D Coat + Substance Painter + Photoshop.
You can do the same with other softwares, for example using 3DS Max + MudBox or Maya + ZBrush and so on…
The important is the file format you choose to exchange data.
To avoid plugins with fragile bridges I export using .fbx format + bitmap textures, after that I reconstruct by hand shaders inside Unity or Unreal.
With this workflow every software are independent and I can change tools whenever.

3DS Max – Scene Setup

1. Setup the scene with the System Unit Scale>1 Unit=1,0 Centimeters;
as described here:
http://www.lucedigitale.com/blog/3ds-max-micro-reference-manual-unit-setup-interiors/

2. Create a Box of 1x1x1m as reference

3. Create one or more Planes of 1x1m to map the image reference of your character, you will resize it to 1,80m if your character is 1,80m height

4. Setup the Viewport: Shaded + Edged Faces

5. RIGHT COLUMN> Utilities> Polygon Count

3DS Max – Modeling one side

CASE 1a.
I have a small collection of 1.000 poly people, male, female, fat, old, cartoon etc… with a very basic poly structure, starting from here I save a lot of time.
The low res character have a basic T pose and a structure suitable for animations.
Go to point 2

CASE 1b.
If you start from a hires model you will need first retopo it using 3D Coat.
Follow the lesson here:
http://www.lucedigitale.com/blog/3d-coat-retopo/
Consider to generate normal + occlusion map here to use the detail of hi res mesh.
Export to 3DS Max.
Go to point 2

2. RIGHT COLUMN> RMB over the Mesh name> Convert To: Editable Poly

4. The most used tools of ‘Editable Poly’ are:

Element

– Attach
– Detach

Polygon

– Create
– Slice Plane
– Quick Slice
– Cut (IT WORKS GREAT!)
– Make Planar
– View Align
– Relax
– Auto Smooth
– Use NURMS Subdivision (RMB over the Mesh name> Convert To: Editable Poly to collapse)

Border

– Double Click to select the entire loop
– CTRL + Click to use Additive Selection
– Split

Vertex

– Remove (remove the vertex without erase poly structure)
– Weld
– Target Weld
– Remove Isolated Vertices (to clear the mesh)

3DS Max – Mirror the other side

1. ‘Editable Poly’> select the middle vertices> Make Planar X> Move command to X=0

2. ‘Editable Poly’> modifers ‘Mirror’> Mirror AxisX, check ‘Copy’

3. ‘Editable Poly’> ‘Show end result on’

4. In the end ‘Editable Poly’> Vertex> Weld

5. RMB over the Mesh name> Collapse All

3DS Max – Export

1. RIGHT COLUMN> Hierarchy> Affect Pivot Only> move to 0,0,0

2. RIGHT COLUMN> Utilities> Reset XForm

3. Select the Mesh> RIGHT COLUMN> Modify> Modifier List> UVW Mapping Clear> RMB> Collapse All (remove old UVW)

4. Select the mesh> Export> Export Selected> name.fbx

3D-Coat – UV Mapping – Paint Texture

Remember that for games you have only one texture, usually 1024x1024px with all body UVW.
Leave more space for head and hands.

1. Run 3D Coat, into Wizard window select ‘UV Map Mesh’ etc…
Follow my tutorial here:
http://www.lucedigitale.com/blog/3d-coat-uv-mapping/

2. Switch 3D Coat to Paint.
Follow my tutorial here:
http://www.lucedigitale.com/blog/3d-coat-paint-texture/

You can paint here only diffuse channel, or diffuse + normal + specular.

3D Coat – Export

1. LEFT COLUMN> Commands> Apply UV-set
2. File> Export Model> .fbx and texture will be exported in the same folder
3. ‘OK’

Allegorithmic – Bitmap2Material

If you paint only diffuse color you can generate normal and specular with just one click using ‘Bitmap2Material’ software.
Follow the lesson here:
http://www.lucedigitale.com/blog/allegorithmic-bitmap2material-basic-tutorial/

Allegorithmic – Substance Painter – Paint Texture

To add more detail to your texture you can you Substance Painter, there are unbelivable tools here as ‘Paint with particles’

Follow the lesson here:
http://www.lucedigitale.com/blog/allegorithmic-substance-painter-basic-tutorial/

Photoshop

Use Photoshop for textures color correction.

3DS Max – Importing – Material

1. 3DS Max> Import> .fbx
2. Select the object> RIGHT COLUMN> Modify> Modifier List> Unwrap UVW
3. Select Unwrap UVW modifier> Edit UVs> Open UV Editor…, then you will see the work you have done using 3D Coat
4. Create a Material> Diffuse > Bitmap> assign the color texture created by 3D Coat, activate ‘Show Shaded Material’
5. DRAG and DROP the Material over the Mesh in the viewport

3DS Max – Face Expression

There are many ways to do that, the classic is:

1. Edit> Cloce> Copy and duplicate the Mesh, and move away from the original one, name it ‘Open Mouth’

2. Modify the face to create a new expression, not add or remove vertex o poly, only move it.

3. Select the original Mesh> RIGHT COLUMN> Modify> Modifier List> Morpher> Pick Object from Scene

4. Create others face expressions, try google-images ‘face expression’ to find useful photos

Follow the tutorial here:
http://www.lucedigitale.com/blog/3ds-max-micro-reference-manual-modifiers-animation-morpher/

3DS Max – Skeletal Animation

CASE 1. Humans
Use’Biped’ + Skin modifier
Follow the lesson here:
http://www.lucedigitale.com/blog/3ds-max-rigging-biped-skin/

CASE 2. Animals
Use ‘CAT’ rig + Skin modifier
Follow the lesson here:
http://www.lucedigitale.com/blog/3ds-max-rigging-cat-skin/

ADDITIONAL BONES
Follow the lesson here:
http://www.lucedigitale.com/blog/3ds-max-micro-reference-manual-animation-bones/

INVERSE KINEMATICS
Follow the lesson here:
http://www.lucedigitale.com/blog/3ds-max-micro-reference-manual-animation-inverse-kinematics/

3DS Max – Open Subdivision Surfaces

In this step you will convert the low poly model in a hi res model for a cinematic intro.

1. ‘Editable Poly’> modifers ‘OpenSubdiv’

3DS Max – Export for Games

The important is the file format you choose to exchange data.
To avoid plugins with fragile bridges I export using .fbx format + bitmap textures (diffuse + specular + normal + occlusion), after that I reconstruct by hand shaders inside Unity or Unreal Engine.
With this workflow every software are independent and I can change tools whenever.

By |3D Graphic, 3DS Max, Video Games Development|Commenti disabilitati su 3D Low Poly Characters for Games – Basic Workflow

3D-Coat – Paint Texture

3D-Coat – Paint Texture

3D-Coat is a standalone software, easy to use and great to improve your 3D workflow!
Let’s take a look how to paint textures.

Why have you to consider painting texture inside 3D-Coat?
Because it has easy to use painting tools near great UV Mapping tools; in matter of fact this speed up your workflow, especially when you create characters for videogames and PTex UV Map is useless.

Follow me!

3DS Max – Exporting

1. Create a 3D model – Editable Poly inside 3DS Max
2. Select the model> RIGHT COLUMN> Modify> Modifier List> UVW Mapping Clear> RMB> Collapse All
3. Select the model> RIGHT COLUMN> Utilities> Reset XForm> Reset Selected
In this way we will clear all old UV Maps and transformations
4. MAX> Export> Export Selected> .fbx

3D Coat – Importing

Import a model without UV map

1. Run 3D Coat, into Wizard window select ‘UV Map Mesh’ and map the object
2. LEFT COLUMN> Commands> Apply UV-set
3. File> Export> .fbx

Import a model with UV map

4. Run 3D Coat, into Wizard window select ‘Paint Directly Over UV Mapped Mesh’, import your mesh

Setup Light

MAIN TOP MENU> setup lights

Paint flat colors

— brush type —

1. LEFT COLUMN> Brushes> select the color and the brush/pencil/airbrush

— brush setup —

2. MAIN TOP MENU> setup brush
– Radius
– Falloff
– Smooting
3. MAIN TOP MENU> setup
– Depth=0
– Color Opacity>=0
– Spec. Intensity=0

— layer setup —

4. RIGHT COLUMN> Layers> remove all layers
5. RIGHT COLUMN> Layers> create a new layer> double click over the name of the layer to change it to ‘Color’
– Color Opacity 100% Standard Blend
– Depth% 0%
– Specular 0%

— painting —

6.
-LMB and paint over the mesh
– rotate the MMB over the mesh to resize the brush

Paint color-depth-specular

— brush type —

1. LEFT COLUMN> Brushes> select the color and the brush/pencil/airbrush

— brush setup —

2. MAIN TOP MENU> setup brush
– Radius
– Falloff
– Smooting
3. MAIN TOP MENU> setup
– Depth>=0
– Color Opacity>=0
– Spec. Intensity>=0

— layer setup —

4. RIGHT COLUMN> Layers> remove all layers
5. RIGHT COLUMN> Layers> create a new layer> double click over the name of the layer to change it to ‘Color’
– Color Opacity 100% Standard Blend
– Depth% 100% Add deph
– Specular 100% Add

— painting —

6.
– LMB and paint over the mesh
– rotate the MMB over the mesh to resize the brush

Paint with Symmetry

1. MAIN TOP MENU> Symmetry> Symmetry
2. Symmetry window>
– on Enable Symmetry
– on Show Symmetry Plane
– Symmetry Type> X-Axis
3. select a brush and paint over the 3D mesh
4. MAIN TOP MENU> Symmetry> No Symmetry to remove this tool

Spline Paint Tool

1. LEFT COLUMN> Spline Paint Tool
2. LMB to paint over the 3D mesh
3. push on the keyboard ENTER ti apply

NOTICE: Spline is a procedural layer and you can

Spline Text Tool

1. LEFT COLUMN> Spline Text Tool
2. LMB to put the text over the 3D mesh
3. push on the keyboard ENTER ti apply

NOTICE: Spline is a procedural layer and you can

Color Operations Tool

1. LEFT COLUMN> Color Operations Tool
2. select Desaturate/Saturate/Darken/Lighten/Sharpen/Smoothing/Increase Hue/ Decrease Hue/ Subst. Hue/Hue & Saturation
3. LMB to paint over the 3D mesh

Paint over the 2D Texture

1. RIGHT COLUMN> Texture Editor> paint over the texture

Hide / Freeze Poly

1. LEFT COLUMN> Hide
2. Paint over the 3D mesh
3. MAIN TOP MENU> Hide> Unhide All

1. LEFT COLUMN> Freeze
2. Paint over the 3D mesh
3. MAIN TOP MENU> Freeze> Unfreeze All

Export Texture

MAIN TOP MENU> File> Export Model> .fbx and texture will be exported in the same folder

By |3D Graphic, 3DS Max|Commenti disabilitati su 3D-Coat – Paint Texture

3D-Coat – UV Mapping

3D-Coat – UV Mapping

3D Coat is an interesting 3D software, easy to use and very good to improve our productivity.
It can be used near 3DSMax, Maya or others big brands to speed up the workflow.
In this article I will explain how use 3D Coat to UV Unwrapping operations.

UV Map Unwrapping cause me a lot of pain because the classic UVWUnwrap modifier of 3DSMax is very boring and not so easy to use.
Even if you are a UVWUnwrap modifier-genie you will spend a lot of time to create a good work. If you work in the game industry, the pain will be increased by texture optimization needed, them… let’s go on to discover 3D Coat UV Tools :)

3DS Max – Exporting

1. Create a 3D model – Editable Poly inside 3DS Max
2. Select the model> RIGHT COLUMN> Modify> Modifier List> UVW Mapping Clear> RMB> Collapse All
3. Select the model> RIGHT COLUMN> Utilities> Reset XForm> Reset Selected
In this way we will clear all old UV Maps and transformations
4. MAX> Export> Export Selected> .fbx

3D Coat – Importing

1. Run 3D Coat, into Wizard window select ‘UV Map Mesh’
2. In the Import Object window select:

– Normal Map Software Preset: Unknown
– Initial Subdivision: No Subdivision
– UV Map Typing: Keep UV
– UV Sey Smooting: No Smoothing

Texture Width: 1024
Texture Height: 1024

press ‘OK’ button.

3. File> Save As, then save your project

3D Coat – Auto Seams

1. LEFT COLUMN> Commands> Auto Seams
3D Coat will create all required seams automatically, calculating distortion, shape etc…
2. LEFT COLUMN> Commands> Unwrap
Fit all clusters onto the texture
3. LEFT COLUMN> Commands> Auto Scale
Auto scale all island to have equal propotions between square in space and square in UV set

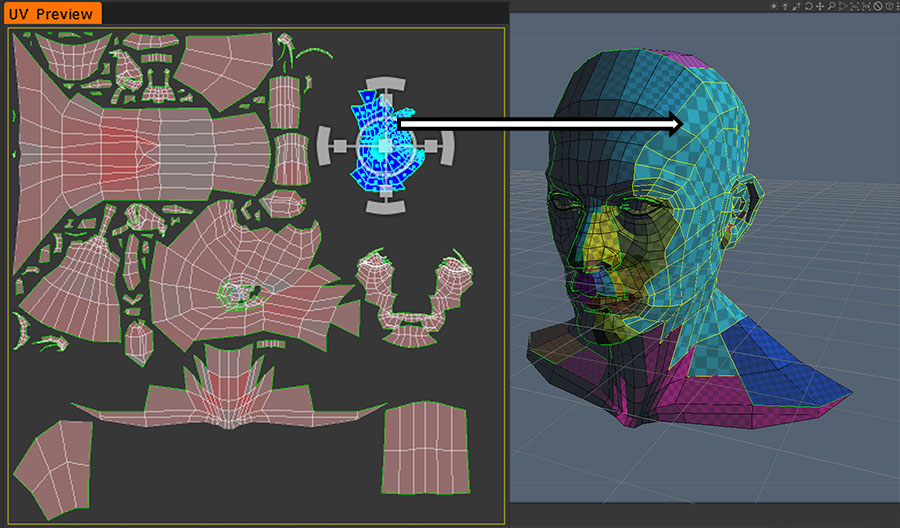
The final result here:

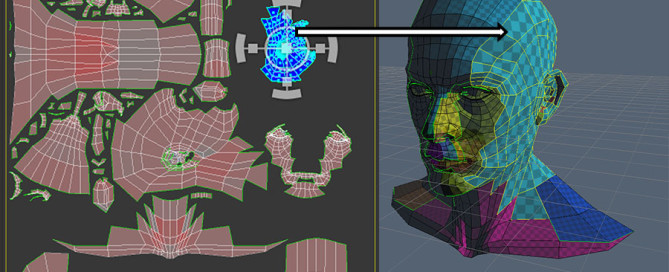
3dcoat-001

Notice that in the 3d mesh the size of the squares are the same for all islands.

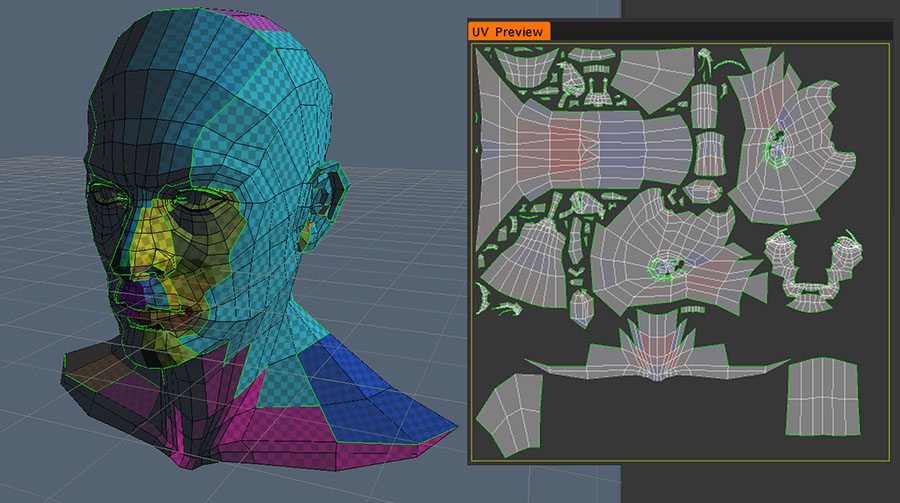
4. In the ‘UV Preview’ click over an island and resize it down, see the result below, the squares of this island will be bigger.

3dcoat-002

3D Coat – Export

1. LEFT COLUMN> Commands> Apply UV-set
2. File> Export Model> .fbx
3. ‘OK’

3DS Max – Importing

1. MAx> Import> .fb
2. Select the object> RIGHT COLUMN> Modify> Modifier List> Unwrap UVW
3. Select Unwrap UVW modifier> Edit UVs> Open UV Editor…, then you will see the work you have done using 3D Coat

3D Coat – Mark Seams Manually

To create a good texture map for a game character you need an island for the head and separated islands for the rest of the body.
‘Auto Seam’ command is good, but if you have an organic model, 3D Coat can’t understand where is the head, the hands, the torso etc… without your help! Let’s try to help it!

1. Import your 3D Mesh

2. LEFT COLUMN> Modes> Edge Loops
3. Over the 3D Mesh> LMB and select edges OR CTRL+LMB to deselect

AND/OR

2. LEFT COLUMN> Modes> Mark Seams
3. Over the 3D Mesh>LMB select edges OR CTRL+LMB to deselect

4. LEFT COLUMN> Commands> Unwrap
5. LEFT COLUMN> Commands> Auto Scale

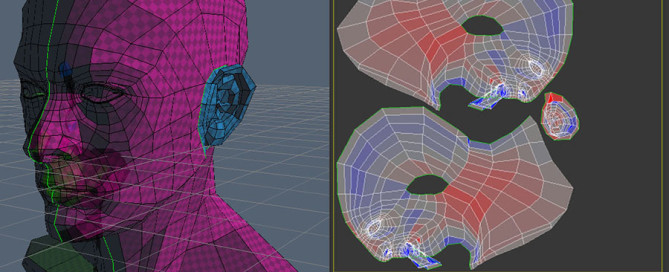
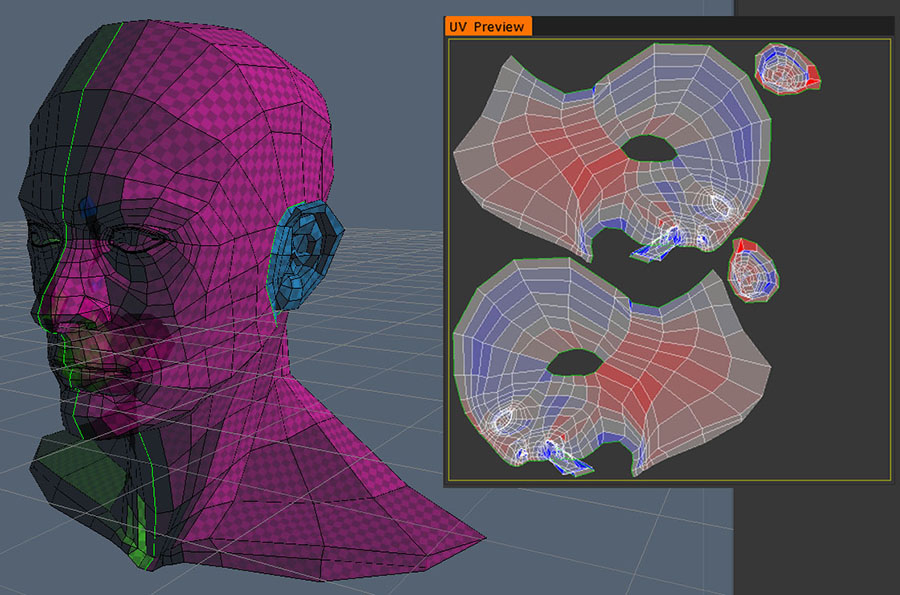
An example of marking manual seams, it is not a good work, it is only an example.

3dcoat-003

Compare colors of 3d mesh in ‘3D View’ and islands in ‘UV Preview’ to better understand.

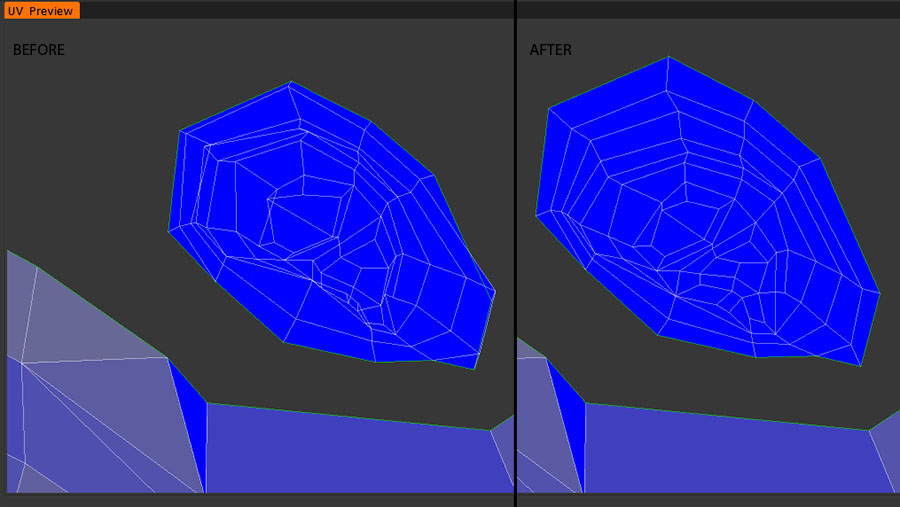
Relax

You will relax UV if you need to redure square trash. Relax UV introduces additional stretching.
You should choose what is better for you: square trash or strech.

1. MAIN TOP MENU> ‘Islands’ to enable the islands selection
2. UV Preview> MMB to move the view AND RMB to scale the view
3. UV Preview> select an island and scale if you need
4. RIGHT COLUMN> Selected> Relax

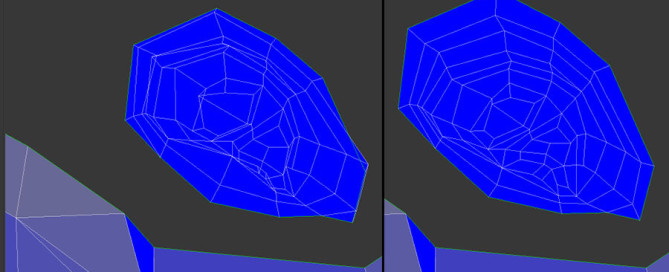
See the image below: before and after ‘Relax’ command

3dcoat-004

Manipulate UV Vertices

1. MAIN TOP MENU> Vertices
2. UV Preview> MMB to move the view AND RMB to scale the view
3. UV Preview> select an island scale if you need
4. UV Preview> LMB+single click select one vertice OR LMB+maintain pressure+slide over vertices for multiple selection
5. Manipulate using the handles
6. LEFT COLUMN> Selected> Clear to end the selection

Planar Mapping

1. MAIN TOP MENU> Island
2. UV Preview> MMB to move the view AND RMB to scale the view
3. UV Preview> select an island and scale if you need
4. RIGHT COLUMN> Selected> To Planar

Other Algorithms for Mapping

1. MAIN TOP MENU> Island
2. UV Preview> MMB to move the view AND RMB to scale the view
3. UV Preview> select an island and scale if you need
4. RIGHT COLUMN> Selected>

> To GU: 3D-Coat’s proprietary unwrapping algorithm, Globally Uniform. Great for all types of meshes, be they organic or hard surface. Try it Love it!

> To LSCM: LSMC algorithm

> To ABF: ABF++ algorithm

Hide Islands

1. MAIN TOP MENU> Island
2. UV Preview> select an island
3. RIGHT COLUMN> Selected> Hide / Unhide

Clear All

1. LEFT COLUMN> Commands> Clear Seams, clear all seams
2. LEFT COLUMN> Commands> Upd. Islands, to refresh the UV Preview
3. LEFT COLUMN> Commands> Restore UV, restore original UV

By |3D Graphic, 3DS Max|Commenti disabilitati su 3D-Coat – UV Mapping