3D Graphic

Allegorithmic Substance Painter – Basic Tutorial

Allegorithmic Substance Painter – Basic Tutorial

Substance Painter is a mesh painter software, with this you can paint your substances over a 3D Mesh.
Let’s take it from the top!

Paint a flat color

1. Start Substance Painter

2. MAIN TOP MENU> File> New> Mesh ‘Select…’, load your .fbx file

3. LEFT COLUMN> Document Settings> setup Size, click the minus ‘-‘ on the right of the channels slots to remove unwanted channels. For now with need only ‘Base Color’.

4. LEFT COLUMN> BOTTOM LABELS ‘Viewer Settings’ and ‘Post Effects’, to setup the 3D View.

5. MAIN TOP TOOLBAR> activate ‘Symmetry’ if you need.

6. BOTTOM> Material label> select ‘plastic matte’.

7. BOTTOM> Brush label> select ‘default brush’

8. RIGHT COLUMN> Tool-Paint, as you can see we will use the brush on the left thumbnail to paint the material on the right
UNDER click on the base color slot to change color. Click over the green box under the brush thumbnail to setup the brush size, flow and spacing.

9. Go to in 3D View, paint over the mesh and remember my friend:
– LMB paint
– ALT + LMB camera rotate
– ALT + MMB camera translate
– ALT + RMB or Mouse Wheel camera zoom
– MAIUSC + LMB rotate panorama
– CTRL + RMB changes brush flow
– CTRL + LMB canges brush size

10. RIGHT COLUMN> Layers> click plus ‘+’ to add a new layer, this window works like Photoshop.
We will create Layer 1 and Layer 2 for ALL CHANNELS, if you want paint only one channel you have to disable the unwanted layers inside the channel, for example select Layers> Specular> LMB over Layer 1 – Ldge (ON THE RIGHT)> Disable

11. LEFT COLUMN> BOTTOM LABELS ‘Viewer Settings’> Mode> Solo view to see only the strokes in current layer.

Paint height

1. LEFT COLUMN> Channels + Height

2. LEFT COLUMN> Viewer Settings> Height force = 1

3. RIGHT COLUMN> Layers> Height> All Layer> rename it Height> Disable all aother layers

4. RIGHT COLUMN> Tool – Paint> Material – advanced> enable only ‘height’ button> Height roolout> slide to 0.6

5. Paint

use the same way to paint only specular, metallic, reflection etc…

Fill Layer

You you use a procedural substance as bricks or other seamless materials you need a fill layer

1. RIGHT COLUMN> Layers> Add a Fill Layer

2. BOTTOM> Material> selec ‘bricks 001’

Mask – paint

1. RMB over the layer> Add WHITE mask (in Photoshop sarebbe aggiungi maschera> mostra tutto) and paint the mask.

Mask – decal using geometry

1. RIGHT COLUMN> Layers> Select a BLACK mask layer (it turn to red)

2. MAIN TOP TOOLBAR> Geometry Decal

3. LEFT COLUMN> Viewer Settings> Wireframe opacity

4. RIGHT COLUMN> Tool – Geometry Decal> Color to white, select faces mode then select into 3D View faces

Mask – add effect (id_selector)

Apply the mask using material id

1. RIGHT COLUMN> Layers> Select a BLACK mask layer (it turn to red)

2. RIGHT COLUMN> Layers> TOOLBAR> Add effect> Substance effect

3. BOTTOM> LEFT> Shelf> Effects> DRAN ANG DROP ‘id_selector’ over RIGHT COLUMN> Layers> Filters parameters> ‘Effect No effect selected’ slot

You can use id material from 3DS Max of using a ID map.

Mask – add effect (MG Edge Dirt)

1. RIGHT COLUMN> Layers> Select a BLACK mask layer (it turn to red)

2. RIGHT COLUMN> Layers> TOOLBAR> Add effect> Substance effect

3. BOTTOM> LEFT> Shelf> Effects> DRAN ANG DROP ‘MG Edge Dirt’ over RIGHT COLUMN> Layers>

– Filters parameters> ‘Effect No effect selected’ slot

– Filters parameters> Image inputs> apply a ‘curvature map’

NOTE:
With curvature maps you can easily create masks or textures to work on chipped or worn edges.
Substance Designer creates ‘curvature maps’, based on the normal map.

Mask – Stencils

1. RIGHT COLUMN> Layers> create a layer

2. BOTTOM> Shelf> Stencils> DRAG AND DROP a stencil over RIGHT COLUMN> Tool – Paint> Stencil – basic

3. BOTTOM> Shelf> Material> select a material and paint your mesh

NOTE: LEFT COLUMN> Viewer Settings> check ‘Hide stencil when painting’

Paint Stencils

1. RIGHT COLUMN> Layers> select a layer

2. BOTTOM> Shelf> Stencils> DRAG AND DROP a stencil over RIGHT COLUMN> Tool – Paint> ‘Base color’ slot

3. Use a big brush to paint your stencil!

Paint with particles

1. BOTTOM> Particles label> liquid stream

Save and Export

MAIN TOP MENU> File> Save As…, select a folder and ‘Save’
It will create a complex folder structure with all the project files.

MAIN TOP MENU> File> Export all channels> select a folder and ‘Export’
It will create a bitmap texture for every channel.

Increase Texture resolution on the fly

Substance Painter is resolution indipendent!

RIGHT COLUMN> Document Settings> Size> Change the size, Substance Painter will use the stack informations to recompute the new texture!

By |3D Graphic|Commenti disabilitati su Allegorithmic Substance Painter – Basic Tutorial

Allegorithmic – Substance Designer – Basic Tutorial

Allegorithmic – Substance Designer – Basic Tutorial

With Substance Designer you can create great materials for your favourite 3D application.
A ‘Substance’ is a file with the .SBSAR extension that can be used into 3DS Max, Maya, Unity3D, Unreal Engine.
Let’s go on!

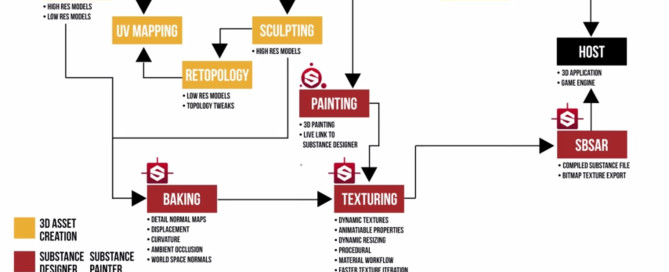
Where can you use Substance Designer in your pipeline?
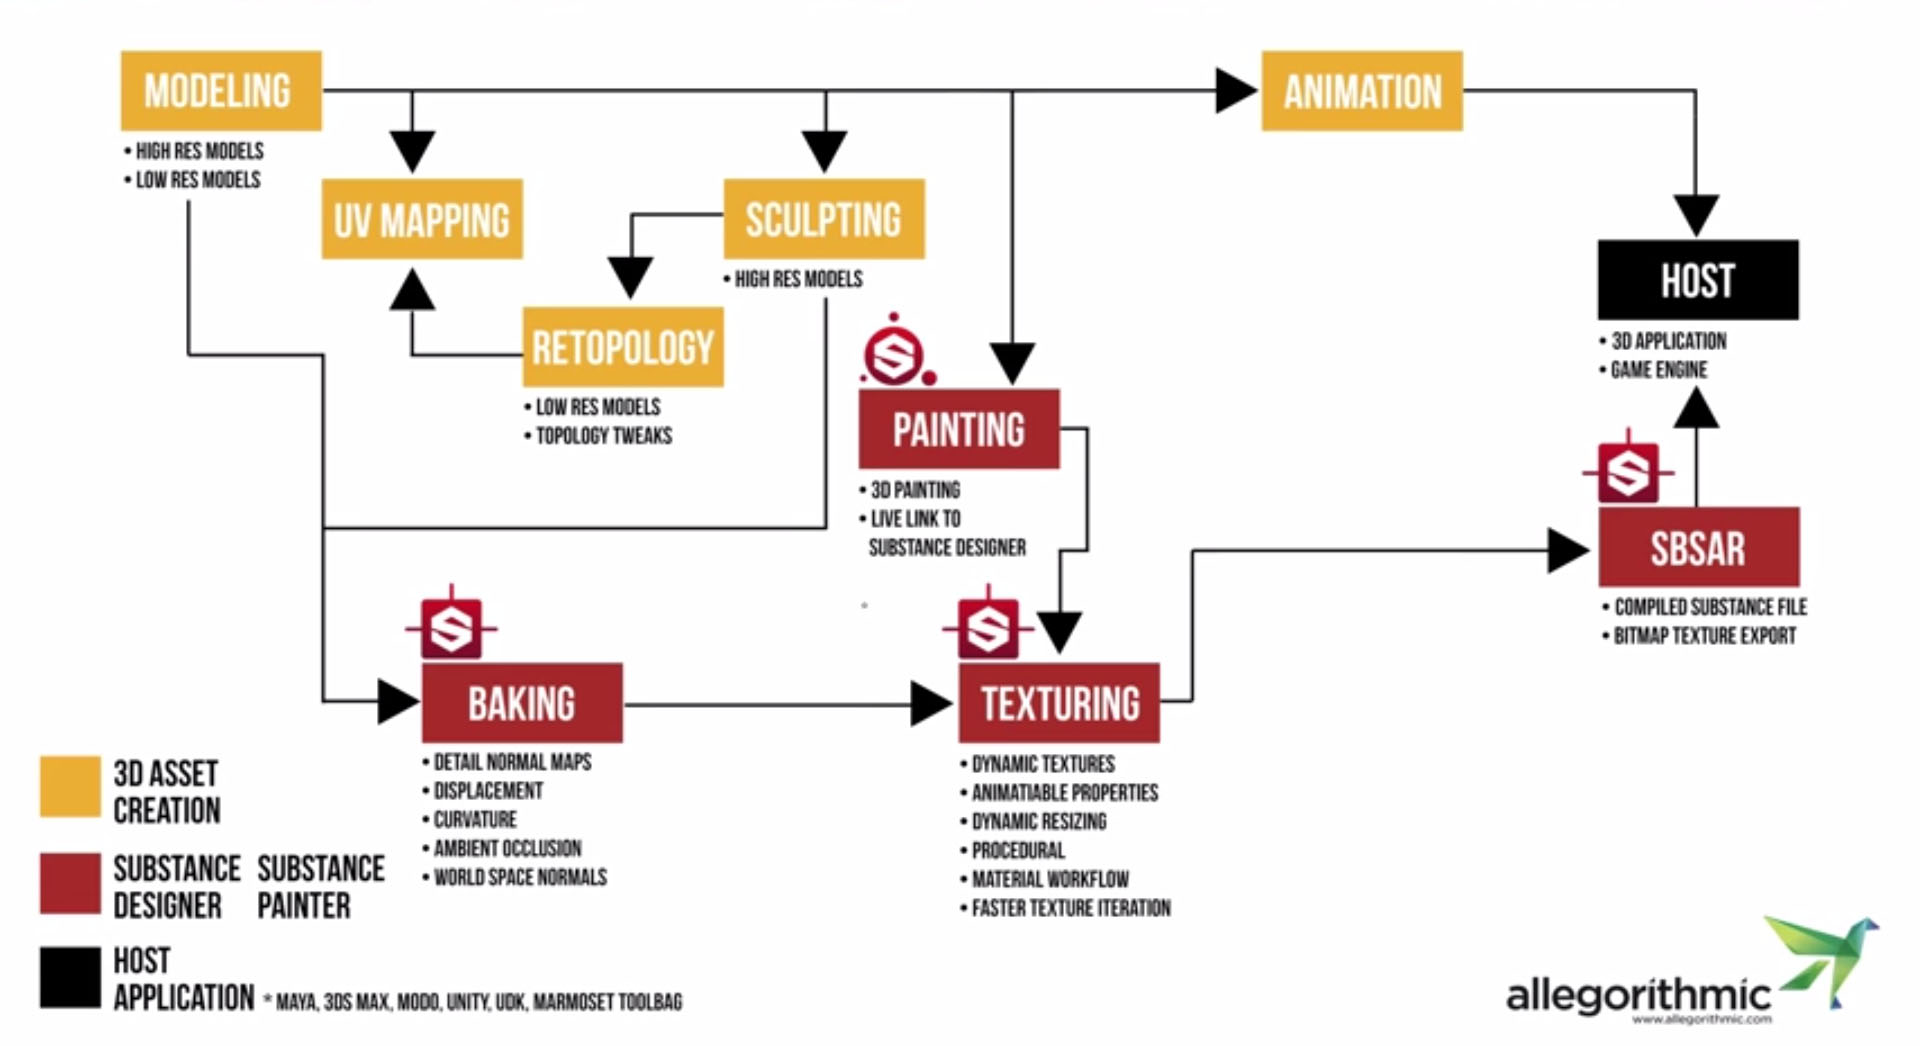
You need create a model and the UV Map using for example 3DSMax or MudBox, then import the mesh inside Substance Designer and here create the maps, see the workflow below:

substance-designer-workflow

Initial setup

1. Open Substance Designer

2. 3D View> Materials> Default> Shader> physically_based
– LMB to rotate View
– SHIFT+LMB to move light

3. Tools> Switch Engine…> Direct3D or SSE2

Create new substance

1. MAIN TOP MENU> File> New Substance…

2. ‘New Substance’ Window> ‘Outputs’ label> BOTTOM RIGHT ‘Add Output’ to add a channel, expard the roolout of the channel to select the type of maps that can be:
– diffuse
– baseColor
– opacity
– emissive
– ambient
– ambientOcclusion
– mask
– normal
– bump
– height
– dispacement
– specular
– specularLevel
– specularColor
– glossiness
– roughness
– anisotropyLevel
– anisotropyAngle
– transmissive
– reflection
– refraction
– environment
– IOR
– scattering
– any
– metallic
– panorama

Not bad!

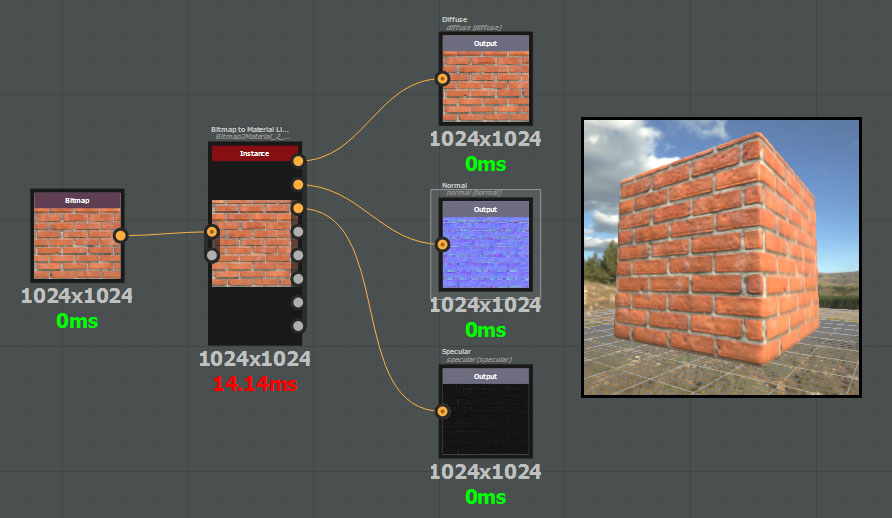
3. DRAG AND DROP a bitmap file over New_Graph Window> Import resource(s)

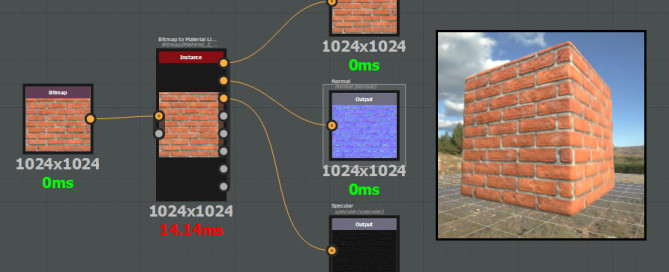
4. DRAG AND DROP from BOTTOM LEFT Library> Material Filters> 1-Click> ‘Bitmap to Material Light’ over New_Graph Window

5. Connect the Input/output values as you can see in the graph below

substance-designer-material-diagram-1

6. Click over Bitmap to Material Light Box, setup parameters on the right box

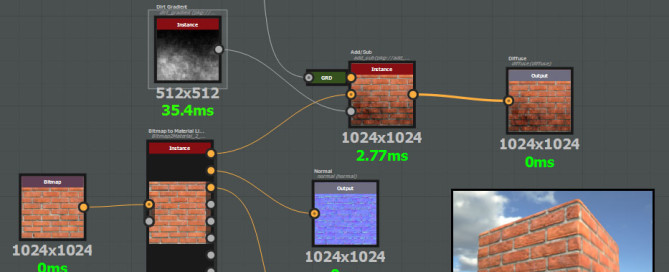
Add simple dirt

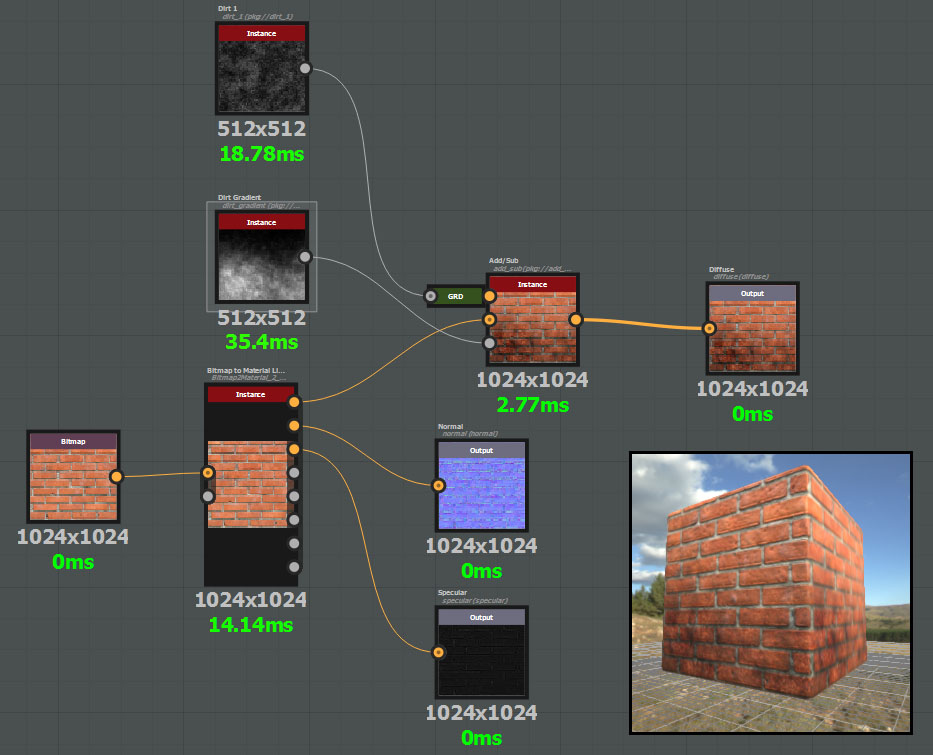
See the diagram below

substance-designer-diagram-2

Notice the blocks:

Library>Generators> Dirt ———————————> | Filters Add/Sub Foreground |
Library>Material Filters>Bitmap to Materia Light -> | Filters Add/Sub Background | -> Diffuse Output
Library>Noises> Dirt Gradient —————————> | Filters Add/Sub Mask |

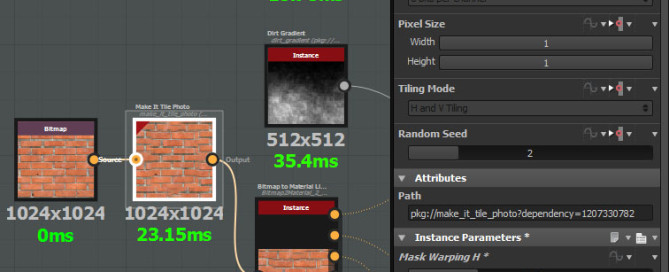
Make tileable

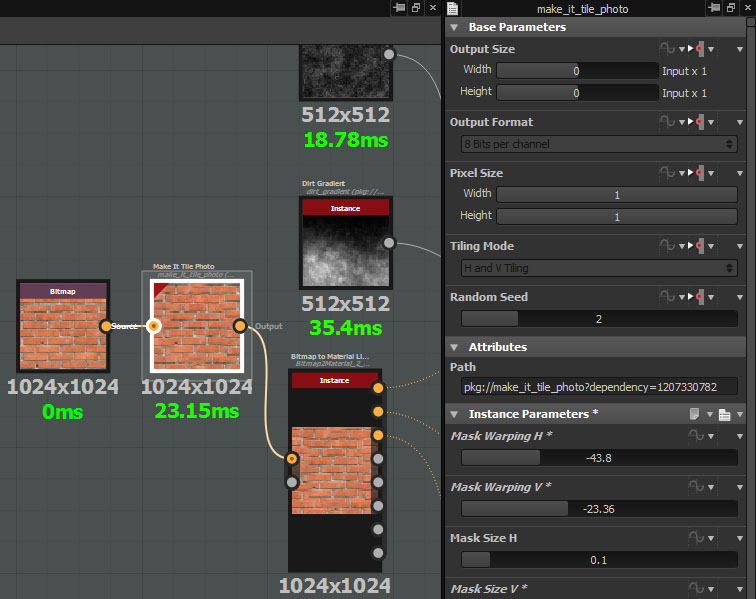
See the diagram below

substance-designer-diagram-3

Notice the blocks:

Bitmap -> | Library> Filters> Tiling> Make It Tile Photo | -> etc…

Save the project

1. TOP LEFT> Explorer> RMB over ‘New_Graph’> Rename> Bricks

2. TOP LEFT> Explorer> RMB over ‘Unsaved Package’> Save As…> Bricks.sbs
This is our project file. In order to edit a substance, you must then have its .sbs file.
In your hard drive you will find Bricks.sbs + Bricks.resources Folder with bitmap files.

Export the substance

1. TOP LEFT> Explorer> RMB over Bricks.sbs> Publish…> Bricks.sbsar
SBSAR files are heavily optimized for performance and contain only the data required to render the Substances they contain, thus SBSAR nodes cannot be opened for editing. This file is created to be imported in your 3D Software (3DSMax, Unity3D etc…).
In your hard drive you will find ONLY Bricks.sbsar, all resouces and code are embedded in this file.

Import the substance in Unity3D

1. Open Unity3D> Project> RMB> Import New Asset> Bricks.sbsar Done!!!

2. Setup in Inspector if you want.

Import a mesh of 3DS MAX

1. Inside 3DS Max create:
– a mesh
– assign UV
– assign a material from using Material Editor

Export in fbx format.

1. Open Substance Designer> File> New Substance

2. DRAG AND DROP the .fbx file over Substance Designer> Unsaved Package
It will be created a Folder Resources> Your Mesh> RMB> Open

3. 3D View> Geometry> Display UVs in 2D View
3D View> Materials> Your Mesh Material

4. DRAG AND DROP the bitmap texture of the Mesh over New_Graph Window and create your substance

5. RMB over New_Graph> View outputs in 3D View

By |3D Graphic|Commenti disabilitati su Allegorithmic – Substance Designer – Basic Tutorial

Allegorithmic – Bitmap2Material – Basic Tutorial

Allegorithmic – Bitmap2Material – Basic Tutorial

With Bitmap2Material you can easily convert a simple bitmap texture as for example a .jpg image into a complex material with a lot of different channels as Base Color, Roughness, Metallic, Normal, Height, Ambient Occlusion. This is a must have tool for every 3D Graphic! It looks like great also in games development! Let’s go on!

Create a material

Start your standalone copy of Bitmap2Material

MAIN TOP MENU> Options> Switch engine…> choose between DirecX (Microsoft Engine) or SSE (PhysX Engine)

3D View>
> Geometry> Primitive List or Load a Mesh
> Materials> Default> Shader> physically_based

1. Bitmap2Material needs a power of 2 square image in order to work. Create it.

2. DRAG AND DROP the bitmap over the area that says: ‘Drop a bitmap here’> Load in ‘Main Input tweak’

3. Outputs roolout> activate Diffuse, Normal and all channels you need to show in 3D Preview Window

4. Bitmap2Material roolout> setup Output Size

Relief setup

1. 2D Window> Height label to focus about height map

2. Global roolout> Method> Slope Based> Light Angle> setup the light selector on the right to improve the height map. Tips: better results can be obtained if ‘Light Angle’ is the same of the image in the photography.

3. 2D Window> Normal label to focus about height map

4. Relief roolout>
a. setup Normal Intensity
b. setupRelief Balance
c. setup Relief Pinch and Relief Radius

IMPORTANT: sometimes the normal map will be inverted, if this happens use Global roolout> Invert Relief

Make it tileable

1. Global roolout> Make it Tile> Edges Quincunx, Linear (good for bricks), Linear X, Linear Y, Random (good for ground, rocks etc…)

Diffuse setup

1. Diffuse | Base Color roolout>
> Luminosity, Hue Shift, Contrast and so on…
> Light Cancellation, to remove darkest shadows

Roughness setup

1. 2D Window> Roughness label to focus about roughness map

2. Roughness | Glossiness roolout> setup Roughness Value and others

Tips: 3D Window> LMB+SHIFT to rotate light in the scene

3. Grunge roolout> Grunge On> Grunge Choice> select a grunge map to add dust, dirt and scratches

Metallic setup

1. 2D Window> Metallic label

2. Metallic | Specular roolout> Metallic Creation Method> From Metallic Input
3. Bitmap2Material roolout> Matallic (optional) slot> load your specular texture

OR

2. Metallic | Specular roolout> Metallic Creation Method> From Main Input
3. Metallic | Specular roolout
> Metal From Diffuse Keying Type> RGB
> Metal From Diffuse Keying Color> pick color box on the right> Pick> pick color, white color in the map will be a metallic material
> Metal Fron Diffuse Keying Settings> setup Range / Softness

Tips: 3D Window> LMB+SHIFT to rotate light in the scene

Export

Export> Export as Bitmap… Done!

Presets

TOP RIGHT CORNER> Presets> New File

Export to Unity3D

Bitmap2Material> MAIN TOP MENU> Export> Export as Bitmap…>
– Substance metadata: Enabled (embedded)
– Tweaks values: Embedded
– SBSAR file: Embedded (only once)
– Format: jpg

‘Export’ button

Unity3D> Project Window>
– create a folder and put inside all maps were generated
– RMB over Project Window> Create> Material> Inspector> Shader Type> example: Bumped Diffuse
– DRAG AND DROP Texture over empty slots
– select the Normal Map> Inspector> setup Bumpiness and click ‘Apply’ in the BOTTOM RIGHT of Inspector Window.

By |3D Graphic|Commenti disabilitati su Allegorithmic – Bitmap2Material – Basic Tutorial

3d-io Unwrella – Optimal Automatic Unwrapping

3d-io Unwrella – Optimal Automatic Unwrapping

Unwrella for 3DS Max is a single click solution which allows you to automatically unfold your 3D models with exact pixel to model surface aspect ratio, speeding up texture baking UV map production significantly.

Unwrap UVW modifier

1. Select your Mesh

2. RIGHT COLUMN> Modifier List> Unwrap UVW

3. Unwrap UVW>
– Edge
– Peel> Seams -> ‘Point-To-Point Seams’ icon

You will draw now the seams lines. Just click at one vertex and then follow the edge flow and select the next one.

Surrond the body parts with BLUE SEAM LINES.
The BLUE LINES are only a representations of the seams. They did not create physical UV Edges

4. You need to convert the BLUE EDGES to GREEN UV Seams:
Unwrap UVW> Peel> ‘Quick Peel’ icon, the BLUE converts to GREEN

See Also ufficial UVW Unwrap lesson at:
http://docs.autodesk.com/3DSMAX/15/ENU/3ds-Max-Tutorials/index.html

Unwrella modifier

1. RIGHT COLUMN> Modifier List> Unwrella

2. Unwrella>
– Parameters> Gutter Padding: 4 pixels
– Preserve Seams: check
– Unwrap as: Polygons
– ‘Unwrap’ button

DONE!!!!

The final UV map is being displayed on your screen
You will notice new BLUE LINES on the mesh. Thin indicates that Unwrella was not able to unfold this part of the geometry without stretching it too much, so Unwrella automatically decided where to split the UV Map in order to get the best result.

If you are not satisfied you can try an alternate map calculation checking ‘High Quality’

By |3D Graphic, 3DS Max|Commenti disabilitati su 3d-io Unwrella – Optimal Automatic Unwrapping

Autodesk Mud Box – Retopology

Autodesk Mud Box – Retopology

1. Load a very dense Mesh as .fbx or .obj, select it

Mudbox cannot retopologize a mesh with discontiguous areas (islands).

To separate out a mesh island for retopology, choose the Face Select tool and double-click to select the island.
Then use Mesh>Duplicate Selected Faces to copy it to a separate mesh.

NOTICE: Retopology command does not reduce faces, but only

Automatic

2. MAIN TOP MENU> Mesh> Retopology> New Operation

3. In the floating Window:

– Target Base Face Count: for example 3000 faces for a videogame character

– Use Curves to Control Topology Flow: UNCHECK

4. ‘Retopology’

Using Curves

2. BOTTOM LEFT> Curve Tools> Create Curve, create curves

3. MAIN TOP MENU> Mesh> Retopology> New Operation

– Target Base Face Count: for example 3000 faces for a videogame character

– Use Curves to Control Topology Flow: CHECK

4. RMB over a Curve in the Viewport, select Soft Constrain or Hard Constrain

5. ‘Retopology’

Very dense Mesh -> Reduce -> Adjust -> Retopology -> Export

1. Load a very dense Mesh

2. MAIN TOP MENU> Mesh> Reduce Mesh> target Face Count: for example 3000 poly, ‘Create Reduced Mesh’

3. You need to close the holes:

a. BOTTOM LEFT> Select/Move Tools> Faces> select the adiacent faces of the hole

b. MAIN TOP MENU> Mesh> Patch (benda, pezza, tappa il buco)

c. Keep the previous selection> MAIN TOP MENU> Mesh> Tighten selection (modifica le facce nuove per renderle più continue con il resto della superficie)

d. Keep the previous selection> MAIN TOP MENU> Mesh> Fair selection (modifica le facce nuove per renderle più continue con il resto della superficie)

OPTION 1

4. MAIN TOP MENU> Mesh> Retopology> New Operation

5. In the floating Window:

– Target Base Face Count: for example 3000 faces for a videogame character

– Use Curves to Control Topology Flow: UNCHECK

6. ‘Retopology’

OPTION 2

2. BOTTOM LEFT> Curve Tools> Create Curve, create curves

3. MAIN TOP MENU> Mesh> Retopology> New Operation

– Target Base Face Count: for example 3000 faces for a videogame character

– Use Curves to Control Topology Flow: CHECK

4. RMB over a Curve in the Viewport, select Soft Constrain or Hard Constrain

5. ‘Retopology’

Export

1. Press on the keyboard PGDOWN to se the lower level

2. BOTTOM LEFT> Select/Move Tool> Select the Object

3. MAIN TOP MENU> File> Export Selection…> yourobject.obj

4. Inside 3DS Max> MAIN TOP MENU> Import> yourobject.obj, you will see 2 object, the Reduced model and the Retopo model.

Official video: http://www.youtube.com/watch?v=cpVCvgvzR_I

By |3D Graphic, Mudbox|Commenti disabilitati su Autodesk Mud Box – Retopology