Video Games Development

C++ – Name Visibility – Namespace – Using

C++ – Name Visibility – Namespace – Using

Name Visibility

Named entities, such as variables, functions, and compound types need to be declared before being used in C++.

– An entity declared outside any block has global scope, meaning that its name is valid anywhere in the code.

– An entity declared within a block, such as a function or a selective statement, has block scope, and is only visible within the specific block in which it is declared.


int foo;        // global variable

int some_function ()
{
  int bar;      // local variable
  bar = 0;
}

int other_function ()
{
  foo = 1;  // ok: foo is a global variable
  bar = 2;  // wrong: bar is not visible from this function
}

Example:


// inner block scopes
#include <iostream>
using namespace std;

int main () {
  int x = 10;
  int y = 20;
  {
    int x;   // ok, inner scope.
    x = 50;  // sets value to inner x
    y = 50;  // sets value to (outer) y
    cout << "inner block:\n";
    cout << "x: " << x << '\n';
    cout << "y: " << y << '\n';
  }
  cout << "outer block:\n";
  cout << "x: " << x << '\n';
  cout << "y: " << y << '\n';
  return 0;
}

The result is:
inner block:
x: 50
y: 50
outer block:
x: 10
y: 50

Namespaces

Namespaces allow us to group named entities that otherwise would have global scope into narrower scopes, giving them namespace scope. This allows organizing the elements of programs into different logical scopes referred to by names.

The syntax is:

...
namespace myNamespace
{
  int a, b;
}
...
// Access at variables with:
myNamespace::a
myNamespace::b
...

Working example:


// namespaces
#include <iostream>
using namespace std;

namespace foo
{
  int value() { return 5; }
}

namespace bar
{
  const double pi = 3.1416;
  double value() { return 2*pi; }
}

int main () {
  cout << foo::value() << '\n';
  cout << bar::value() << '\n';
  cout << bar::pi << '\n';
  return 0;
}

The result is:
5
6.2832
3.1416

Using

The keyword using introduces a name into the current declarative region (such as a block), thus avoiding the need to qualify the name.


// using
#include <iostream>
using namespace std;

namespace first
{
  int x = 5;
  int y = 10;
}

namespace second
{
  double x = 3.1416;
  double y = 2.7183;
}

int main () {
  using first::x;
  using second::y;
  cout << x << '\n';
  cout << y << '\n';
  cout << first::y << '\n';
  cout << second::x << '\n';
  return 0;
}

The result is:
5
2.7183
10
3.1416

The keyword using can also be used as a directive to introduce an entire namespace:


// using
#include <iostream>
using namespace std;

namespace first
{
  int x = 5;
  int y = 10;
}

namespace second
{
  double x = 3.1416;
  double y = 2.7183;
}

int main () {
  using namespace first;
  cout << x << '\n';
  cout << y << '\n';
  cout << second::x << '\n';
  cout << second::y << '\n';
  return 0;
}

The result is:
5
10
3.1416
2.7183

‘using’ and ‘using namespace’ have validity only in the same block in which they are stated or in the entire source code file if they are used directly in the global scope. For example, it would be possible to first use the objects of one namespace and then those of another one by splitting the code in different blocks:


// using namespace example
#include <iostream>
using namespace std;

namespace first
{
  int x = 5;
}

namespace second
{
  double x = 3.1416;
}

int main () {
  {
    using namespace first;
    cout << x << '\n';
  }
  {
    using namespace second;
    cout << x << '\n';
  }
  return 0;
}

The result is:
5
3.1416

Reference: http://www.cplusplus.com/doc/tutorial/namespaces/

By |C++, Video Games Development|Commenti disabilitati su C++ – Name Visibility – Namespace – Using

Unreal Game Engine – Blueprints – Set World Location

Unreal Game Engine – Blueprints – Set World Location

1. LEFT COLUMN> Content Browser> RMB over a Mesh (example Floor_400x400)> Create Blueprint Using…> select your ‘Blueprints’ folder> give it the name (example Floor_400x400_Blueprint)

2. Blueprint window> TOP RIGHT> Components> WHELL MOUSE BUTTON to zoom in/out

3. Blueprint window> TOP RIGHT> Graph> you can see component on the RIGHT COLUMN: – StaticMesh1

4. Event Graph> RIGHT COLUMN> DRAG AND DROP StaticMesh1 over an empty area> Get (to add StaticMesh1 block)

5. Event Graph> DRAG from StaticMesh1 to an empty area> Set Wold Location (to add Set World Location block)

6. Event Graph> RMB over an Empty Area> Event Begin Play (to add Event Begin Play block)

7. Event Graph> Create other connections as in the image below

8. Unreal Editor> Content Browser> Blueprint folder> ‘Floor_400x400_Blueprint’ DRAG AND DROP into scene

9. Play

unreal-blueprints-worldposition-mesh

For italian people: come funziona?

1. All’inizio del gioco (Event Begin Play block) —> viene settata la posizione assoluta (Set World Location) —> per Static Mesh 1

By |Unreal Engine, Video Games Development|Commenti disabilitati su Unreal Game Engine – Blueprints – Set World Location

Unreal Game Engine – Blueprints – Mesh Rotator

Unreal Game Engine – Blueprints – Mesh Rotator

1. LEFT COLUMN> Content Browser> RMB over a Mesh (example Floor_400x400)> Create Blueprint Using…> select your ‘Blueprints’ folder> give it the name (example Floor_400x400_Blueprint)

2. Blueprint window> TOP RIGHT> Components> WHELL MOUSE BUTTON to zoom in/out

3. Blueprint window> TOP RIGHT> Graph> you can see component on the RIGHT COLUMN: – StaticMesh1

4. Blueprint window> TOP RIGHT> Graph> RMB over an Empty Area> Add Timeline

5. DOUBLE CLICK Timeline box> Timeline window> Add Vector Track

6. Vector Track> TOP LEFT> name the track ‘Rotator’

7. Vector Track> TOP> Length> 1 second

8. Vector Track> RMB over empty area> Add Key: 0 sec->1 / 1 sec->360

9. Float Track> TOP> check Autoplay and Loop

10. Event Graph> RIGHT COLUMN> DRAG AND DROP StaticMesh1 over an empty area> Get (to add StaticMesh1 block)

11. Event Graph> DRAG from StaticMesh1 to an empty area> Set Relative Rotation (to add Relative Rotation block)

12. Event Graph> DRAG from Timeline>Update to Set Relative Rotation>exec

13. Event Graph> DRAG from Timeline>Rotator to an empty area (to add Break Vector)

14. Event Graph> DRAG from Set Relative Rotation>New Rotation to an empty area (to add Make Rot block)

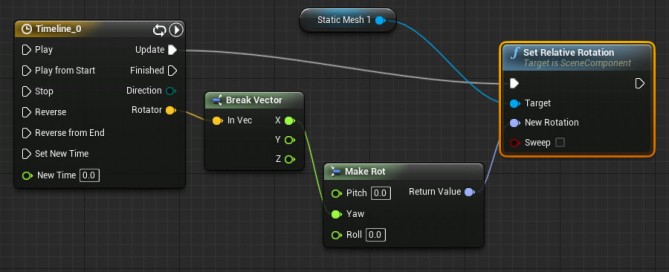
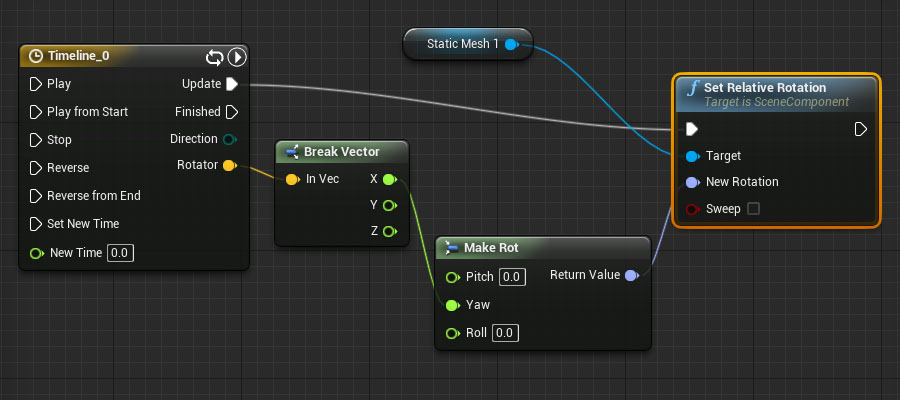
15. Event Graph> Create other connections as in the image below

16. Unreal Editor> Content Browser> Blueprint folder> ‘Floor_400x400_Blueprint’ DRAG AND DROP into scene

17. Play

unreal-blueprints-mesh-rotator

For italian people: come funziona?

1. Timeline invia i valori di Rotator ad ogni fotogramma alla funzione Set Relative Rotation
2. Set Relative Rotation invia i dati di rotazione a Static Mesh 1

NOTA BENE: la traccia Rotator deve essere prima separata con Break Vector, poi assegnata con Make Rot a New Rotation

By |Unreal Engine, Video Games Development|Commenti disabilitati su Unreal Game Engine – Blueprints – Mesh Rotator

Unreal Game Engine – Blueprints – Pulsing Mesh

Unreal Game Engine – Blueprints – Pulsing Mesh

1. LEFT COLUMN> Content Browser> RMB over a Mesh (example Floor_400x400)> Create Blueprint Using…> select your ‘Blueprints’ folder> give it the name (example Floor_400x400_Blueprint)

2. Blueprint window> TOP RIGHT> Components> WHELL MOUSE BUTTON to zoom in/out

4. Blueprint window> TOP RIGHT> Graph> you can see component on the RIGHT COLUMN: – StaticMesh1

5. Blueprint window> TOP RIGHT> Graph> RMB over an Empty Area> Add Timeline

6. DOUBLE CLICK Timeline box> Timeline window> Add Float Track

7. Float Track> TOP LEFT> name the track ‘Pulsing’

8. Float Track> TOP> Length> 1 second

9. Float Track> RMB over empty area> Add Key: 0 sec->1 / 0.5 sec->0.5 / 1->1

10. Float Track> TOP> check Autoplay and Loop

11. Event Graph> RIGHT COLUMN> DRAG AND DROP StaticMesh1 over an empty area> Get (to add StaticMesh1 block)

12. Event Graph> DRAG from StaticMesh1 to an empty area> Set Relative Scale 3D (to add Relative Scale 3D block)

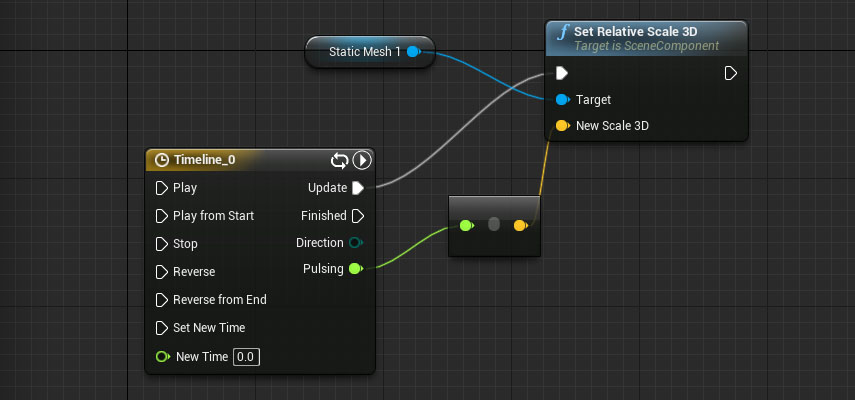
13. Event Graph> DRAG from Timeline>Update to Set Relative Scale 3D>exec

14. Event Graph> DRAG from Timeline>Pulsing to Set Relative Scale 3D>New Scale

14. Unreal Editor> Content Browser> Blueprint folder> ‘Floor_400x400_Blueprint’ DRAG AND DROP into scene

15. Play

unreal-blueprints-pulsing-mesh

For italian people: come funziona?

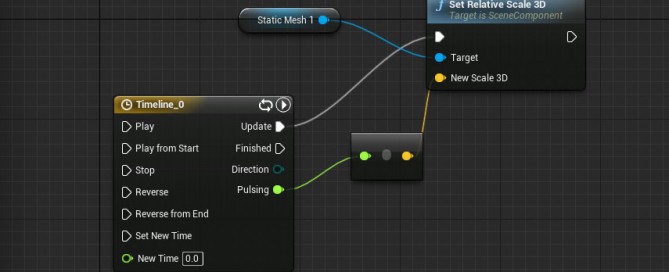
1. Timeline>Update —> Set Relative Scale 3D: esegue un update continuo di Set Relative Scale 3D ad ogni fotogramma

2. Timeline>Pulsing —> New Scale: fornisce il valore variabile nel tempo

3. Set Relative Scale 3D>Target —> Static Mesh 1: setta la scala di Static Mesh 1

By |Unreal Engine, Video Games Development|Commenti disabilitati su Unreal Game Engine – Blueprints – Pulsing Mesh

Unreal Game Engine – Blueprints – Flashing Light

Unreal Game Engine – Blueprints – Flashing Light

1. LEFT COLUMN> Content Browser> RMB over a Mesh (example Floor_400x400)> Create Blueprint Using…> select your ‘Blueprints’ folder> give it the name (example Floor_400x400_Blueprint)

2. Blueprint window> TOP RIGHT> Components> WHELL MOUSE BUTTON to zoom in/out

3. Blueprint window> MAIN TOP MENU> Window> Components> Add Component> Point Light> move the Point Light over the Mesh

4. Blueprint window> TOP RIGHT> Graph> you can see component on the RIGHT COLUMN: – PointLight1 – StaticMesh1

5. Blueprint window> TOP RIGHT> Graph> RMB over an Empty Area> Add Timeline

6. DOUBLE CLICK Timeline box> Timeline window> Add Float Track

7. Float Track> TOP LEFT> name the track ‘Brightness’

8. Float Track> TOP> Length> 1 second

9. Float Track> RMB over empty area> Add Key: 0 sec->0 / 0.5 sec->5.000 / 1->0

10. Float Track> TOP> check Autoplay and Loop

11. Event Graph> RIGHT COLUMN> DRAG AND DROP PointLight1 over an empty area> Get (to add Point Light block)

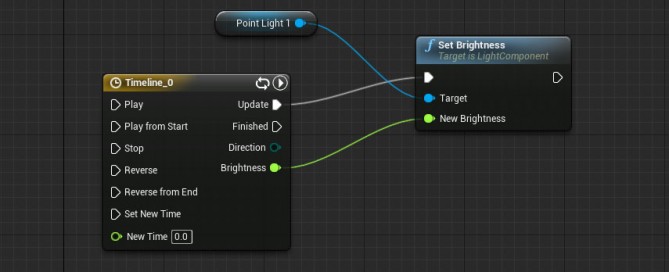
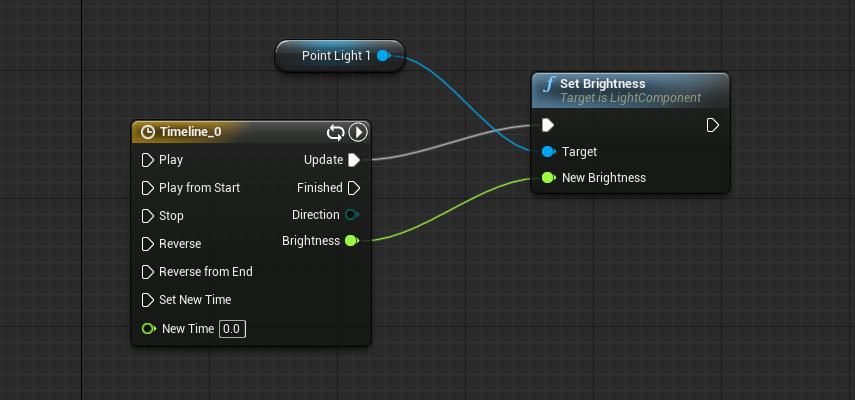
12. Event Graph> DRAG from Point Light to an empty area> Set Brightness (to add Set Brightness block)

13. Event Graph> DRAG from Timeline>Update to set Brightness>exec

14. Unreal Editor> Content Browser> Blueprint folder> ‘Floor_400x400_Blueprint’ DRAG AND DROP into scene

15. Play

unreal-blueprints-flashing-light

For italian people: come funziona?

1. Timeline>Update —> Set Brighness: esegue un update continuo di Set Brightness ad ogni fotogramma

2. Timeline>Brightness —> New Brighness: fornisce il valore variabile nel tempo Brightness

3. SetBrightness>Target —> Point Light 1: setta la luminosità di Point Light 1

By |Unreal Engine, Video Games Development|Commenti disabilitati su Unreal Game Engine – Blueprints – Flashing Light