Web Design

PHP – MySQL – Display Table Content

PHP – MySQL – Display Table Content

Simple

Statement:
SELECT column_name(s)
FROM table_name

<?php
// Create connection
// Statement: mysqli_connect(host,username,password,dbname)
// NOTICE: se lo script è installato nello stesso server del Data Base, host->localhost
$con=mysqli_connect("localhost","lucedigi_user","mypassword","lucedigi_testphp");

// Check connection
if (mysqli_connect_errno())
  {
  echo "Failed to connect to MySQL: " . mysqli_connect_error();
  }

// SELECT asterisco (tutti i dati) dalla tabella Persons - START
// inserisco i dati nella variabile $result
$result = mysqli_query($con,"SELECT * FROM Persons");

// Restituisce il set di record come un array
// ad ogni chiamata viene restituita la riga successiva
while($row = mysqli_fetch_array($result))
  {
  // Visualizza a video i dati
  echo $row['FirstName'] . " " . $row['LastName'];
  echo "<br>";
  }
// SELECT asterisco (tutti i dati) dalla tabella Persons - END

mysqli_close($con); 
echo "Great! Connection Closed!"; 
?>

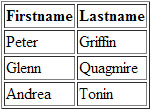
Display the Result in an HTML Table

Statement:
SELECT column_name(s)
FROM table_name

<?php
// Create connection
// Statement: mysqli_connect(host,username,password,dbname)
// NOTICE: se lo script è installato nello stesso server del Data Base, host->localhost
$con=mysqli_connect("localhost","lucedigi_user","mypassword","lucedigi_testphp");

// Check connection
if (mysqli_connect_errno())
  {
  echo "Failed to connect to MySQL: " . mysqli_connect_error();
  }

// Display the Result in an HTML Table - START  

// SELECT asterisco (tutti i dati) dalla tabella Persons
// inserisco i dati nella variabile $result
$result = mysqli_query($con,"SELECT * FROM Persons");

echo "<table border='1'>
<tr>
<th>Firstname</th>
<th>Lastname</th>
</tr>";

while($row = mysqli_fetch_array($result))
  {
  echo "<tr>";
  echo "<td>" . $row['FirstName'] . "</td>";
  echo "<td>" . $row['LastName'] . "</td>";
  echo "</tr>";
  }
echo "</table>";
// Display the Result in an HTML Table - END 

mysqli_close($con); 
echo "Great! Connection Closed!"; 
?>

PhpMyAdmin:

mysql-0006

Result:

mysql-0005

By |MySQL, PHP|Commenti disabilitati su PHP – MySQL – Display Table Content

PHP – MYSQL – Insert Records using a HTML Form

PHP – MYSQL – Insert Records using a HTML Form

I Records sono le righe della tabella.

insert-form.php (the HTML Form)

<html>
<body>

<!-- Send data to insert.php -->
<form action="insert-engine.php" method="post">
Firstname: <input type="text" name="firstname">
Lastname: <input type="text" name="lastname">
Age: <input type="text" name="age">
<input type="submit">
</form>

</body>
</html>

insert-engine.php (the PHP engine)

Syntax:

INSERT INTO table_name
VALUES (value1, value2, value3,…)

or

INSERT INTO table_name (column1, column2, column3,…)
VALUES (value1, value2, value3,…)

<?php
// Create connection
// Statement: mysqli_connect(host,username,password,dbname)
// NOTICE: se lo script è installato nello stesso server del Data Base, host->localhost
$con=mysqli_connect("localhost","lucedigi_user","mypassword","lucedigi_testphp");

// Check connection
if (mysqli_connect_errno())
  {
  echo "Failed to connect to MySQL: " . mysqli_connect_error();
  }
else
  {
  echo "Great! Connect to MySQL!";
  }
// Aggiungere nuovi record alle colonne con POST - START
$sql="INSERT INTO Persons (FirstName, LastName, Age)
VALUES
('$_POST[firstname]','$_POST[lastname]','$_POST[age]')";

if (!mysqli_query($con,$sql))
  {
  die('Error: ' . mysqli_error($con));
  }
echo "1 record added";
// Aggiungere nuovi record alle colonne con POST - END

mysqli_close($con); 
echo "Great! Connection Closed!"; 
?>
By |MySQL, PHP|Commenti disabilitati su PHP – MYSQL – Insert Records using a HTML Form

IP and HREF Management – PHP – $_SERVER

IP and HREF Management – PHP – $_SERVER

$_SERVER is a PHP super global variable which holds information about headers, paths, and script locations.

Example, install this script in yourwebsite.com/testphp/test.php

<?php 

echo $_SERVER['PHP_SELF']; 
// Output: /testphp/test.php

echo "<br>";

echo $_SERVER['SERVER_NAME']; 
// Output: www.yourwebsite.com

echo "<br>";

echo $_SERVER['HTTP_HOST']; 
// Output: www.yourwebsite.com

echo "<br>";

echo $_SERVER['HTTP_REFERER']; 
// Output: http://www.yourwebsite.com/testphp/test.php

echo "<br>";

echo $_SERVER['HTTP_USER_AGENT']; 
// Output: Mozilla/5.0 (Windows NT 6.1; WOW64; rv:26.0) Gecko/20100101 Firefox/26.0

echo "<br>";

echo $_SERVER['SCRIPT_NAME']; 
// Output: /testphp/test.php

echo "<br>";

echo $_SERVER['SERVER_ADDR']
// Output: 69.195.124.88

?>

List

$_SERVER[‘PHP_SELF’]
Returns the filename of the currently executing script

$_SERVER[‘GATEWAY_INTERFACE’]
Returns the version of the Common Gateway Interface (CGI) the server is using

$_SERVER[‘SERVER_ADDR’]
Returns the IP address of the host server

$_SERVER[‘SERVER_NAME’]
Returns the name of the host server (such as www.lucedigitale.com)

$_SERVER[‘SERVER_SOFTWARE’]
Returns the server identification string (such as Apache/2.2.24)

$_SERVER[‘SERVER_PROTOCOL’]
Returns the name and revision of the information protocol (such as HTTP/1.1)

$_SERVER[‘REQUEST_METHOD’]
Returns the request method used to access the page (such as POST)

$_SERVER[‘REQUEST_TIME’]
Returns the timestamp of the start of the request (such as 1377687496)

$_SERVER[‘QUERY_STRING’]
Returns the query string if the page is accessed via a query string

$_SERVER[‘HTTP_ACCEPT’]
Returns the Accept header from the current request

$_SERVER[‘HTTP_ACCEPT_CHARSET’]
Returns the Accept_Charset header from the current request (such as utf-8,ISO-8859-1)

$_SERVER[‘HTTP_HOST’]
Returns the Host header from the current request

$_SERVER[‘HTTP_REFERER’]
Returns the complete URL of the current page (not reliable because not all user-agents support it)

$_SERVER[‘HTTPS’]
Is the script queried through a secure HTTP protocol

$_SERVER[‘REMOTE_ADDR’]
Returns the IP address from where the user is viewing the current page

$_SERVER[‘REMOTE_HOST’]
Returns the Host name from where the user is viewing the current page

$_SERVER[‘REMOTE_PORT’]
Returns the port being used on the user’s machine to communicate with the web server

$_SERVER[‘SCRIPT_FILENAME’]
Returns the absolute pathname of the currently executing script

$_SERVER[‘SERVER_ADMIN’]
Returns the value given to the SERVER_ADMIN directive in the web server configuration file

$_SERVER[‘SERVER_PORT’]
Returns the port on the server machine being used by the web server for communication (such as 80)

$_SERVER[‘SERVER_SIGNATURE’]
Returns the server version and virtual host name which are added to server-generated pages

$_SERVER[‘PATH_TRANSLATED’]
Returns the file system based path to the current script

$_SERVER[‘SCRIPT_NAME’]
Returns the path of the current script

$_SERVER[‘SCRIPT_URI’]
Returns the URI of the current page

By |PHP, Web Design|Commenti disabilitati su IP and HREF Management – PHP – $_SERVER

PHP – Simple File Uploader

PHP – Simple File Uploader

With PHP you can upload file inside a webserver using a HTML Form.

DOWNLOAD


WARNING!!!

1. Providers allow the upload of file in shared web space with restrictions of:

– Type (example: .zip files are allowed, .exe files are not allowed)
– Size
– Only inside special folders (example: public)

You must FIRST verify your hosting contract!

2. The upload folder must have write/read permission (755)
To Change folders permissions you can use an FTP software or the Admin Panel of your Web Site.

You must create in the same folder:

1. upload-form.php -> the HTML upload form
2. upload-engine.php -> the PHP uploader engine
3. a folder ‘upload’ -> the upload folder

upload-form.php

<html>
<body>

<!-- Upload Form START -->
<!-- Notice the enctype type is 'multipart/form-data' It means a bynary data -->
<form action="upload-engine.php" method="post" enctype="multipart/form-data">
<label for="file">Filename:</label>
<input type="file" name="file" id="file"><br>
<input type="submit" name="submit" value="Submit">
</form>
<!-- Upload Form END -->

</body>
</html>

upload-engine.php

<?php
if ($_FILES["file"]["error"] > 0) // the error code resulting from the file upload
  {
  // If there is an error give a message
  echo "Error: " . $_FILES["file"]["error"] . "<br>";
  }
else
  {
  // the name of the uploaded file
  echo "Upload: " . $_FILES["file"]["name"] . "<br>"; 
  // the type of the uploaded file  
  echo "Type: " . $_FILES["file"]["type"] . "<br>"; 
  // the size in Kbytes of the uploaded file  
  echo "Size: " . ($_FILES["file"]["size"] / 1024) . " kB<br>"; 
  // the name of the temporary copy of the file stored on the server
  echo "Stored in: " . $_FILES["file"]["tmp_name"];             
  }
?>

Output:

Upload: 1.jpg
Type: image/jpeg
Size: 16.1640625 kB
Stored in: /var/tmp/php1HXXSm

Temporary Copy -> Save Permanent Copy

The examples above create a temporary copy of the uploaded files in the PHP temp folder on the server.

The temporary copied files disappears when the script ends.

To store the uploaded file we need to copy it to a different location.

upload-engine.php

<?php
if ($_FILES["file"]["error"] > 0) // the error code resulting from the file upload
  {
  // If there is an error give a message
  echo "Error: " . $_FILES["file"]["error"] . "<br>";
  }
else
  {
  // the name of the uploaded file
  echo "Upload: " . $_FILES["file"]["name"] . "<br>"; 
  // the type of the uploaded file  
  echo "Type: " . $_FILES["file"]["type"] . "<br>"; 
  // the size in Kbytes of the uploaded file  
  echo "Size: " . ($_FILES["file"]["size"] / 1024) . " kB<br>"; 
  // the name of the temporary copy of the file stored on the server
  echo "Stored in: " . $_FILES["file"]["tmp_name"];  

  // Muovi il file con il nome temporaneo -> dentro la cartella upload -> salvalo con il suo nome originale
  // NOTICE: se il file esiste già verrà sovrascritto!!!
  move_uploaded_file($_FILES["file"]["tmp_name"],"upload/" . $_FILES["file"]["name"]);
  echo "<br> Stored in: " . "upload/" . $_FILES["file"]["name"];  
  }
?>

NOTICE:
the PHP function – move_uploaded_file() –

Output:

Upload: 1.jpg
Type: image/jpeg
Size: 16.1640625 kB
Stored in: /var/tmp/phpQy4CY8
Stored in: upload/1.jpg

Temporary Copy -> Change Name -> Save Permanent Copy

upload-engine.php

<?php
if ($_FILES["file"]["error"] > 0) // the error code resulting from the file upload
  {
  // If there is an error give a message
  echo "Error: " . $_FILES["file"]["error"] . "<br>";
  }
else
  {
  // the name of the uploaded file
  echo "Upload: " . $_FILES["file"]["name"] . "<br>"; 
  // the type of the uploaded file  
  echo "Type: " . $_FILES["file"]["type"] . "<br>"; 
  // the size in Kbytes of the uploaded file  
  echo "Size: " . ($_FILES["file"]["size"] / 1024) . " kB<br>"; 
  // the name of the temporary copy of the file stored on the server
  echo "Stored in: " . $_FILES["file"]["tmp_name"];  

  $uploads_dir = 'upload/'; // upload folder
  $newname = 'newname.jpg'; // upload new name
  // Muovi il file con il nome temporaneo -> dentro la cartella upload -> salvalo con il suo nuovo nome
  // NOTICE: se il file esiste già verrà sovrascritto!!!
  move_uploaded_file($_FILES["file"]["tmp_name"],"$uploads_dir"."$newname");
  echo "<br> Stored in: " . $uploads_dir . $newname; 
  }
?>

Output:

Upload: 3.jpg
Type: image/jpeg
Size: 14.541015625 kB
Stored in: /var/tmp/php77QJJH
Stored in: upload/newname.jpg

Upload Restrictions

<?php
$allowedExts = array("gif", "jpeg", "jpg", "png");

$temp = explode(".", $_FILES["file"]["name"]);
$extension = end($temp);
if ((($_FILES["file"]["type"] == "image/gif")
|| ($_FILES["file"]["type"] == "image/jpeg")
|| ($_FILES["file"]["type"] == "image/jpg")
|| ($_FILES["file"]["type"] == "image/pjpeg")
|| ($_FILES["file"]["type"] == "image/x-png")
|| ($_FILES["file"]["type"] == "image/png"))
&& ($_FILES["file"]["size"] < 20000) // size restriction
&& in_array($extension, $allowedExts))
  {
  if ($_FILES["file"]["error"] > 0)
    {
    echo "Return Code: " . $_FILES["file"]["error"] . "<br>";
    }
  else
    {
    echo "Upload: " . $_FILES["file"]["name"] . "<br>";
    echo "Type: " . $_FILES["file"]["type"] . "<br>";
    echo "Size: " . ($_FILES["file"]["size"] / 1024) . " kB<br>";
    echo "Temp file: " . $_FILES["file"]["tmp_name"] . "<br>";

    if (file_exists("upload/" . $_FILES["file"]["name"]))
      {
      echo $_FILES["file"]["name"] . " already exists. ";
      }
    else
      {
      move_uploaded_file($_FILES["file"]["tmp_name"],
      "upload/" . $_FILES["file"]["name"]);
      echo "Stored in: " . "upload/" . $_FILES["file"]["name"];
      }
    }
  }
else
  {
  echo "Invalid file";
  }
?>
By |PHP, Web Design|Commenti disabilitati su PHP – Simple File Uploader

PHP – Simple Password Protection – No Sessions

PHP – Simple Password Protection – No Sessions

Take care of yourself! Read the comments inside!

DOWNLOAD


SELF PAGE PROTECTION


<html>
<body>
<!-- SIMPLE PHP PASSWORD PROTECTION WITH NO SESSIONS -->
<!-- Author: blog.lucedigitale.com - Andrea Tonin -->

<!-- FORM START -->
<!-- Il form invia a se stesso PHP_SELF la password con il nome 'password' -->
<form method="post" action="<?php echo $_SERVER['PHP_SELF'];?>">
Type Password: <input type="text" name="password">
<input type="submit">
</form>
<!-- FORM END -->

<?php 
// $_REQUEST colleziona il dato ricevuto dal form 
$password = $_REQUEST['password']; 
// se la password è corretta visualizza il contenuto HTML nascosto 
if ($password=="test")
  {
  echo "
  <!-- SECRET CONTENT START -->
  Password OK!<br>
  <strong>This is my super HTML formatted secret content!</strong>
  <!-- SECRET CONTENT END -->
  ";
  }
  else
  {
  echo "You need password to enter";
  }
?>

</body>
</html>

SPLIT PAGES PROTECTION

You must create in the same folder:
1. password-form.php -> the password form
2. password-reserved.php -> the password protected page

The code for password-form.php

<html>
<body>
<!-- SIMPLE PHP PASSWORD PROTECTION WITH NO SESSIONS -->
<!-- Author: blog.lucedigitale.com - Andrea Tonin -->

<!-- FORM START -->
<!-- Il form invia a password-reserved.php la password con il nome 'password' -->
<form method="post" action="password-reserved.php">
Type Password: <input type="text" name="password">
<input type="submit">
</form>
The password is test
<!-- FORM END -->
</body>
</html>

The code for password-reserved.php

<?php 
// $_REQUEST colleziona il dato ricevuto dal form 
$password = $_REQUEST['password']; 

if ($password=="test")
  // se la password è corretta visualizza il contenuto HTML nascosto 
  {
  echo "
  <!-- SECRET CONTENT START -->
  <html>
  <body>
  Password OK!<br>
  <strong>This is my super HTML formatted secret content!</strong>
  
  </body>
  </html>
  <!-- SECRET CONTENT END -->
  ";
  }
  else
  {
  // se la password non è corretta visualizza il messaggio di errore
  echo "You need password to enter";
  }
?>

SPLIT PAGES PROTECTION + Redirection JavaScript

The code for password-form.php

<html>
<body>
<!-- SIMPLE PHP PASSWORD PROTECTION WITH NO SESSIONS -->
<!-- Author: blog.lucedigitale.com - Andrea Tonin -->

<!-- FORM START -->
<!-- Il form invia a password-reserved.php la password con il nome 'password' -->
<form method="post" action="password-reserved.php">
Type Password: <input type="text" name="password">
<input type="submit">
</form>
The password is test
<!-- FORM END -->
</body>
</html>

The code for password-reserved.php

<?php 
// $_REQUEST colleziona il dato ricevuto dal form 
$password = $_REQUEST['password']; 

if ($password=="test")
  // se la password è corretta visualizza il contenuto HTML nascosto 
  {
  echo "<center>Password Corretta</center>";
  }
  else
  {
  // se la password è errata visualizza il messaggio di errore e torna al login
  echo "<center>Password Errata</center> <script>location.href = 'password-form.php';</script>";
  }
?>

<!DOCTYPE html>
... Your Secret Content ...
</html>
By |PHP, Web Design|Commenti disabilitati su PHP – Simple Password Protection – No Sessions