gamedev

Unreal Engine – FBX Content Pipeline

Create a 3D Object inside 3DSMax

0. 3DSMax
– Use the setup scene in meters, you can find the right setup for human modeling here: Unit Setup

– Create a Box 1x1x1 name it ‘BoxMesh1x1x1’
– From Material Editor assign ‘BoxMaterial’ into Diffuse Map an ‘uvrefmap.jpg’
– Create a Smooting Group

– Select the Mesh> MAIN Button> Export> Export Selected> BoxExported.FBX

Setup FBX Exporter:
Geometry>
– Smoothing Groups check
– Tangents and Binormals check
– Triangulate check
– Others uncheck

FBX File Format>
– Type: Binary
– Version: FBX 2014

Ref: https://docs.unrealengine.com/latest/INT/Engine/Content/QuickStart/1/4/index.html

Import into Unreal4 mesh – smooting groups – materials – textures

1. Launch Unreal Engine

2. Tab New Project>
– Blank
– Desktop / Console
– Maximum Quality
– With Starter Content
– select a Folder for your project for example ‘Unreal’ folder
– choose a project Name for example ‘Test’

Click ‘Create Project’ button

The software will create:
Unreal/Test/Config/ some .ini files
Unreal/Test/Content/StarterContent
Unreal/Test/Intermediate
Unreal/Test/Saved
Unreal/Test.uproject

3. UE4> bottom ‘Content Browser’> select ‘Content’ folder> Add New> New Folder ‘Box’

Now there are:
Content>
– Box
– StarterContent

4. Double Click on ‘Box’

5. Content Browser> Import> select BoxExported.FBX>

– Import as Skeletal uncheck
– Auto Generate Collision uncheck (auto create a collision box)
– Import Materials check (auto import 3DS Max Material)
– Import Textures check (auto import Texture of 3DSMax Material)

>’Import’ button

Now inside Content/Box trere are
– BoxExported (mesh)
– BoxMaterial (3DS Max Material)
– uvrefmap.jpg

NOTICE: the .fbx memorize mesh, smooting groups, max material, texture position into your hard drive

6. There are some asterisks over imported elements because they was not saved inside ‘Content’ folder of the

project. Let’s save it:

UE4> bottom ‘Content Browser’> Save All

Asterisks disappears, watch the folder Test/Content/Box now there are:
– BoxExported.uasset
– BoxMaterial.uasset
– uvrefmap.uasset

All elements was converted in Unreal Assets format.

Import into Unreal4 color / normal map textures

1. Content Browser> Import> select uvrefmap2.png

2. Content Browser> Save All

Insert the mesh into Unreal4 scene

1. Content Browser> DRAG AND DROP ‘BoxExported’ (the mesh) over Perspective view

2. Perspective window> Top Right> Move Rotate Scale / remove Snaps to manipolate the mesh

3. Camera movements:
– LMB + WASD walk
– RMB look around
– Mouse Wheel to Zoom in/out

Father and son…

1. RIGHT COLUMN> World Outliner> DRAG AND DROP son over the parent

By |Unreal Engine, Video Games Development|Commenti disabilitati su Unreal Engine – FBX Content Pipeline

3D Low Poly Characters for Games – Basic Workflow

Hi all,
today I will write about my favourite workflow to create low poly characters for games.
I will use 3DS Max + 3D Coat + Substance Painter + Photoshop.
You can do the same with other softwares, for example using 3DS Max + MudBox or Maya + ZBrush and so on…
The important is the file format you choose to exchange data.
To avoid plugins with fragile bridges I export using .fbx format + bitmap textures, after that I reconstruct by hand shaders inside Unity or Unreal.
With this workflow every software are independent and I can change tools whenever.

3DS Max – Scene Setup

1. Setup the scene with the System Unit Scale>1 Unit=1,0 Centimeters;
as described here:
http://www.lucedigitale.com/blog/3ds-max-micro-reference-manual-unit-setup-interiors/

2. Create a Box of 1x1x1m as reference

3. Create one or more Planes of 1x1m to map the image reference of your character, you will resize it to 1,80m if your character is 1,80m height

4. Setup the Viewport: Shaded + Edged Faces

5. RIGHT COLUMN> Utilities> Polygon Count

3DS Max – Modeling one side

CASE 1a.
I have a small collection of 1.000 poly people, male, female, fat, old, cartoon etc… with a very basic poly structure, starting from here I save a lot of time.
The low res character have a basic T pose and a structure suitable for animations.
Go to point 2

CASE 1b.
If you start from a hires model you will need first retopo it using 3D Coat.
Follow the lesson here:
http://www.lucedigitale.com/blog/3d-coat-retopo/
Consider to generate normal + occlusion map here to use the detail of hi res mesh.
Export to 3DS Max.
Go to point 2

2. RIGHT COLUMN> RMB over the Mesh name> Convert To: Editable Poly

4. The most used tools of ‘Editable Poly’ are:

Element

– Attach
– Detach

Polygon

– Create
– Slice Plane
– Quick Slice
– Cut (IT WORKS GREAT!)
– Make Planar
– View Align
– Relax
– Auto Smooth
– Use NURMS Subdivision (RMB over the Mesh name> Convert To: Editable Poly to collapse)

Border

– Double Click to select the entire loop
– CTRL + Click to use Additive Selection
– Split

Vertex

– Remove (remove the vertex without erase poly structure)
– Weld
– Target Weld
– Remove Isolated Vertices (to clear the mesh)

3DS Max – Mirror the other side

1. ‘Editable Poly’> select the middle vertices> Make Planar X> Move command to X=0

2. ‘Editable Poly’> modifers ‘Mirror’> Mirror AxisX, check ‘Copy’

3. ‘Editable Poly’> ‘Show end result on’

4. In the end ‘Editable Poly’> Vertex> Weld

5. RMB over the Mesh name> Collapse All

3DS Max – Export

1. RIGHT COLUMN> Hierarchy> Affect Pivot Only> move to 0,0,0

2. RIGHT COLUMN> Utilities> Reset XForm

3. Select the Mesh> RIGHT COLUMN> Modify> Modifier List> UVW Mapping Clear> RMB> Collapse All (remove old UVW)

4. Select the mesh> Export> Export Selected> name.fbx

3D-Coat – UV Mapping – Paint Texture

Remember that for games you have only one texture, usually 1024x1024px with all body UVW.
Leave more space for head and hands.

1. Run 3D Coat, into Wizard window select ‘UV Map Mesh’ etc…
Follow my tutorial here:
http://www.lucedigitale.com/blog/3d-coat-uv-mapping/

2. Switch 3D Coat to Paint.
Follow my tutorial here:
http://www.lucedigitale.com/blog/3d-coat-paint-texture/

You can paint here only diffuse channel, or diffuse + normal + specular.

3D Coat – Export

1. LEFT COLUMN> Commands> Apply UV-set
2. File> Export Model> .fbx and texture will be exported in the same folder
3. ‘OK’

Allegorithmic – Bitmap2Material

If you paint only diffuse color you can generate normal and specular with just one click using ‘Bitmap2Material’ software.
Follow the lesson here:
http://www.lucedigitale.com/blog/allegorithmic-bitmap2material-basic-tutorial/

Allegorithmic – Substance Painter – Paint Texture

To add more detail to your texture you can you Substance Painter, there are unbelivable tools here as ‘Paint with particles’

Follow the lesson here:
http://www.lucedigitale.com/blog/allegorithmic-substance-painter-basic-tutorial/

Photoshop

Use Photoshop for textures color correction.

3DS Max – Importing – Material

1. 3DS Max> Import> .fbx
2. Select the object> RIGHT COLUMN> Modify> Modifier List> Unwrap UVW
3. Select Unwrap UVW modifier> Edit UVs> Open UV Editor…, then you will see the work you have done using 3D Coat
4. Create a Material> Diffuse > Bitmap> assign the color texture created by 3D Coat, activate ‘Show Shaded Material’
5. DRAG and DROP the Material over the Mesh in the viewport

3DS Max – Face Expression

There are many ways to do that, the classic is:

1. Edit> Cloce> Copy and duplicate the Mesh, and move away from the original one, name it ‘Open Mouth’

2. Modify the face to create a new expression, not add or remove vertex o poly, only move it.

3. Select the original Mesh> RIGHT COLUMN> Modify> Modifier List> Morpher> Pick Object from Scene

4. Create others face expressions, try google-images ‘face expression’ to find useful photos

Follow the tutorial here:
http://www.lucedigitale.com/blog/3ds-max-micro-reference-manual-modifiers-animation-morpher/

3DS Max – Skeletal Animation

CASE 1. Humans
Use’Biped’ + Skin modifier
Follow the lesson here:
http://www.lucedigitale.com/blog/3ds-max-rigging-biped-skin/

CASE 2. Animals
Use ‘CAT’ rig + Skin modifier
Follow the lesson here:
http://www.lucedigitale.com/blog/3ds-max-rigging-cat-skin/

ADDITIONAL BONES
Follow the lesson here:
http://www.lucedigitale.com/blog/3ds-max-micro-reference-manual-animation-bones/

INVERSE KINEMATICS
Follow the lesson here:
http://www.lucedigitale.com/blog/3ds-max-micro-reference-manual-animation-inverse-kinematics/

3DS Max – Open Subdivision Surfaces

In this step you will convert the low poly model in a hi res model for a cinematic intro.

1. ‘Editable Poly’> modifers ‘OpenSubdiv’

3DS Max – Export for Games

The important is the file format you choose to exchange data.
To avoid plugins with fragile bridges I export using .fbx format + bitmap textures (diffuse + specular + normal + occlusion), after that I reconstruct by hand shaders inside Unity or Unreal Engine.
With this workflow every software are independent and I can change tools whenever.

By |3D Graphic, 3DS Max, Video Games Development|Commenti disabilitati su 3D Low Poly Characters for Games – Basic Workflow

MMORPG Anatomy – Basic Concepts

Today I will write about creating a MMORPG, basic concepts and variables only.

First, what is a MMORPG?

Massively multiplayer online role-playing games (MMORPGs) blend the genres of role-playing video games and massively multiplayer online games, potentially in the form of web browser-based games, in which a very large number of players interact with one another within a world.

As in all RPGs, the player assume the role of a character (often in a fantasy world or science-fiction world) and takes control over many of that character’s actions. MMORPGs are distinguished from single-player or small multi-player online RPGs by the number of players able to interact together, and by the game’s persistent world (usually hosted by the game’s publisher), which continues to exist and evolve while the player is offline and away from the game.

Main concepts

The idea is:
1. You, player have to fight monsters and/or other players to improve your skills.
2. Over time the strong players/monsters are going to beat you because they have more skills and power…
3. It’s time to improve your skill to take your revenge… again and again…

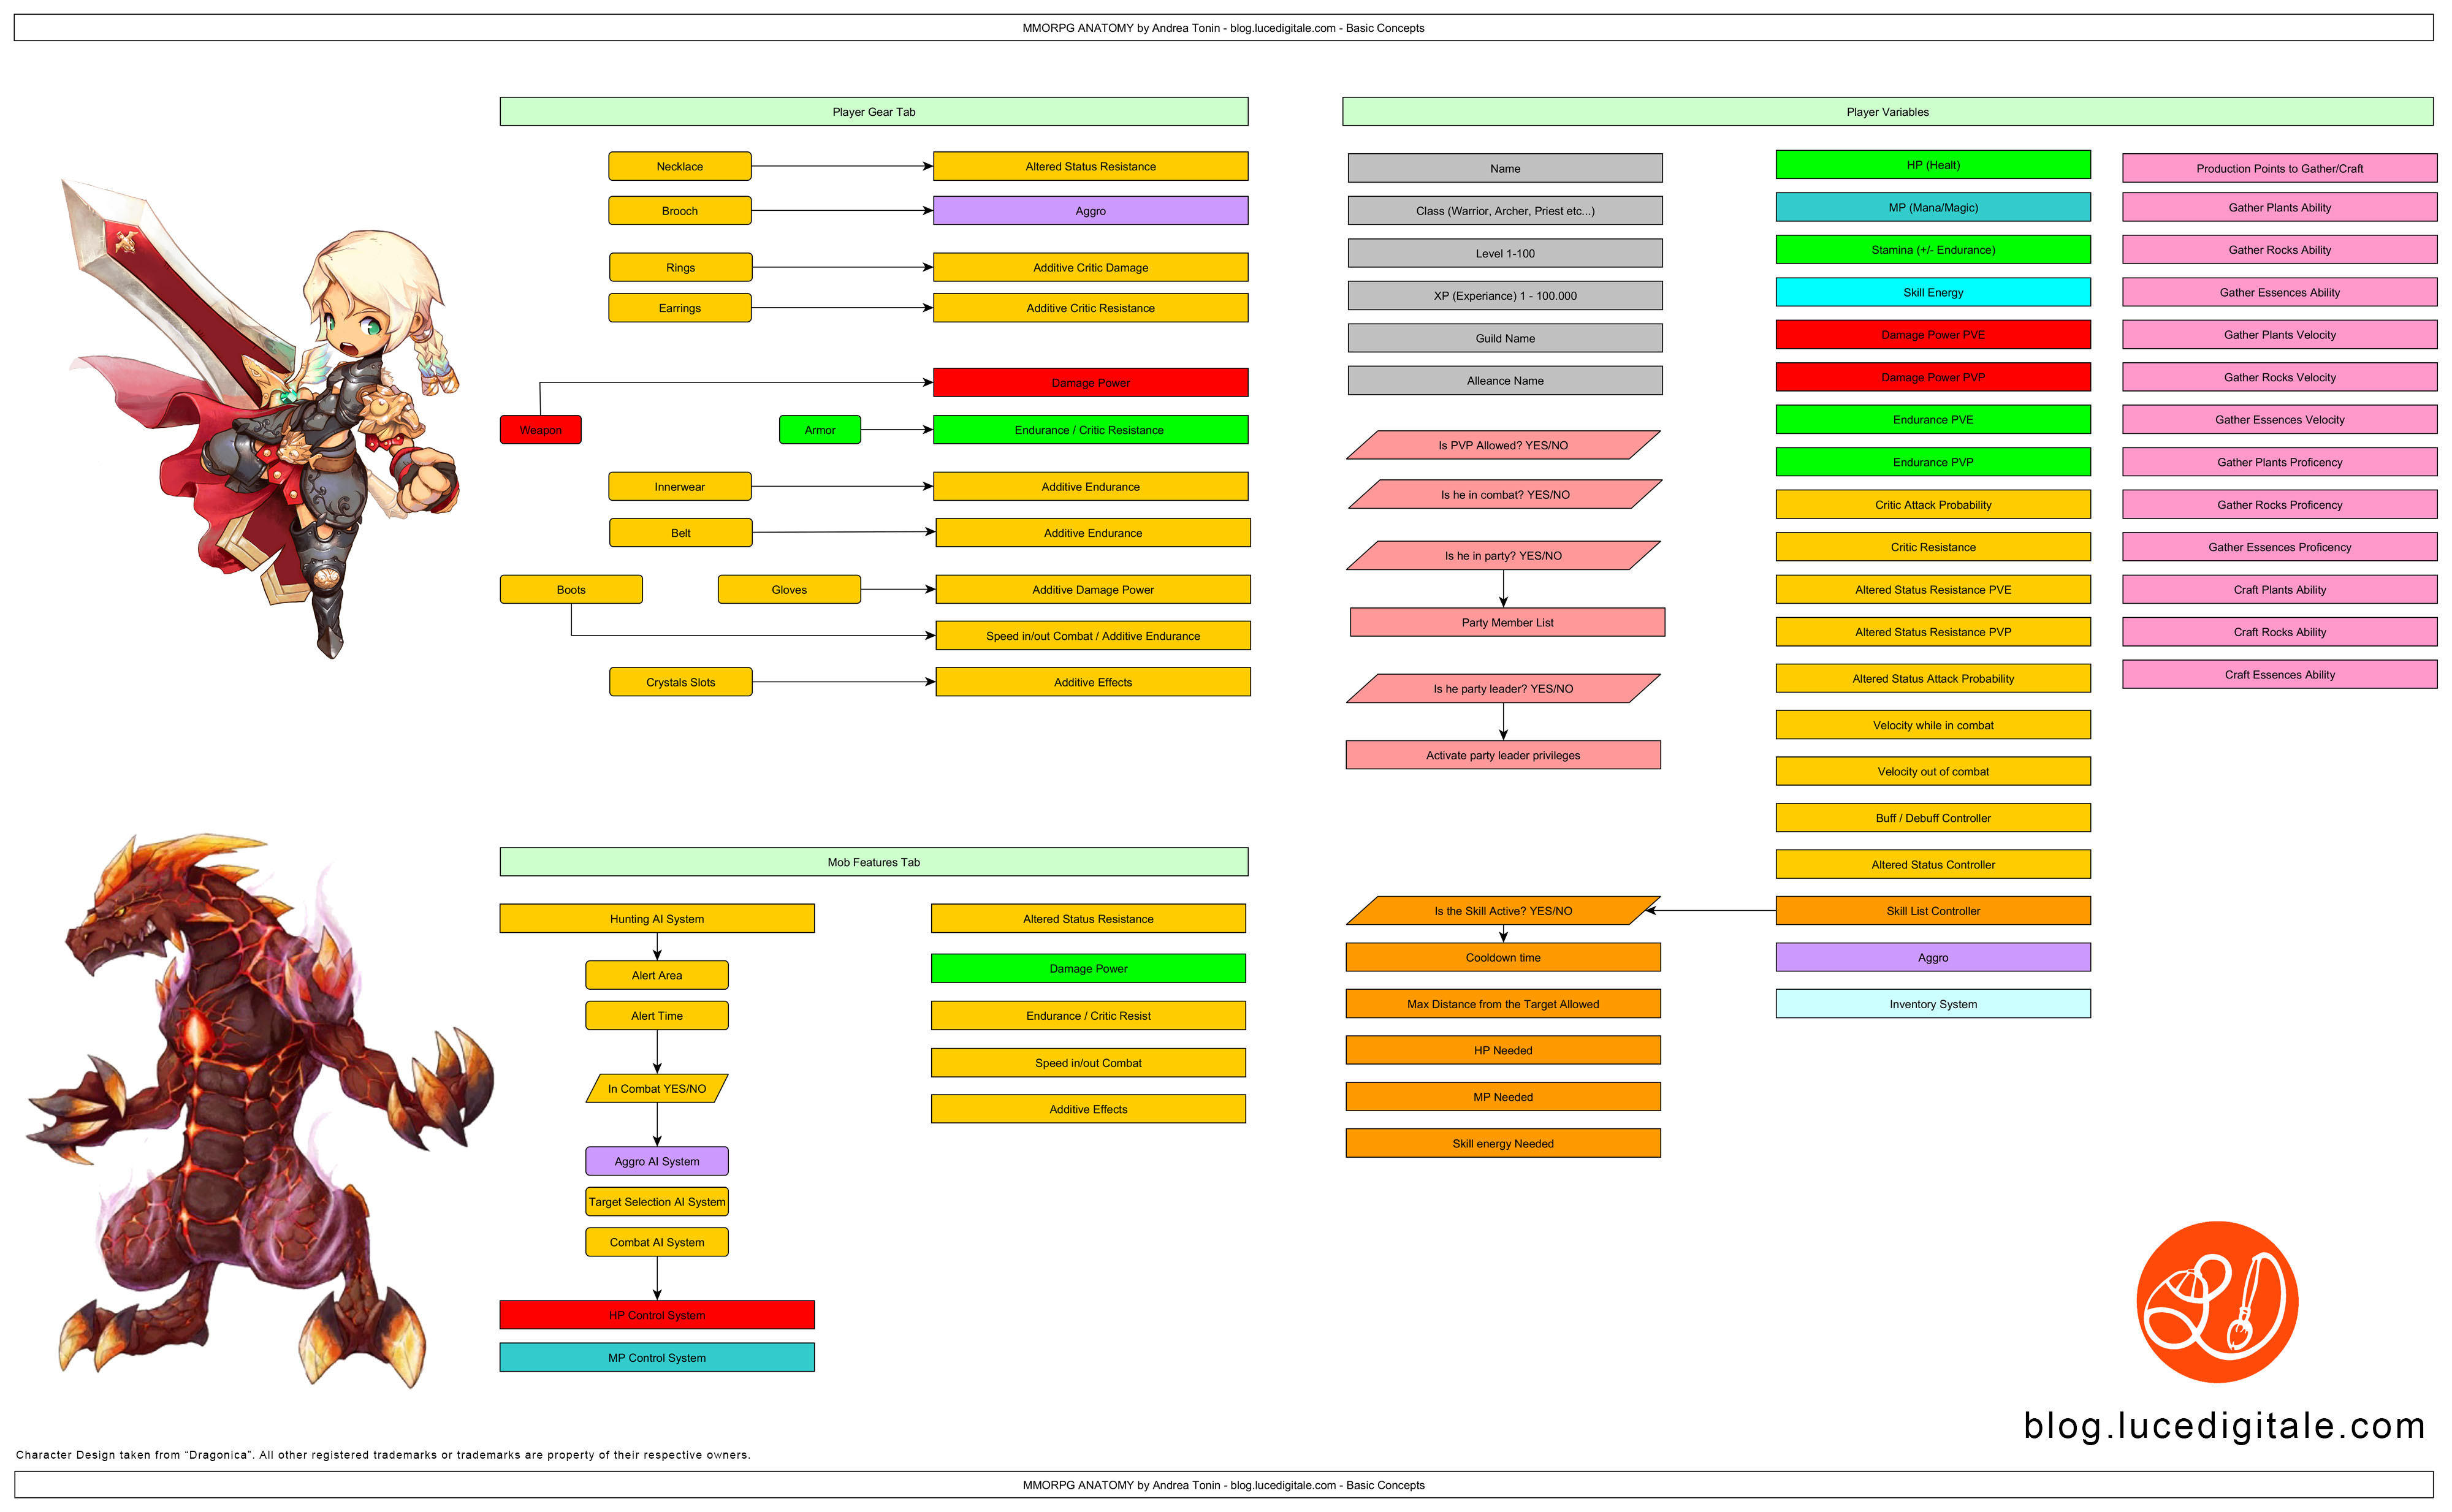
We have 2 protagonist: the player and the monster, this is the ultra basic concept, but it is not simple as it looks.

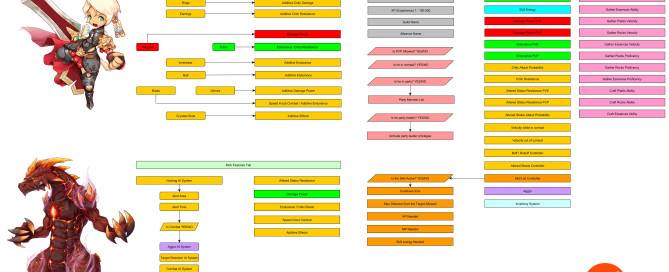
Click over the flow chart below:

mmorpg-anatomy-by-andrea-tonin-001

Classes

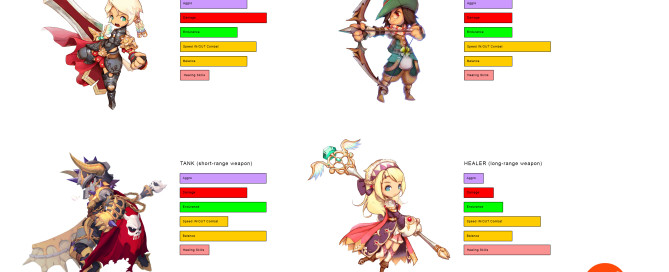
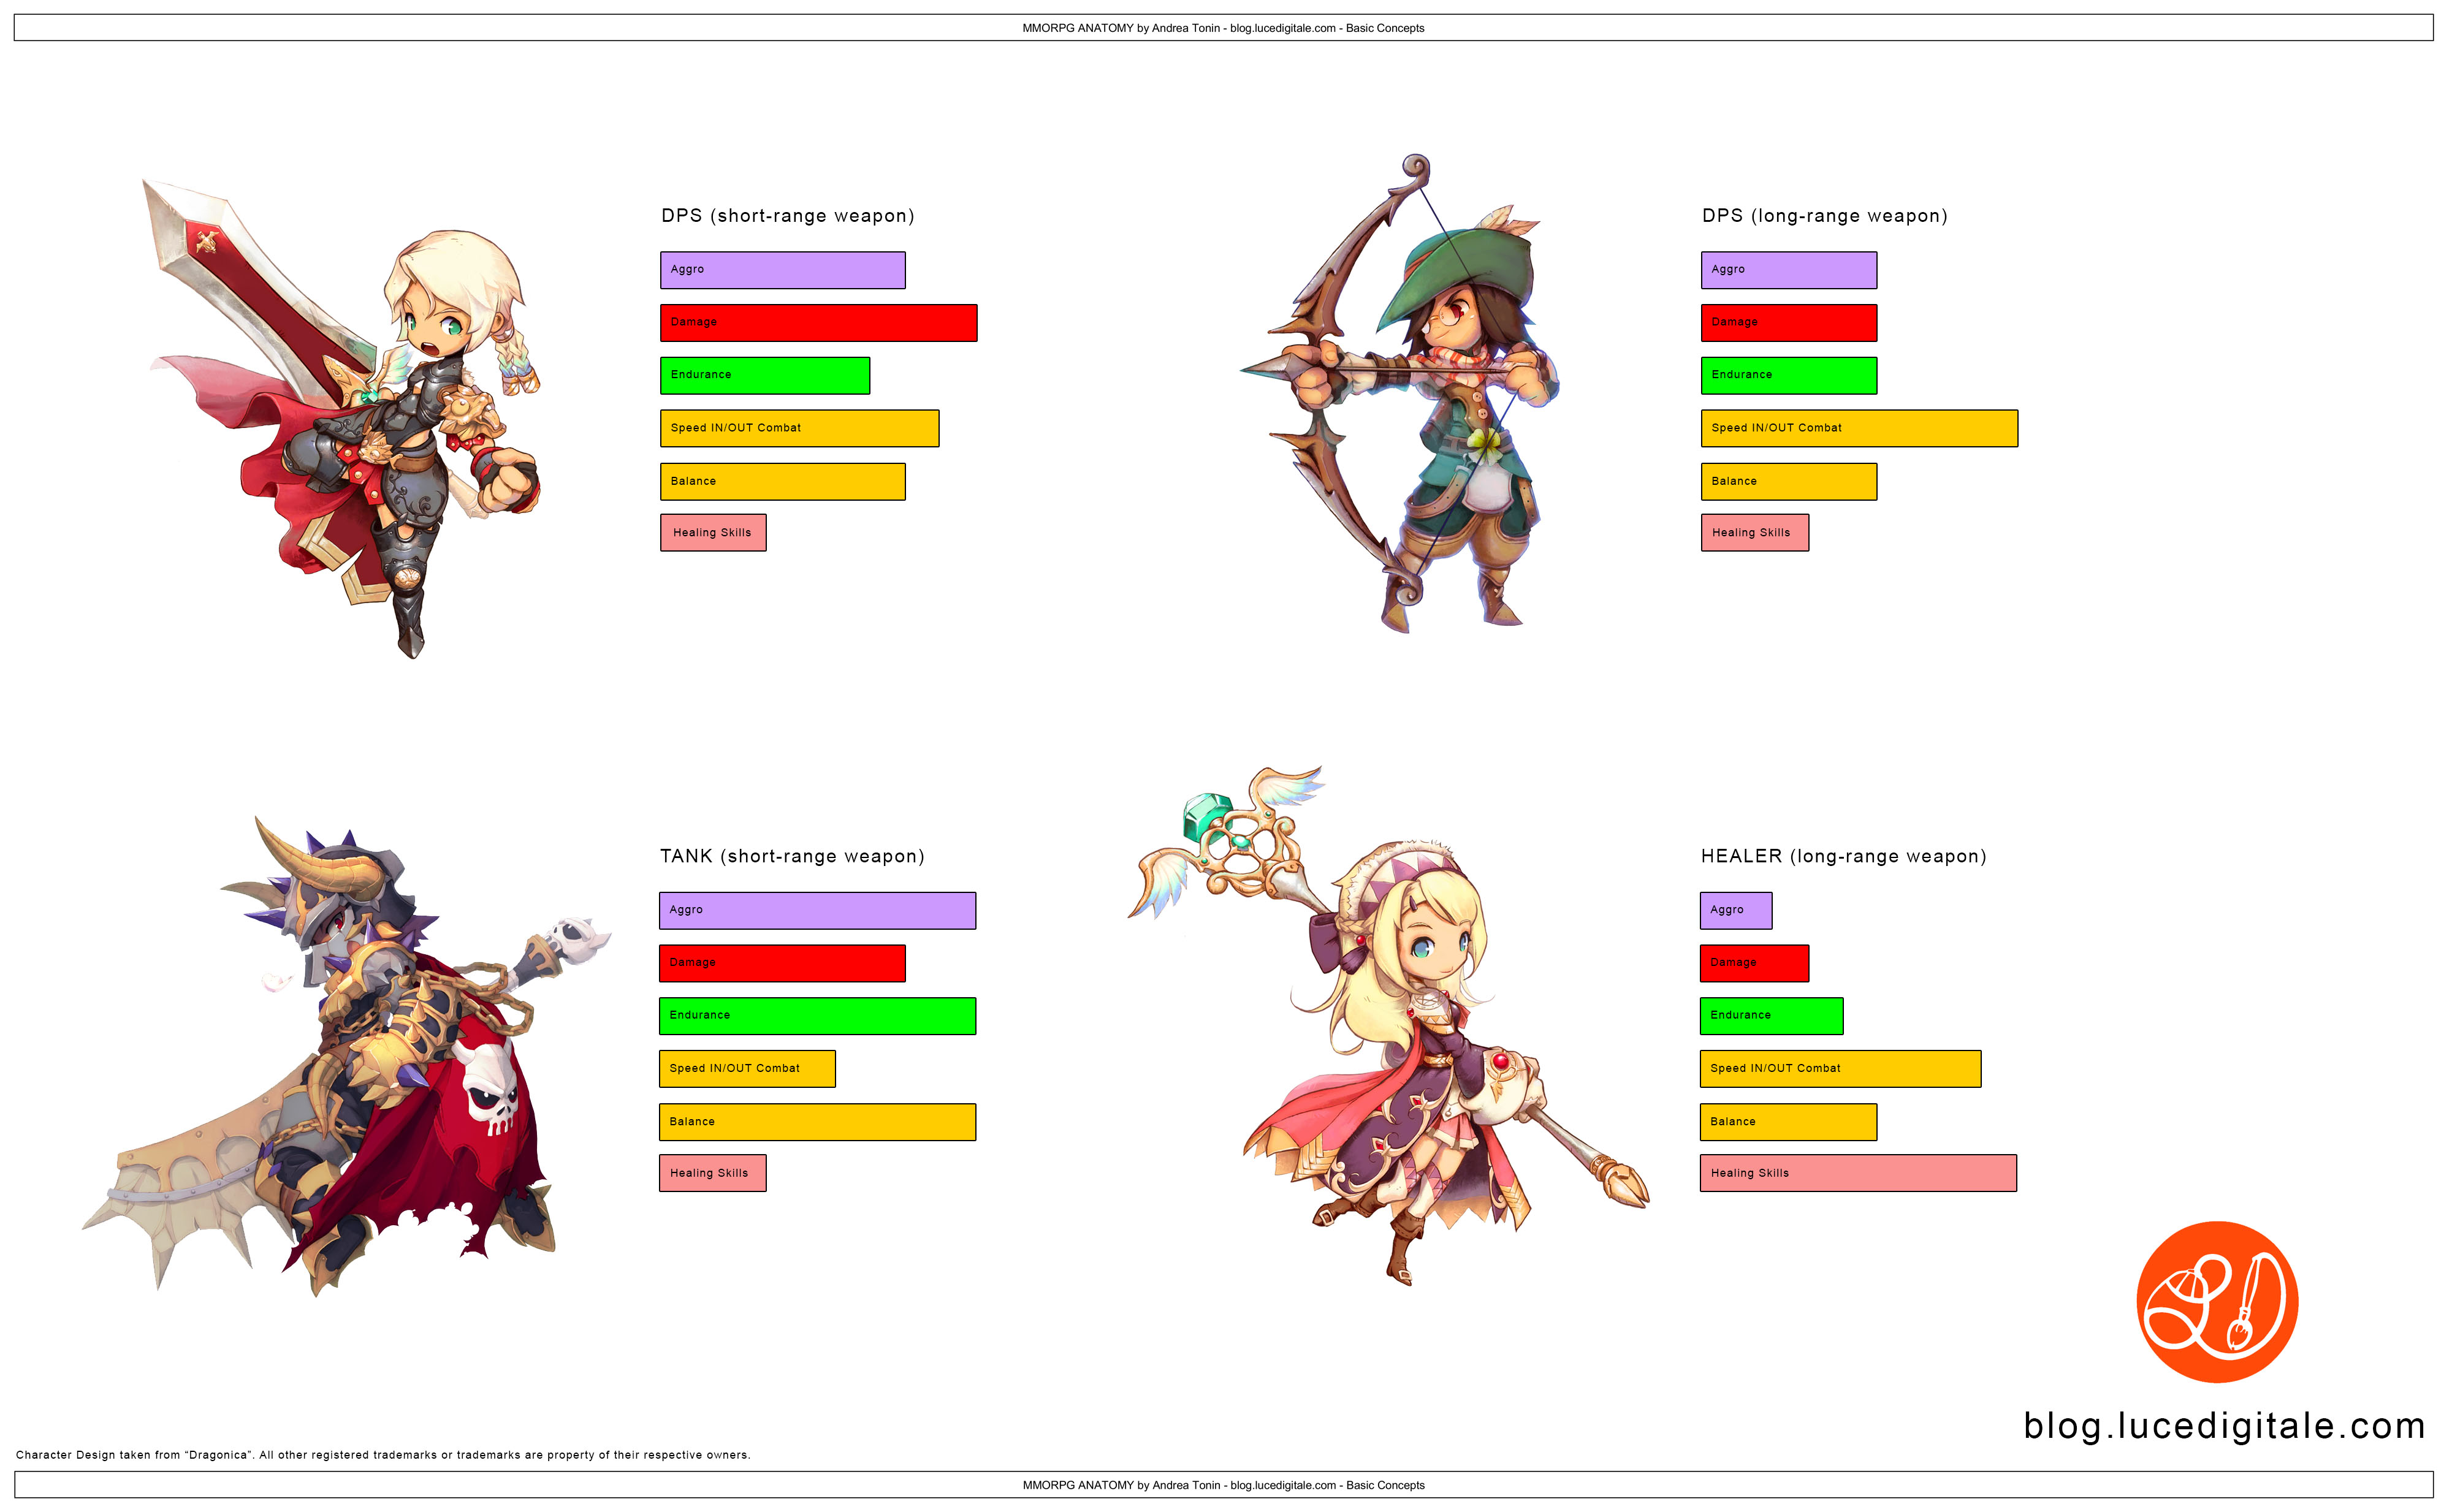
In a classic MMORPG there are 4 classes, every class has different skills and features.
This step is really important to understand because if you fail the character setup the game will be trash.
The right setup  is important to improve team play, strategies and general game play.

See the table below:

mmorpg-anatomy-by-andrea-tonin-002

I try to explain briefly:

1. DPS with short-range weapon, he deals great damage in a very short time. He has light leather armor, good endurance and good speed.

2. TANK. He wears heavy metal armor, he is slow while in combat but has great endurance. His main task is take aggro from monster and resist to frontal attacks to protect other party members.

3. DPS with long-range weapon, he deals good damage in a very short time. He has light leather armor, less endurance than DPS with melee weapon but he moves faster.

4. (Cute!) HEALER. She wears a cloth tunic, she has low endurance but can heal herself and, very important, others party members. Healer usually has buff and debuff ability.

Ok, these are main classes, after that you can imagine intermediate classes as Bersek, Assasin, Mistic, Gunner, Thief with unique abilities; the only limit is your fantasy! Remember that players like fine tuning and choose between a lot of characters and features!

Cast Time and Cool Down

MMORPG is not a Shoot’em Up, inside the game the player can’t spell 100 fire balls per second! He is not a heavy machine gun :/
We need setup inside our code a Cast Time, a Cool Down and a Skill Energy.
– Every magic/moves use an amount of Skill Energy per second.
– Cast Time is the time you need to spell a magic, or the time you need to lift your heavy sword to blow your foe. Light damage move needs low cast time, hight damage move needs long cast time.
– Cool Down is the wait time you need to repeat a move.

Press the key -> Cast Time counter -> Play Animation / Skill energy consumption -> Cool Down counter -> Press the key … and so on …

When player make a combo of moves he has to discover the better combination considering Damage/Cast Time/Cool Down/Skill Energy needed, it is very funny.
This gameplay rewads at the same time good reflex and tactics, it is like a chess game, but with more action :)

Combat Tactics

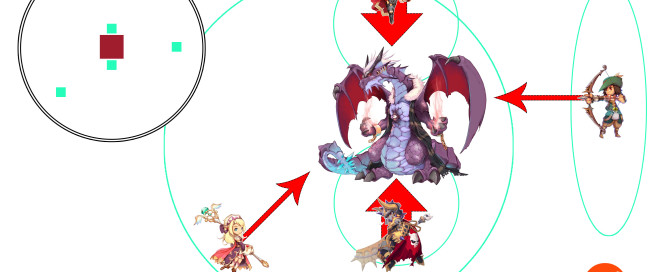
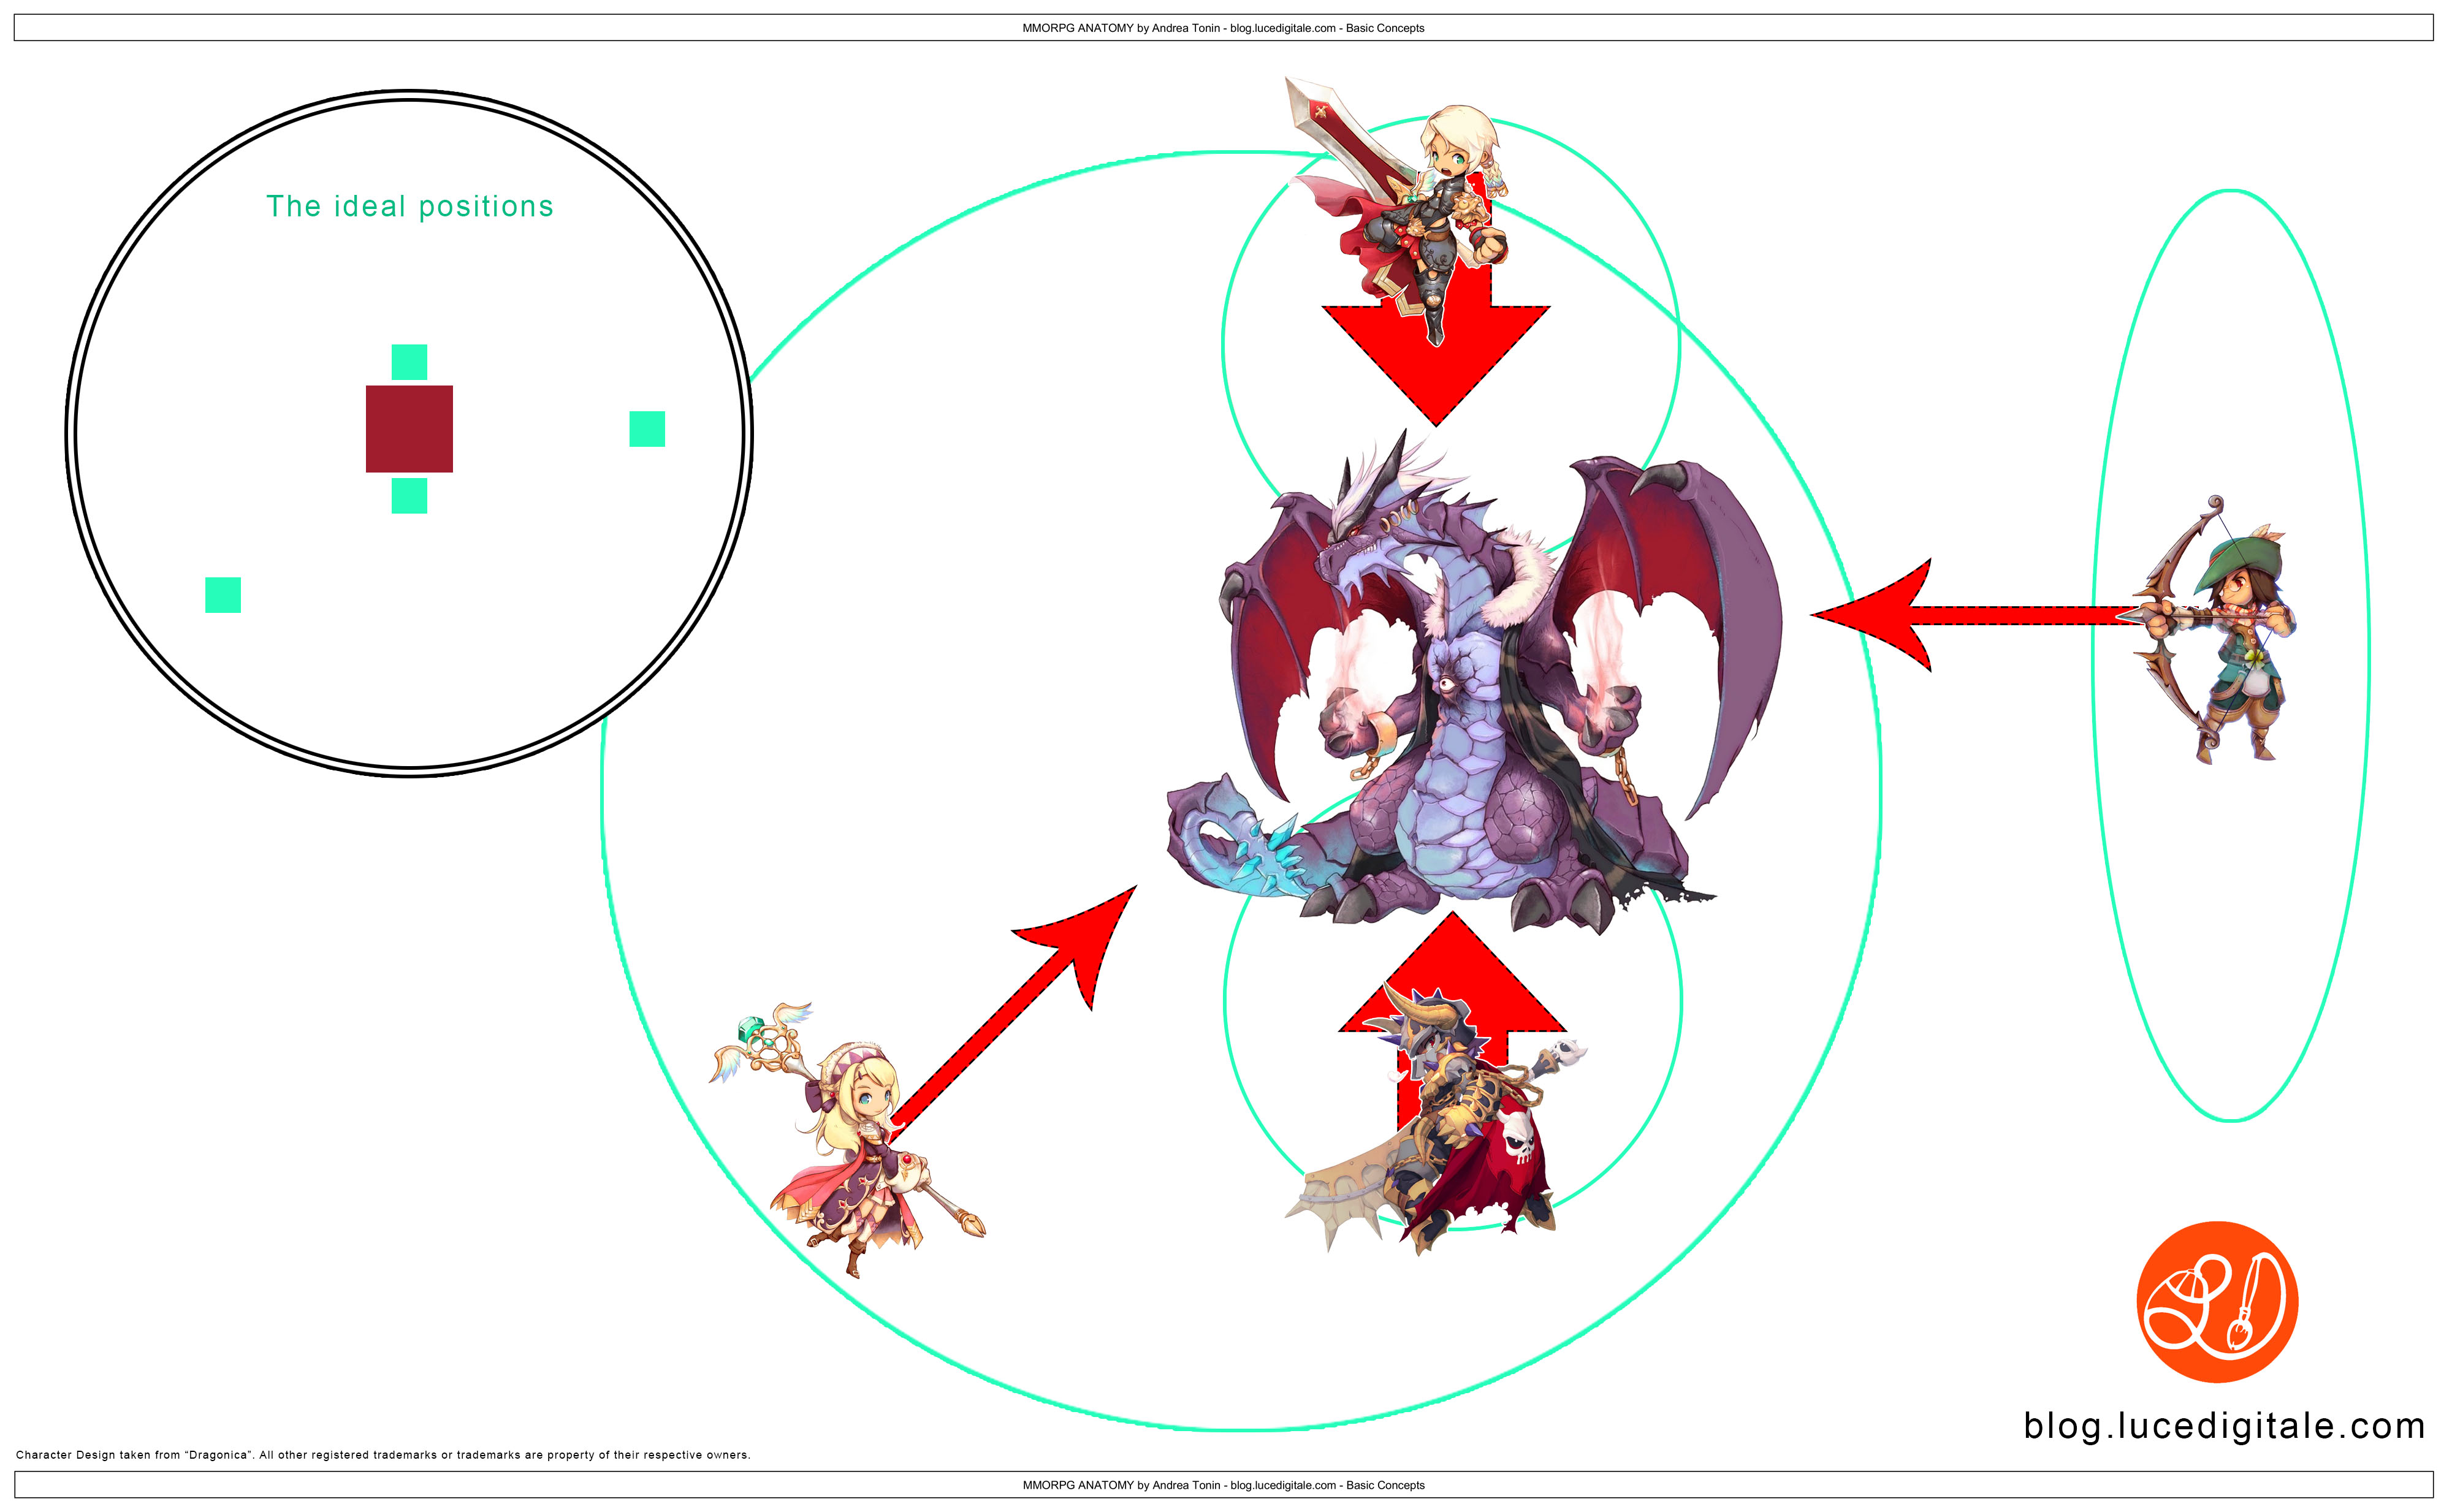
Understand the combact tactics is essential to create the AI for monsters in a MMORPG, you can see a simple example below:

mmorpg-anatomy-by-andrea-tonin-003

1. TANK takes Aggro to protect other party members and deals damage.
2. DPS with short-range weapon deals damage rear of the monster, to avoid frontal attacks.
3. DPS with long-range weapon deals damage far away of the monster, and support HEALER.
4. HEALER run a lot near and far away the monster to support all party members, also in her spare time, deals damage.

It is clear that our monster will need:
– long range attacks
– short range attacks
– global attacks to damage every party member at the same time.
– attacks to damage
– attacks to stun
– attacks to throwdown
– attacks to debuff
– special features

Next Time I will talk about AI for monsters.

Have a nice day

Andrea

Thanks to:
Roberto ‘Drago’ for the useful informations about general mmorpg gameplay
Chicca ‘Coccinella’, my favorite Priest/Healer 😛

By |Video Games Development|Commenti disabilitati su MMORPG Anatomy – Basic Concepts

Unity3D – Tutorials – UI – Button – OnClick

Unity3D – Tutorials – UI – Button – OnClick

This feature is avaiable for Unity3D 4.6 or above.

Create Objects

1. Open Unity3D and create:

– MAIN TOP MENU> GameObject> Camera, name it ‘Main Camera’
– MAIN TOP MENU> GameObject> UI> Canvas
– MAIN TOP MENU> GameObject> UI> Button, this will add an ‘EventSystem’ and Button will be child of Canvas

NOTICE: Canvas will be created inside Layer UI

NOTICE: In the Hierarchy there is:
– Canvas
-> Button (it is the child of Canvas)
->> Text (it is the child of Button)

Setup Viewports and Tools

2. 3D Viewport select orthographic X View
3. TOP LEFT> TOOLS> Canvas Manipulation icon
4. Game Viewport> 4:3

On Click() – Ready to use function

The UI Framework contains a powerful event system, let’s take a first look.

1. Hierarchy> select Button> Inspector> Button (Script)

> Interactable: check

> On Click> click on ‘+’ Add List

a. DRAG AND DROP The Main Camera over the empty slot

b. RIGHT ROLLOUT> GameObject> SetActive> uncheck (it means false)

c. Play and click the button to deactivate Main Camera

On Click() – Custom function

Elegible Functions

NOTICE: a function will be elegible if is – public void MyFunction() – and have none or 1 parameter.

public: deve essere pubblica, cioè poter essere letta al di fuori dello script originale
void: non restituisce un valore di ritorno, non ammette il comando – return –

The parameter can be in C#:

– public void MyFunction()
– public void MyFunction(float MyFloat)
– public void MyFunction(int myInt)
– public void MyFunction(string myString)
– public void MyFunction(bool myBool)
– public void MyFunction(Object myObject) -> Unity Object

The parameter can be in JS:

– public function MyFunction()
– public function MyFunction(float MyFloat)
– public function MyFunction(int myInt)
– public function MyFunction(string myString)
– public function MyFunction(bool myBool)
– public function MyFunction(Object myObject) -> Unity Object

1. Attacch to Main Camera MyCameraScript.js:


#pragma strict

function Start () {
}

public function MyFunction(){
Debug.Log ("Clicked!");
}

function Update () {
}

2. Hiearchy> select Button> Inspector> Button (Script)> OnClick()> DRAG AND DROP The Main Camera over the empty slot

3. RIGHT ROLLOUT> GameObject> MyCameraScript> MyFunction

4. Play and click the Button

By |Unity3D, Video Games Development|Commenti disabilitati su Unity3D – Tutorials – UI – Button – OnClick

Client-Server Communication Socket-Based in Videogames – Basic Concepts

Client-Server Communication Socket-Based in Videogames – Basic Concepts

What is a Client-Server Communication

Client-server is a request-response remote communication model that involves processes requesting services from other processes which offer these services via the network.
The processes offering services by executing certain tasks following remote process requests are known as servers. In general, the servers receive requests from remote processes, execute the tasks associated with these services, and dispatch responses back to the requesting entities. Example of services include database information retrieval and updates, file system access services, and dedicated user-application tasks.
The process that contact the servers and request them to perform services is known as Client

In general, Client processes manage user-interfaces, validate data entered by users, dispatch requests to servers, collect servers’ responses, and/or display the information received.

Client-Server Communication in Videogames

In the fantastic world of videogames development we find:

Client
It is the videogame, installed in your PC, Mobile Device or Web Player, generally:
– manage the user input
– manage local data as scores, lives etc…
– collect data from a database installed inside a Server and manage it inside the videogame

Server
It is the computer that stores (using for example MySQL) accounts, scores and others usefull datas for the gamer
If you play a MMORPG (Massive(ly) Multiplayer Online Role-Playing Game, you will see that the Server manages a lot af data and thousands of users in the same time.

Low Data Management

If you have to manage few users or only username and scores value, the server will not work hard, it is enough a communication like that:

Client (Videogame) -> PHP POST REQUEST -> Server with PHP+MySQL offers a service

High Data Management

You are in trouble, there are thousands of users that sends thousands of PHP POST in the same time.
Using the previus scheme we have:

Client1 (Videogame) -> PHP POST -> Server with PHP+MySQL offers a service
Client2 (Videogame) -> PHP POST -> Server with PHP+MySQL offers a service
Client3 (Videogame) -> PHP POST -> Server with PHP+MySQL offers a service
Client4 (Videogame) -> PHP POST -> Server with PHP+MySQL offers a service
Client5 (Videogame) -> PHP POST -> Server with PHP+MySQL offers a service
Client6 (Videogame) -> PHP POST -> Server with PHP+MySQL offers a service
Client7 (Videogame) -> PHP POST -> Server with PHP+MySQL offers a service
Client8 (Videogame) -> PHP POST -> Server with PHP+MySQL offers a service
Client9 (Videogame) -> PHP POST -> Server with PHP+MySQL offers a service
Client1000000 (Videogame) -> PHP POST REQUEST -> Server with PHP+MySQL offers a service …-> CRASH OF THE SYSTEM!!!

The solution are:

1. Use of SSD (Solid State Drive) instead ad traditional Hard Driver
2. Use of one or more dedicated servers, not sharing IP or low-end hosting solution admitted!
3. Use of Client-Server Communication Socket-Based

The Client-Server Communication Socket-Based is:

Client1 (Videogame) -> PHP POST -> | |
Client2 (Videogame) -> PHP POST -> | |
Client3 (Videogame) -> PHP POST -> | |
Client4 (Videogame) -> PHP POST -> | |
Client5 (Videogame) -> PHP POST -> | Socket manage REQUEST | -> Server with PHP+MySQL offers a service
Client6 (Videogame) -> PHP POST -> | (Multithreaded) |
Client7 (Videogame) -> PHP POST -> | |
Client8 (Videogame) -> PHP POST -> | |
Client9 (Videogame) -> PHP POST -> | |

With WebSockets you can transfer as much data as you like without incurring the overhead associated with traditional HTTP requests. Data is transferred through a WebSocket as messages, each of which consists of one or more frames containing the data you are sending (the payload).

To run a WebSocket you need a DEDICATED IP, no SHARED IP are allowed, because you will setup your own IP and listening ports.

A popular software to create a WebSocket is Node.js (http://nodejs.org/).

WebSoscket inside a SHARED IP

You can run Node.js in a shared host using CGI-Node (http://www.cgi-node.org/).
‘CGI-Node’ is a CGI adaptor for node.js that mimmicks the Node.js http library.

Low Latency Client-Server and Server-Client Connections

Around 2005, AJAX started to make the web feel more dynamic. Still, all HTTP communication was steered by the client, which required user interaction or periodic polling to load new data from the server.

One of the most common hacks to create the illusion of a server initiated connection is called long polling. With long polling, the client opens an HTTP connection to the server which keeps it open until sending response. Long polling and the other techniques work quite well. You use them every day in applications such as GMail chat.

However, all of these work-arounds share one problem: They carry the overhead of HTTP, which doesn’t make them well suited for low latency applications. Think multiplayer first person shooter games in the browser or any other online game with a realtime component.

The WebSocket (http://dev.w3.org/html5/websockets/) specification defines an API establishing “socket” connections between a web browser and a server. In plain words: There is an persistent connection between the client and the server and both parties can start sending data at any time over a single TCP channel.

WebSocket give you a bidirectional communication technology for web apps for:
IE 10 or over
Firefox 33 or over
Chrome 31 or over
Safari 7.1 or over
Opera 26 or over
iOS Safari 7.1 or over
Android Browser 4.4 or over
Chrome for Android 39 or over

What it means single TCP Channel?

The Transmission Control Protocol (TCP) is one of the core protocols of the Internet protocol suite (IP), and is so common that the entire suite is often called TCP/IP.

IP works by exchanging pieces of information called packets. A packet is a sequence of bytes and consists of a header followed by a body. The header describes the packet’s source, destination and control information. The body contains the data IP is transmitting. The size of one IP packet is 65535 bytes (63.99902 Kbyte or 0.0625 Mbyte).

Due to network congestion, traffic load balancing, or other unpredictable network behavior, IP packets can be lost, duplicated, or delivered out of order. TCP detects these problems, requests retransmission of lost data, rearranges out-of-order data, and even helps minimize network congestion to reduce the occurrence of the other problems.

TCP is utilized extensively by many of the Internet’s most popular applications, including the World Wide Web (WWW), E-mail, File Transfer Protocol, Secure Shell, peer-to-peer file sharing, and some streaming media applications.
TCP is optimized for accurate delivery rather than timely delivery, and therefore, TCP sometimes incurs relatively long delays (on the order of seconds) while waiting for out-of-order messages or retransmissions of lost messages. It is not particularly suitable for real-time applications such as Voice over IP. For such applications, protocols like the Real-time Transport Protocol (RTP) running over the User Datagram Protocol (UDP) are usually recommended instead.

Ready to use solutions

Setup a server is very expensive, sometimes the budget and the time we can spend to develop is not enought to do that.
In the market there are some ready to use platforms to build multiplayer games.

Photon Cloud

https://www.exitgames.com

Photon Cloud is available globally to guarantee low latency and shortest round-trip times for your multiplayer games worldwide.
Distributed worldwide Photon Cloud scales seamless and automatically even for tens of thousands of concurrent users.

Customers: from indie to AAA

Support:

– Unity3D (check Unity3D Asset Store also)
– iOS
– Android
– Win8
– Unreal4
– Cocos
– HTML5
– Flash
– Marmalade
– Corona

– Realtime Multiplayer
– Turn Based Games
– Chat

App Warp

http://appwarp.shephertz.com/

Powerful, yet simple to use cloud platform for massively multiplayer realtime games

Customers: from indie to AAA

Support:

– Unity3D
– iOS
– Android
– Win8
– Unreal4
– Cocos
– HTML5
– Flash
– Marmalade
– Corona
– J2me SDK
– andengine
– Starlink SDK
– Fixel SDK
– Sencha SDK

Game Cloud

http://game-cloud.org/

Using our advanced technology we reduce the traffic to the player allowing large number of players to connect even on slow (mobile) networks without lagging

Support:

– Unity3D (Build for Unity3D integrated into Unity Editor Tools)
– Win 8
– Android
– Mac OS
– Linux
– Playstation
– XBox 360
– Wii
– iOS
– Browsers

Gamooga

http://www.gamooga.com/

State-of-art realtime backend for your apps/games that guarantees under 1ms response time. None of our competitiors can beat us here!

Support:

– Unity3D
– HTML5
– iOS
– Android
– Falsh
– Marmalade

Gamespark

http://www.gamesparks.com/

GameSparks ensures you keep your costs to a minimum whether they be intial set-up or recurring fees

Support:

– Unity3D
– Unreal 4
– iOS
– Android
– Falsh
– Marmalade

My official website: http://www.lucedigitale.com

References:

– Server Side Score
http://www.lucedigitale.com/blog/unity-3d-server-side-highscores-js-programming/

– Advanced Network Programming – Principles and Techniques (By Bogdan Ciubotaru, Gabriel-Miro Muntean)

– http://www.html5rocks.com/en/tutorials/websockets/basics/ (By Malte Ubl and Eiji Kitamura)

– http://caniuse.com/#feat=websockets

By |Video Games Development|Commenti disabilitati su Client-Server Communication Socket-Based in Videogames – Basic Concepts