gamedev

C++ Pointers

C++ Pointers

For a C++ program, the memory of a computer is like a succession of memory cells, each one byte in size, and each with a unique address. These single-byte memory cells are ordered in a way that allows data representations larger than one byte to occupy memory cells that have consecutive addresses.

When a variable is declared, its value is assigned to a specific location in memory (its memory address)

With pointers you can use dynamic memory (heap) instead of static memory (stack) only. Using pointers the visibility of a variable will be position indipendent.

(&) address of… – (*) dereference operator

...
myvar = 25;  // the value of this var is 25
foo = &myvar;// example: the address of myvar is memory address 1776
bar = myvar; // bar is 25
baz = *foo;  // baz equal to value pointed to by foo (25) 
...

Workink example:


// my first pointer
#include <iostream>
using namespace std;

int main ()
{
  int firstvalue, secondvalue; // declaring variables
  int * mypointer;             // declaring pointer wuth asterisk

  mypointer = &firstvalue;
  *mypointer = 10;

  mypointer = &secondvalue;
  *mypointer = 20;

  cout << "firstvalue is " << firstvalue << '\n';
  cout << "secondvalue is " << secondvalue << '\n';
  return 0;
}

Ther result is:
10
20

For italian people: come funziona?
1. dichiaro le variabili firstvalue, secondvalue; -> il sistema operativo assegna loro un indirizzo di memoria
2. dichiaro il puntatore usando *mypointer
3. il puntatore ‘punta’ all’indirizzo di firstvalue e gli assegna un valore di 10
4. LO STESSO PUNTATORE ‘punta’ all’indirizzo di secondvalue e gli assegna un valore di 20
5. Ora firstvalue=10 e secondvalue=20

Example:


// more pointers
#include <iostream>
using namespace std;

int main ()
{
  int firstvalue = 5, secondvalue = 15;
  int * p1, * p2;

  p1 = &firstvalue;  // p1 = address of firstvalue
  p2 = &secondvalue; // p2 = address of secondvalue
  *p1 = 10;          // value pointed to by p1 = 10
  *p2 = *p1;         // value pointed to by p2 = value pointed by p1
  p1 = p2;           // p1 = p2 (value of pointer is copied)
  *p1 = 20;          // value pointed by p1 = 20
  
  cout << "firstvalue is " << firstvalue << '\n';
  cout << "secondvalue is " << secondvalue << '\n';
  return 0;
}

The result is:
firstvalue is 10
secondvalue is 20

Arrays and Pointers

Example with an array:


// more pointers
#include <iostream>
using namespace std;

int main ()
{
  int numbers[5];
  int * p;
  p = numbers;  *p = 10;
  p++;  *p = 20;
  p = &numbers[2];  *p = 30;
  p = numbers + 3;  *p = 40;
  p = numbers;  *(p+4) = 50;
  for (int n=0; n<5; n++)
    cout << numbers[n] << ", ";
  return 0;
}

The result is:
10, 20, 30, 40, 50,

Const

Keyword ‘const’ declares pointers that can access the pointed value to read it, but not to modify it.

...
int x;
int y = 10;
const int * p = &y;
x = *p;          // ok: reading p
*p = x;          // error: modifying p, which is const-qualified 
...

Working example:


// pointers as arguments:
#include <iostream>
using namespace std;

void increment_all (int* start, int* stop)
{
  int * current = start;
  while (current != stop) {
    ++(*current);  // increment value pointed
    ++current;     // increment pointer
  }
}

void print_all (const int* start, const int* stop)
{
  const int * current = start;
  while (current != stop) {
    cout << *current << '\n';
    ++current;     // increment pointer
  }
}

int main ()
{
  int numbers[] = {10,20,30};
  increment_all (numbers,numbers+3);
  print_all (numbers,numbers+3);
  return 0;
}

The result is:
11
21
31

Pointers can also be themselves const:

...
int x;
      int *       p1 = &x;  // non-const pointer to non-const int
const int *       p2 = &x;  // non-const pointer to const int
      int * const p3 = &x;  // const pointer to non-const int
const int * const p4 = &x;  // const pointer to const int 
...
const int * p2a = &x;  //      non-const pointer to const int
int const * p2b = &x;  // also non-const pointer to const int 
...

Pointers and string literals

const char * foo = "hello"; 

Address Value
1702 h
1703 e
1704 l
1705 l
1706 o
1707 \0

Pointers to Pointers

C++ allows the use of pointers that point to pointers, the syntax simply requires an asterisk (*) for each level of indirection in the declaration of the pointer:


char a;
char * b;  // pointer to variable, one asterisk
char ** c; // pointer to pointer , two asterisk
a = 'z';
b = &a;
c = &b;

Void (privo) Pointers

Void pointers are pointers that point to a value that has no type.


// increaser
#include <iostream>
using namespace std;

void increase (void* data, int psize)
{
  if ( psize == sizeof(char) )
  { char* pchar; pchar=(char*)data; ++(*pchar); }
  else if (psize == sizeof(int) )
  { int* pint; pint=(int*)data; ++(*pint); }
}

int main ()
{
  char a = 'x';
  int b = 1602;
  increase (&a,sizeof(a)); // sizeof: the number of bytes required to represent the type.
  increase (&b,sizeof(b));
  cout << a << ", " << b << '\n';
  return 0;
}

The result is:
y, 1603

Null Pointers

Sometimes, a pointer really needs to explicitly point to nowhere, and not just an invalid address.


// null pointers
int * p = 0;
int * q = nullptr;

Pointers to Functions

The typical use of this is for passing a function as an argument to another function.
The name of the function is enclosed between parentheses () and an asterisk (*) is inserted before the name.


// pointer to functions
#include <iostream>
using namespace std;

int addition (int a, int b)
{ return (a+b); }

int subtraction (int a, int b)
{ return (a-b); }

int operation (int x, int y, int (*functocall)(int,int))
{
  int g;
  g = (*functocall)(x,y);
  return (g);
}

int main ()
{
  int m,n;

  // passing a function as an argument to another function
  int (*minus)(int,int) = subtraction;

  m = operation (7, 5, addition);
  n = operation (20, m, minus);
  cout <<n;
  return 0;
}

The result is: 8

For italian peolple: come funziona?
1. m = operation (7, 5, addition); -> int operation (int x, int y, int (*functocall)(int,int))
passiamo i valori 7, 5 e la funzione da richiamare

2. g = (*functocall)(x,y);
richiama la funzione addition inviando i valori 7 e 5 -> il valore sarà m= 12

3. n = operation (20, m, minus); dove -> int (*minus)(int,int) = subtraction;
passiamo i valori 20, 12 e la funzione substraction -> il valore sarà 20-8= 12

My website: http://www.lucedigitale.com

Reference: http://en.wikipedia.org/wiki/Sizeof
Reference: http://www.cplusplus.com/doc/tutorial/pointers/

By |C++, Video Games Development|Commenti disabilitati su C++ Pointers

C++ Array of Characters

C++ Array of Characters

We can represent a text string as plain arrays of elements of a character type.

Inizialization:

...
char myword[] = { 'H', 'e', 'l', 'l', 'o', '\0' };
...
char myword[] = "Hello"; 
...
myword[0] = 'B';
myword[1] = 'y';
myword[2] = 'e';
myword[3] = '\0';
...

Working example:

// strings and NTCS:
#include <iostream>
#include <string>
using namespace std;

int main ()
{
  char question1[] = "What is your name? ";
  string question2 = "Where do you live? ";
  char answer1 [80];
  string answer2;
  cout << question1;
  cin >> answer1;
  cout << question2;
  cin >> answer2;
  cout << "Hello, " << answer1;
  cout << " from " << answer2 << "!\n";
  return 0;
}

The result is:
What is your name? Homer
Where do you live? Greece
Hello, Homer from Greece!

By |C++, Video Games Development|Commenti disabilitati su C++ Array of Characters

C++ Arrays

C++ Arrays

Inizialization


// Inizialization samples:
int foo [5];

int foo [5] = { 16, 2, 77, 40, 12071 }; 

int bar [5] = { 10, 20, 30 };

int bar [5] = { };

// They are equivalent
int foo[] = { 10, 20, 30 };
int foo[] { 10, 20, 30 }; 

Store – Access


// Store
foo [2] = 75;

// Access
x = foo[2];

Operations


foo[0] = a;
foo[a] = 75;
b = foo [a+2];
foo[foo[a]] = foo[2] + 5;

Multidimensional Arrays

Multidimensional arrays can be described as “arrays of arrays”.


int jimmy [3][5];   // is equivalent to
int jimmy [15];     // (3 * 5 = 15)  

Arrays as parameters

At some point, we may need to pass an array to a function as a parameter.


// arrays as parameters
#include <iostream>
using namespace std;

void printarray (int arg[], int length) {
  for (int n=0; n<length; ++n)
    cout << arg[n] << ' ';
  cout << '\n';
}

int main ()
{
  int firstarray[] = {5, 10, 15};
  int secondarray[] = {2, 4, 6, 8, 10};
  printarray (firstarray,3);
  printarray (secondarray,5);
}

The result is:
5 10 15
2 4 6 8 10

Library Array

C++ provides an alternative array type as a standard container.


#include <iostream>
#include <array>
using namespace std;

int main()
{
  array<int,3> myarray {10,20,30};

  for (int i=0; i<myarray.size(); ++i)
    ++myarray[i];

  for (int elem : myarray)
    cout << elem << '\n';
}

Reference: http://www.cplusplus.com/doc/tutorial/arrays/

By |C++, Video Games Development|Commenti disabilitati su C++ Arrays

C++ – Name Visibility – Namespace – Using

C++ – Name Visibility – Namespace – Using

Name Visibility

Named entities, such as variables, functions, and compound types need to be declared before being used in C++.

– An entity declared outside any block has global scope, meaning that its name is valid anywhere in the code.

– An entity declared within a block, such as a function or a selective statement, has block scope, and is only visible within the specific block in which it is declared.


int foo;        // global variable

int some_function ()
{
  int bar;      // local variable
  bar = 0;
}

int other_function ()
{
  foo = 1;  // ok: foo is a global variable
  bar = 2;  // wrong: bar is not visible from this function
}

Example:


// inner block scopes
#include <iostream>
using namespace std;

int main () {
  int x = 10;
  int y = 20;
  {
    int x;   // ok, inner scope.
    x = 50;  // sets value to inner x
    y = 50;  // sets value to (outer) y
    cout << "inner block:\n";
    cout << "x: " << x << '\n';
    cout << "y: " << y << '\n';
  }
  cout << "outer block:\n";
  cout << "x: " << x << '\n';
  cout << "y: " << y << '\n';
  return 0;
}

The result is:
inner block:
x: 50
y: 50
outer block:
x: 10
y: 50

Namespaces

Namespaces allow us to group named entities that otherwise would have global scope into narrower scopes, giving them namespace scope. This allows organizing the elements of programs into different logical scopes referred to by names.

The syntax is:

...
namespace myNamespace
{
  int a, b;
}
...
// Access at variables with:
myNamespace::a
myNamespace::b
...

Working example:


// namespaces
#include <iostream>
using namespace std;

namespace foo
{
  int value() { return 5; }
}

namespace bar
{
  const double pi = 3.1416;
  double value() { return 2*pi; }
}

int main () {
  cout << foo::value() << '\n';
  cout << bar::value() << '\n';
  cout << bar::pi << '\n';
  return 0;
}

The result is:
5
6.2832
3.1416

Using

The keyword using introduces a name into the current declarative region (such as a block), thus avoiding the need to qualify the name.


// using
#include <iostream>
using namespace std;

namespace first
{
  int x = 5;
  int y = 10;
}

namespace second
{
  double x = 3.1416;
  double y = 2.7183;
}

int main () {
  using first::x;
  using second::y;
  cout << x << '\n';
  cout << y << '\n';
  cout << first::y << '\n';
  cout << second::x << '\n';
  return 0;
}

The result is:
5
2.7183
10
3.1416

The keyword using can also be used as a directive to introduce an entire namespace:


// using
#include <iostream>
using namespace std;

namespace first
{
  int x = 5;
  int y = 10;
}

namespace second
{
  double x = 3.1416;
  double y = 2.7183;
}

int main () {
  using namespace first;
  cout << x << '\n';
  cout << y << '\n';
  cout << second::x << '\n';
  cout << second::y << '\n';
  return 0;
}

The result is:
5
10
3.1416
2.7183

‘using’ and ‘using namespace’ have validity only in the same block in which they are stated or in the entire source code file if they are used directly in the global scope. For example, it would be possible to first use the objects of one namespace and then those of another one by splitting the code in different blocks:


// using namespace example
#include <iostream>
using namespace std;

namespace first
{
  int x = 5;
}

namespace second
{
  double x = 3.1416;
}

int main () {
  {
    using namespace first;
    cout << x << '\n';
  }
  {
    using namespace second;
    cout << x << '\n';
  }
  return 0;
}

The result is:
5
3.1416

Reference: http://www.cplusplus.com/doc/tutorial/namespaces/

By |C++, Video Games Development|Commenti disabilitati su C++ – Name Visibility – Namespace – Using

Unreal Game Engine – Blueprints – Flashing Light

Unreal Game Engine – Blueprints – Flashing Light

1. LEFT COLUMN> Content Browser> RMB over a Mesh (example Floor_400x400)> Create Blueprint Using…> select your ‘Blueprints’ folder> give it the name (example Floor_400x400_Blueprint)

2. Blueprint window> TOP RIGHT> Components> WHELL MOUSE BUTTON to zoom in/out

3. Blueprint window> MAIN TOP MENU> Window> Components> Add Component> Point Light> move the Point Light over the Mesh

4. Blueprint window> TOP RIGHT> Graph> you can see component on the RIGHT COLUMN: – PointLight1 – StaticMesh1

5. Blueprint window> TOP RIGHT> Graph> RMB over an Empty Area> Add Timeline

6. DOUBLE CLICK Timeline box> Timeline window> Add Float Track

7. Float Track> TOP LEFT> name the track ‘Brightness’

8. Float Track> TOP> Length> 1 second

9. Float Track> RMB over empty area> Add Key: 0 sec->0 / 0.5 sec->5.000 / 1->0

10. Float Track> TOP> check Autoplay and Loop

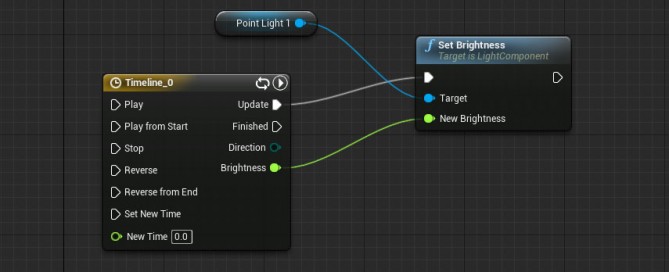
11. Event Graph> RIGHT COLUMN> DRAG AND DROP PointLight1 over an empty area> Get (to add Point Light block)

12. Event Graph> DRAG from Point Light to an empty area> Set Brightness (to add Set Brightness block)

13. Event Graph> DRAG from Timeline>Update to set Brightness>exec

14. Unreal Editor> Content Browser> Blueprint folder> ‘Floor_400x400_Blueprint’ DRAG AND DROP into scene

15. Play

unreal-blueprints-flashing-light

For italian people: come funziona?

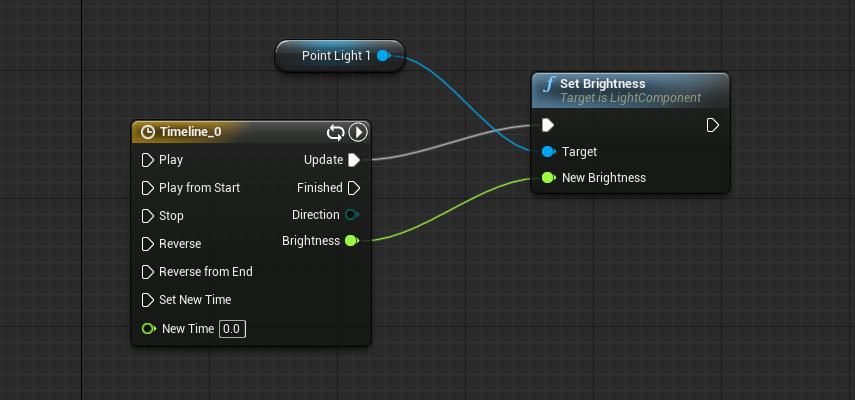
1. Timeline>Update —> Set Brighness: esegue un update continuo di Set Brightness ad ogni fotogramma

2. Timeline>Brightness —> New Brighness: fornisce il valore variabile nel tempo Brightness

3. SetBrightness>Target —> Point Light 1: setta la luminosità di Point Light 1

By |Unreal Engine, Video Games Development|Commenti disabilitati su Unreal Game Engine – Blueprints – Flashing Light