indiegamedev

C++ – Operators

C++ – Operators

Assignment


// assignment operator
#include <iostream>
using namespace std;

int main ()
{
  int a, b;         // a:?,  b:?
  a = 10;           // a:10, b:?
  b = 4;            // a:10, b:4
  a = b;            // a:4,  b:4
  b = 7;            // a:4,  b:7

  cout << "a:";
  cout << a;
  cout << " b:";
  cout << b;
}

Arithmetic operators


...	
y = 2 + (x = 5);
...
x = 5;
y = 2 + x;
...
x = y = z = 5;
...

On C++ you can use:

+ addition
– subtraction
* multiplication
/ division
% modulo

Compound assignment


// compound assignment operators
#include <iostream>
using namespace std;

int main ()
{
  int a, b=3;
  a = b;
  a+=2;             // equivalent to a=a+2
  cout << a;
}

Increment and decrement

...
++x;
x+=1;
x=x+1;
...

Relational and comparison operators

...
(7 == 5)     // evaluates to false
(5 > 4)      // evaluates to true
(3 != 2)     // evaluates to true
(6 >= 6)     // evaluates to true
(5 < 5)      // evaluates to false
...
(a == 5)     // evaluates to false, since a is not equal to 5
(a*b >= c)   // evaluates to true, since (2*3 >= 6) is true
(b+4 > a*c)  // evaluates to false, since (3+4 > 2*6) is false
((b=2) == a) // evaluates to true 
...

Logical operators

...
!(5 == 5)   // evaluates to false because the expression at its right (5 == 5) is true
!(6 <= 4)   // evaluates to true because (6 <= 4) would be false
!true       // evaluates to false
!false      // evaluates to true 
...
( (5 == 5) && (3 > 6) )  // evaluates to false ( true && false )
( (5 == 5) || (3 > 6) )  // evaluates to true ( true || false )
...

Conditional ternary operator

...
7==5 ? 4 : 3     // evaluates to 3, since 7 is not equal to 5.
7==5+2 ? 4 : 3   // evaluates to 4, since 7 is equal to 5+2.
5>3 ? a : b      // evaluates to the value of a, since 5 is greater than 3.
a>b ? a : b      // evaluates to whichever is greater, a or b.  
...

Reference: http://www.cplusplus.com/doc/tutorial/operators/

By |C++, Video Games Development|Commenti disabilitati su C++ – Operators

C++ – Basic Statement

C++ – Basic Statement

To start work on C++ you need:
– One ‘text editor’ for programmers as Visual Studio on windows or Code::Blocks on Unbuntu
– A compiler to build the executable program

The Basic statement:


// This is a single line comment in C++

/* 
This is a multiline comment in C++
*/

/*  Prepocessor
It will be interpreted before the compilation of the program itself begins
Inclusion of iostream allow to perform standard input and output operations
*/
#include <iostream>

// Introduce visibility of 'cout' components,
// without this declaration 'cout' does not work
using namespace std;

//  It is the first function called when the program is run
int main()
{
    // character output - text - endline
    cout << "Hello world!" << endl;
    cout << "It is beautiful day!" << endl; 

    // terminate the program
    return 0; 
}

By |C++|Commenti disabilitati su C++ – Basic Statement

Unreal Game Engine – Blueprints – Toggle Light – OnActorBeginOverlap

Unreal Game Engine – Blueprints – OnActorBeginOverlap – Toggle Light

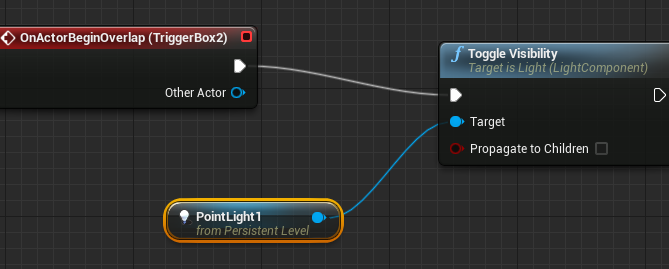
1. LEFT COLUMN> Modes> Light DRAG AND DROP a Point Light in the scene

2. LEFT COLUMN> Modes> Basic> DRAG AND DROP a Box Trigger in the scene

3. RIGHT COLUMN> Actor: TriggerBox> Blueprint> Add Level Events for TriggerBox> Add OnActorBeginOverlap> Blueprint Window appears

4a. 3D Viewport> select the Point Light
4b. Blueprint Window> RMB in a empty area> Call Function On Point light> Rendering> Toggle Visibility

5 Blueprint Window> connect OnActorBeginOverlap output—>input Toggle Visibility

6. MAIN TOP TOOLBAR> Play this level (the joypad icon), move the player over the Box Trigger to turn light on/off

unreal-blueprints-toggle light-OnActorBeginOverlap

By |Unreal Engine, Video Games Development|Commenti disabilitati su Unreal Game Engine – Blueprints – Toggle Light – OnActorBeginOverlap

Unreal Game Engine – Blueprints – Overview

Unreal Game Engine – Blueprints – Overview

Blueprints are the Visual Programming System of Unreal Game Engine.
They allow non-programmers to create features by themselves.
To create behaviours you will need only create relatioship between blocks of a flow chart!

How to create a simple Blueprint?
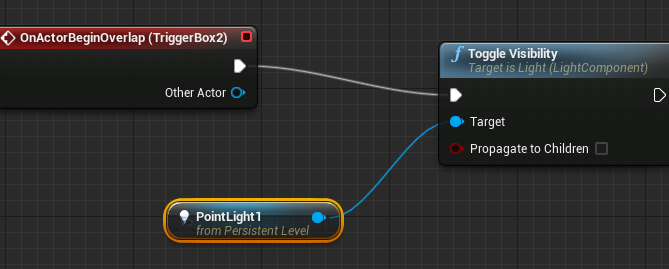
It is really easy and funny, in the next sample we toggle a light using Blueprints.

Object -> Create Blueprint

1. LEFT COLUMN> Modes> Light DRAG AND DROP a Point Light in the scene

2. LEFT COLUMN> Modes> Basic> DRAG AND DROP a Box Trigger in the scene

3. RIGHT COLUMN> Actor: TriggerBox> Blueprint> Add Level Events for TriggerBox> Add OnActorBeginOverlap> Blueprint Window appears

4a. 3D Viewport> select the Point Light
4b. Blueprint Window> RMB in a empty area> Call Function On Point light> Rendering> Toggle Visibility

5 Blueprint Window> connect OnActorBeginOverlap output—>input Toggle Visibility

6. MAIN TOP TOOLBAR> Play this level (the joypad icon), move the player over the Box Trigger to turn light on/off

unreal-blueprints-overview

Blueprint -> Attach Component

1. LEFT COLUMN> Content Browser> select Blueprints folder> New> ‘Actor’
2. name it MyBlueprint, DOUBLE click on it
3. Blueprint window> TOP RIGHT> Components
4. Blueprint window> LEFT COLUMN> Components> Add Component> Rendering> Billboard
5. Blueprint window> TOP RIGHT> Graph
6. LEFT COLUMN> MyBlueprint> +variable> name it MyVar
7. LEFT COLUMN> Details> Variable Name ‘MyVar’, Variable Type> bool
8. LEFT COLUMN> MyBlueprint> DRAG AND DROP MyVar into Event Graph> Get -> after that you can’t change the Variable Type

… and so on to create your Blueprint …

By |Unreal Engine, Video Games Development|Commenti disabilitati su Unreal Game Engine – Blueprints – Overview

Unreal Engine – Editor Overview

Unreal Engine – Editor Overview

Place New Objects

Window> Modes> Place> Geometry> DRAG AND DROP the game object thumb over the 3D Viewport

OR

Window> Content Browser> DRAG AND DROP the game object thumb over the 3D Viewport

Move/Scale/Rotate/Setup Objects

LMB select the object and use the top right small icons to select transformations tools, after that use the handles on screen

OR

1. Window> Scene Outliner> click over the object list to select
2. Window> Details> setup

Static Mesh Editor

RMB over a mesh> (home icon)Edityourmesh

Parenting objects

RIGHT COLUMN> Scene Outliner> DRAG AND DROP an object over another object, the dragged object will be the child of the second one.

Material Editor

RIGHT COLUMN> Details> Materials> DOUBLE CLICK over material preview

Move Camera View

LMB: rotate camera right left and move forward / backward

MMB: move left / right / up / down

Mouse Whell: zoom in / out

RMB: look at right / left / up / down

RMB + WASD: look and move like a FPS

ALT + LMB: orbit around the selected object

By |Unreal Engine, Video Games Development|Commenti disabilitati su Unreal Engine – Editor Overview