indiegamedev

C++ Data Structures – Arrow Operator

C++ Data Structures – Arrow Operator

A data structure is a group of data elements grouped together under one name. These data elements, known as members, can have different types and different lengths.

Regular Variables

The syntax is:


// syntax
struct type_name {
member_type1 member_name1;
member_type2 member_name2;
member_type3 member_name3;
.
.
} object_names;

// working sample:
struct product {
  int weight;
  double price;
} apple, banana, melon;

// access
apple.weight
apple.price
banana.weight
banana.price
melon.weight
melon.price

Working sample:


// example about structures
#include <iostream>
#include <string>
#include <sstream>
using namespace std;

// declare data structure
struct movies_t {
  string title;
  int year;
} mine, yours;

void printmovie (movies_t movie);

int main ()
{
  string mystr;

  mine.title = "2001 A Space Odyssey";
  mine.year = 1968;

  cout << "Enter title: ";
  getline (cin,yours.title); // store title
  cout << "Enter year: ";
  getline (cin,mystr);
  stringstream(mystr) >> yours.year; // store year

  cout << "My favorite movie is:\n ";
  printmovie (mine);
  cout << "And yours is:\n ";
  printmovie (yours);
  return 0;
}

void printmovie (movies_t movie)
{
  // access data structure
  cout << movie.title;
  cout << " (" << movie.year << ")\n";
}

The result is:
Enter title: Alien
Enter year: 1979

My favorite movie is:
2001 A Space Odyssey (1968)
And yours is:
Alien (1979)

Arrays

You can use an Array into Data Structures:


// array of structures
#include <iostream>
#include <string>
#include <sstream>
using namespace std;

struct movies_t {
  string title;
  int year;
} films [3];

void printmovie (movies_t movie);

int main ()
{
  string mystr;
  int n;

  for (n=0; n<3; n++)
  {
    cout << "Enter title: ";
    getline (cin,films[n].title);
    cout << "Enter year: ";
    getline (cin,mystr);
    stringstream(mystr) >> films[n].year;
  }

  cout << "\nYou have entered these movies:\n";
  for (n=0; n<3; n++)
    printmovie (films[n]);
  return 0;
}

void printmovie (movies_t movie)
{
  cout << movie.title;
  cout << " (" << movie.year << ")\n";
}

The result is:
Enter title: Blade Runner
Enter year: 1982
Enter title: The Matrix
Enter year: 1999
Enter title: Taxi Driver
Enter year: 1976

You have entered these movies:
Blade Runner (1982)
The Matrix (1999)
Taxi Driver (1976)

Pointers to Data Structures


// pointers to structures
#include <iostream>
#include <string>
#include <sstream>
using namespace std;

struct movies_t {
  string title;
  int year;
};

int main ()
{
  string mystr;

  movies_t amovie;
  movies_t * pmovie;
  pmovie = &amovie;

  cout << "Enter title: ";
  getline (cin, pmovie->title);
  cout << "Enter year: ";
  getline (cin, mystr);
  (stringstream) mystr >> pmovie->year;

  cout << "\nYou have entered:\n";
  cout << pmovie->title;
  cout << " (" << pmovie->year << ")\n";

  return 0;
}

The result is:
Enter title: Invasion of the body snatchers
Enter year: 1978

You have entered:
Invasion of the body snatchers (1978)

Arrow Operator

The arrow operator (->) is a dereference operator that is used exclusively with pointers to objects that have members. This operator serves to access the member of an object directly from its address.


// arrow operator
pmovie->title
// equivalent to:
(*pmovie).title

Working example:


// pointers to structures
#include <iostream>
#include <string>
#include <sstream>
using namespace std;

struct movies_t {
  string title;
  int year;
};

int main ()
{
  string mystr;

  movies_t amovie;
  movies_t * pmovie;
  pmovie = &amovie;

  cout << "Enter title: ";
  getline (cin, pmovie->title);
  cout << "Enter year: ";
  getline (cin, mystr);
  (stringstream) mystr >> pmovie->year;

  cout << "\nYou have entered:\n";
  cout << pmovie->title;
  cout << " (" << pmovie->year << ")\n";

  return 0;
}

The result is:
Enter title: Invasion of the body snatchers
Enter year: 1978

You have entered:
Invasion of the body snatchers (1978)

Nesting (annidate) Structures

...
struct movies_t {
  string title;
  int year;
};

struct friends_t {
  string name;
  string email;
  movies_t favorite_movie;
} charlie, maria;

friends_t * pfriends = &charlie;
...
// After that it would be valid:
charlie.name
maria.favorite_movie.title
charlie.favorite_movie.year
pfriends->favorite_movie.year
...

My website: http://www.lucedigitale.com

Reference: http://www.cplusplus.com/doc/tutorial/structures/

By |C++, Video Games Development|Commenti disabilitati su C++ Data Structures – Arrow Operator

C++ Array of Characters

C++ Array of Characters

We can represent a text string as plain arrays of elements of a character type.

Inizialization:

...
char myword[] = { 'H', 'e', 'l', 'l', 'o', '\0' };
...
char myword[] = "Hello"; 
...
myword[0] = 'B';
myword[1] = 'y';
myword[2] = 'e';
myword[3] = '\0';
...

Working example:

// strings and NTCS:
#include <iostream>
#include <string>
using namespace std;

int main ()
{
  char question1[] = "What is your name? ";
  string question2 = "Where do you live? ";
  char answer1 [80];
  string answer2;
  cout << question1;
  cin >> answer1;
  cout << question2;
  cin >> answer2;
  cout << "Hello, " << answer1;
  cout << " from " << answer2 << "!\n";
  return 0;
}

The result is:
What is your name? Homer
Where do you live? Greece
Hello, Homer from Greece!

By |C++, Video Games Development|Commenti disabilitati su C++ Array of Characters

C++ – Functions – Overload

C++ – Functions – Overload

Simple Overload

Two different functions can have the same name if their parameters are different.


// overloading functions
#include <iostream>
using namespace std;

int operate (int a, int b)
{
  return (a*b);
}

double operate (double a, double b)
{
  return (a/b);
}

int main ()
{
  int x=5,y=2;
  double n=5.0,m=2.0;
  cout << operate (x,y) << '\n';
  cout << operate (n,m) << '\n';
  return 0;
}

The result is:
10
2.5

Overload with Template

C++ has the ability to define functions with generic types, known as function templates. With templates you will be able to overload a single functions with different data types.

The statement is:


...
template <class SomeType>
SomeType sum (SomeType a, SomeType b)
{
  return a+b;
}
...


// function template
#include <iostream>
using namespace std;

template <class T>
T sum (T a, T b)
{
  T result;
  result = a + b;
  return result;
}

int main () {
  int i=5, j=6, k;
  double f=2.0, g=0.5, h;
  k=sum<int>(i,j);
  h=sum<double>(f,g);
  cout << k << '\n';
  cout << h << '\n';
  return 0;
}

The result is:
11
2.5

Overload with multiple Template parameters


// function templates
#include <iostream>
using namespace std;

template <class T, class U>
bool are_equal (T a, U b)
{
  return (a==b);
}

int main ()
{
  if (are_equal(10,10.0))
    cout << "x and y are equal\n";
  else
    cout << "x and y are not equal\n";
  return 0;
}

Overload with non-type template arguments


// template arguments
#include <iostream>
using namespace std;

template <class T, int N>
T fixed_multiply (T val)
{
  return val * N;
}

int main() {
  std::cout << fixed_multiply<int,2>(10) << '\n';
  std::cout << fixed_multiply<int,3>(10) << '\n';
}

Result is:
20
30

Notice:
(10) —> (non-type)

Reference: http://www.cplusplus.com/doc/tutorial/functions2/

By |C++, Video Games Development|Commenti disabilitati su C++ – Functions – Overload

Unreal Game Engine – Blueprints – Mesh Rotator

Unreal Game Engine – Blueprints – Mesh Rotator

1. LEFT COLUMN> Content Browser> RMB over a Mesh (example Floor_400x400)> Create Blueprint Using…> select your ‘Blueprints’ folder> give it the name (example Floor_400x400_Blueprint)

2. Blueprint window> TOP RIGHT> Components> WHELL MOUSE BUTTON to zoom in/out

3. Blueprint window> TOP RIGHT> Graph> you can see component on the RIGHT COLUMN: – StaticMesh1

4. Blueprint window> TOP RIGHT> Graph> RMB over an Empty Area> Add Timeline

5. DOUBLE CLICK Timeline box> Timeline window> Add Vector Track

6. Vector Track> TOP LEFT> name the track ‘Rotator’

7. Vector Track> TOP> Length> 1 second

8. Vector Track> RMB over empty area> Add Key: 0 sec->1 / 1 sec->360

9. Float Track> TOP> check Autoplay and Loop

10. Event Graph> RIGHT COLUMN> DRAG AND DROP StaticMesh1 over an empty area> Get (to add StaticMesh1 block)

11. Event Graph> DRAG from StaticMesh1 to an empty area> Set Relative Rotation (to add Relative Rotation block)

12. Event Graph> DRAG from Timeline>Update to Set Relative Rotation>exec

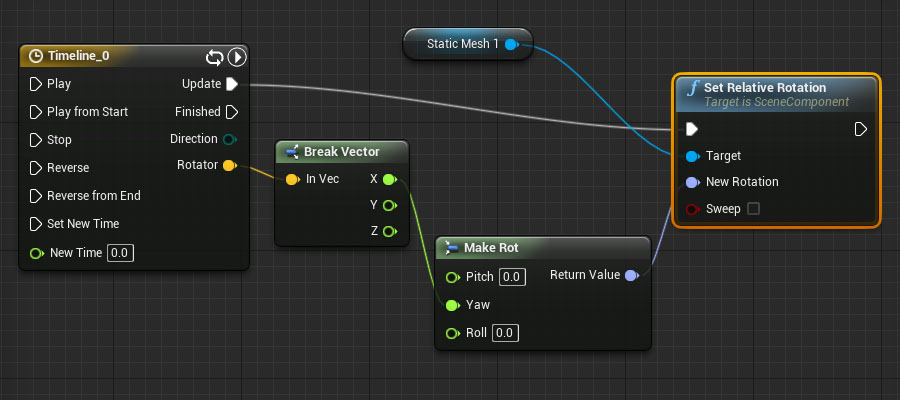
13. Event Graph> DRAG from Timeline>Rotator to an empty area (to add Break Vector)

14. Event Graph> DRAG from Set Relative Rotation>New Rotation to an empty area (to add Make Rot block)

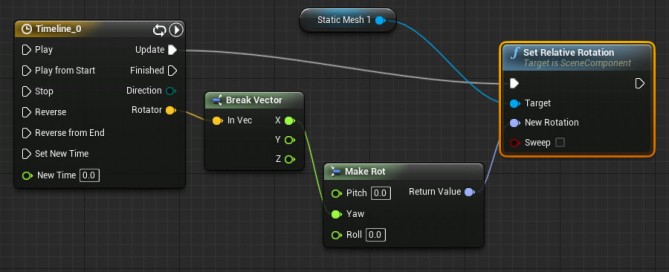
15. Event Graph> Create other connections as in the image below

16. Unreal Editor> Content Browser> Blueprint folder> ‘Floor_400x400_Blueprint’ DRAG AND DROP into scene

17. Play

unreal-blueprints-mesh-rotator

For italian people: come funziona?

1. Timeline invia i valori di Rotator ad ogni fotogramma alla funzione Set Relative Rotation
2. Set Relative Rotation invia i dati di rotazione a Static Mesh 1

NOTA BENE: la traccia Rotator deve essere prima separata con Break Vector, poi assegnata con Make Rot a New Rotation

By |Unreal Engine, Video Games Development|Commenti disabilitati su Unreal Game Engine – Blueprints – Mesh Rotator

Unreal Game Engine – Blueprints – Pulsing Mesh

Unreal Game Engine – Blueprints – Pulsing Mesh

1. LEFT COLUMN> Content Browser> RMB over a Mesh (example Floor_400x400)> Create Blueprint Using…> select your ‘Blueprints’ folder> give it the name (example Floor_400x400_Blueprint)

2. Blueprint window> TOP RIGHT> Components> WHELL MOUSE BUTTON to zoom in/out

4. Blueprint window> TOP RIGHT> Graph> you can see component on the RIGHT COLUMN: – StaticMesh1

5. Blueprint window> TOP RIGHT> Graph> RMB over an Empty Area> Add Timeline

6. DOUBLE CLICK Timeline box> Timeline window> Add Float Track

7. Float Track> TOP LEFT> name the track ‘Pulsing’

8. Float Track> TOP> Length> 1 second

9. Float Track> RMB over empty area> Add Key: 0 sec->1 / 0.5 sec->0.5 / 1->1

10. Float Track> TOP> check Autoplay and Loop

11. Event Graph> RIGHT COLUMN> DRAG AND DROP StaticMesh1 over an empty area> Get (to add StaticMesh1 block)

12. Event Graph> DRAG from StaticMesh1 to an empty area> Set Relative Scale 3D (to add Relative Scale 3D block)

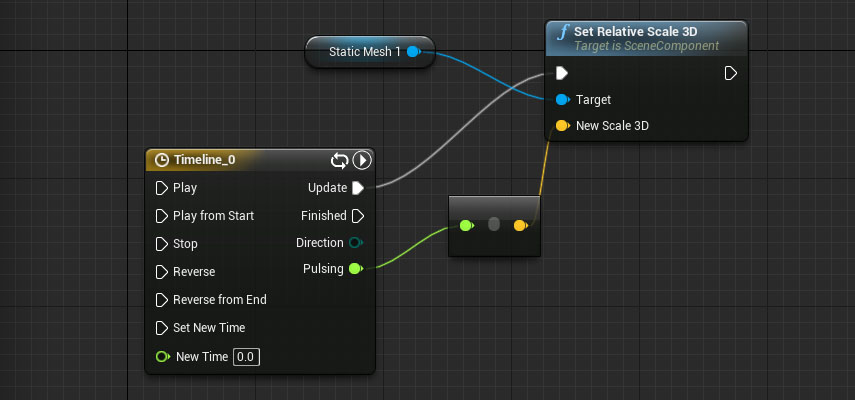
13. Event Graph> DRAG from Timeline>Update to Set Relative Scale 3D>exec

14. Event Graph> DRAG from Timeline>Pulsing to Set Relative Scale 3D>New Scale

14. Unreal Editor> Content Browser> Blueprint folder> ‘Floor_400x400_Blueprint’ DRAG AND DROP into scene

15. Play

unreal-blueprints-pulsing-mesh

For italian people: come funziona?

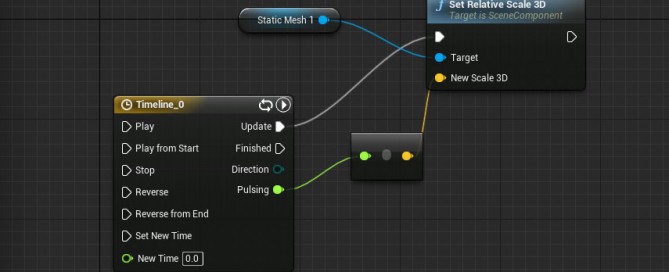
1. Timeline>Update —> Set Relative Scale 3D: esegue un update continuo di Set Relative Scale 3D ad ogni fotogramma

2. Timeline>Pulsing —> New Scale: fornisce il valore variabile nel tempo

3. Set Relative Scale 3D>Target —> Static Mesh 1: setta la scala di Static Mesh 1

By |Unreal Engine, Video Games Development|Commenti disabilitati su Unreal Game Engine – Blueprints – Pulsing Mesh