unity3d

Unity – Physics 3D – Basics

Unity – Physics 3D – Basics

Videogames Development – Unity – How to add Physics 3D

ADD PHYSICS

Setup the Physics 3D engine

MAIN TOP MENU> Edit> Project Settings> Physics> Inspector> Gravity (default: T=-9.81 ms2)

Create a Sphere over a Box, the Sphere will fall and will collide overe the box

1. Hierarchy> select Sphere
2. MAIN TOP MENU> Component> Physics> Rigidbody
3. Hierarchy> select Sphere> Inspector> Rigidbody> setup parameters
4. Hierarchy> select Sphere> Inspector> ‘Add Component Button’> Physics> Mesh Collider
5. Hierarchy> select Sphere> Inspector> Mesh Collider> setup parameters

6. TOP CENTER> click over ‘Play’ button, the Sphere will fall
7. TOP CENTER> click over ‘Play’ button, to stop simulation

8. Hierarchy> select Box
9. MAIN TOP MENU> Component> Physics> Box Collider
10. Hierarchy> select Box> Inspector> Box Collider> setup parameters

11. MAIN TOP MENu> Assets> Create> Physics Material
12. ‘Assets’ window> select New Physics Material> Inspector> setup Friction / Bounciness

13. Hierarchy> select Sphere> Mesh Collider> Material> New Physics Material, assign material
14. Hierarchy> select Box> Box Collider> Material> New Physics Material, assign material

15. TOP CENTER> click over ‘Play’ button, now there is collision
16. TOP CENTER> click over ‘Play’ button, to stop simulation

Colliders

Inspector> ‘Add Component’> Physics

– Box Collider
– Sphere Collider
– Capsule Collider

– Mesh Collider

– Whell Collider

– Terrain Collider

COMPLEX MESH

To simulate Physic with complex mesh you can:

– use a group of simple colliders to simulate the shape (Create a group using parent-child features inside Hierarchy)
– use a low resolution mesh + Mesh Collider

MESH COLLIDER DOES NOT WORK!

The collide engine uses the polygon face normals to simulate collisions. To revert normal try:

Hierarchy> Select mesh> Mesh Collider> check ‘Convex’, re-simulate

Rigid Bodies Properties

Inspector> Rigidbody

Mass: maggiore massa, minore reazione alla collisione

Drag: resistenza al movimento, maggiore resistenza, più velocemente arriva allo stato di quiete

Angular Drag: resistenza angolare al movimento, maggiore resistenza, più velocemente arriva allo stato di quiete

Use Gravity: you can setup gravity MAIN TOP MENU> Edit> Project Settings> Physics> Gravity
– default: Y= -9.81 ms2
– platform: low gravity it is great!
– special effects: add agravity in X or Z

Is Kinematic: se è selezionato, l’oggetto può essere manipolato con muovi-ruota-scala, influenza la fisica degli altri oggetti ma la fisica non lo influenza. Un esempio di oggetto ‘Is Kinematic’ è la racchetta del gioco PONG o di BREAKOUT. Questo oggetto NON forza il ricalcolo della fisica ad ogni frame.

Interpolate:
– None (default)
– Interpolate: smussa il movimento in base al frame precedente
– Extrapolate: smussa il movimento in base al frame previsto successivo

Collision Detection:
– Discrete (default)
– Continuos: it is for fast moving objects that are interacting with static geometry
– Continuos Dynamic: it is for fast moving objects that are interacting with other dynamic objects

Constraints:
Blocca la rotazione o la posizione di un oggetto durante una reazione alla fisica. Ad esempio per un TETRIS i tasselli possono cadere, impilarsi ma non ruotare.
– Position XYZ
– Rotation XYZ

By |Unity3D|Commenti disabilitati su Unity – Physics 3D – Basics

UNITY – Cameras

UNITY – Cameras

Create a Camera

1. MAIN TOP MENU> GameObjects> Create Other> Camera

2. Hierarchy> Main Camera> Inspector

– Projection: Perspective (3D Games) / Orthographic (2D Games and Isometric)

– Clipping Planes: Near / Far (to optimize rendering performance)

– Field of View (zoom)

– Background: BG color / Skybox (MAIN TOP MENU> Edit> Rendering> Skybox)

– Culling Mask: (to render only some layers)

Multiple Camera – Picture in Picture

1. Create the second Camera with different point of view

2. Select the Main Game Camera> Inspector> Camera> Clear Flags> Depth only

3. Select the secondary Camera> Inspector> Camera> Clear Flags> Depth only

By |Unity3D|Commenti disabilitati su UNITY – Cameras

UNITY – Add 3D Lights

UNITY – Add 3D Lights

Ambient Light

MAIN tOP MENU> Edit> Render Settings> Ambient Light

Dynamic Light – Realtime

MAIN TOp MENU> GameObject> Create Others>

– Directional light -> sun

– Point Light -> bulb lamp

– Spot Light -> spot light

Hierarchy> Select the light> Inspector:

– Color

– Intensity

– Cookie: you can create a pattern of shadow with the alpha channel of a Texture

– Shadows: No / Hard / Soft

– Halo
-> può essere sostituito da ‘Add Component’> Effects> Halo, poi deselezionare il vecchio “Draw Halo” assegnato di default

– Flare: click over the small icon on the right> Assets> select a Flare
-> può essere sostituito da ‘Add Component’> Effects> Flare> click over the small icon on the right> Assets> select a Flare, poi svuotare lo slot del vecchio “Flare” assegnato di default
To render Flare Component you need Hierarchy> select Camera> ‘Add Component’> Rendering> Flare Layer

Backed Light – Pre Render and Baked over textures

ONLY BACKED LIGHT:

– MAIN TOP MENU> GameObject> Create Others> Area Light

– Shaders> Self Illumination

Render Mode

– Vertex Lighting
-> fastest
-> it interpolare lighting over the surface of the mesh
-> it NOT allow Normal mapping / Light Cookies / Real Time Shadows

– Per pixel Lighting
-> best quality
-> it calculate lighting in every screen pixel
-> it allow Normal mapping / Light Cookies / Real Time Shadows

Setup:

MAIN TOP MENU> Edit> Project Settings> Quality> Pixel Light Count, maggiore valore, maggiore qualità, minore velocità di rendering

Hierarchy> select Light> Inspector> Render Mode> Important (Per pixel Lighting) / Not important (Vertex Lighting)

By |Unity3D|Commenti disabilitati su UNITY – Add 3D Lights

Unity – Input.GetAxis – Movement Behaviour

Unity – Input.GetAxis – Movement Behaviour

MOVEMENT BEHAVIOUR

NOTICE:
-> Input.GetKey e Input.GetButton -> return a BOOLEAN VALUE true or false
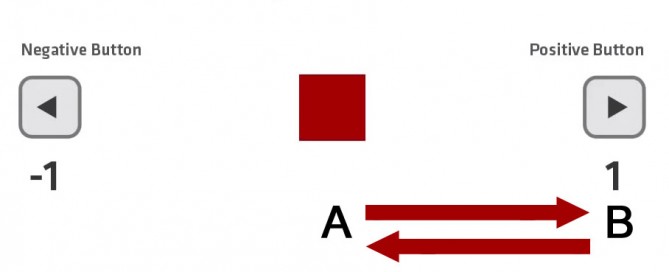
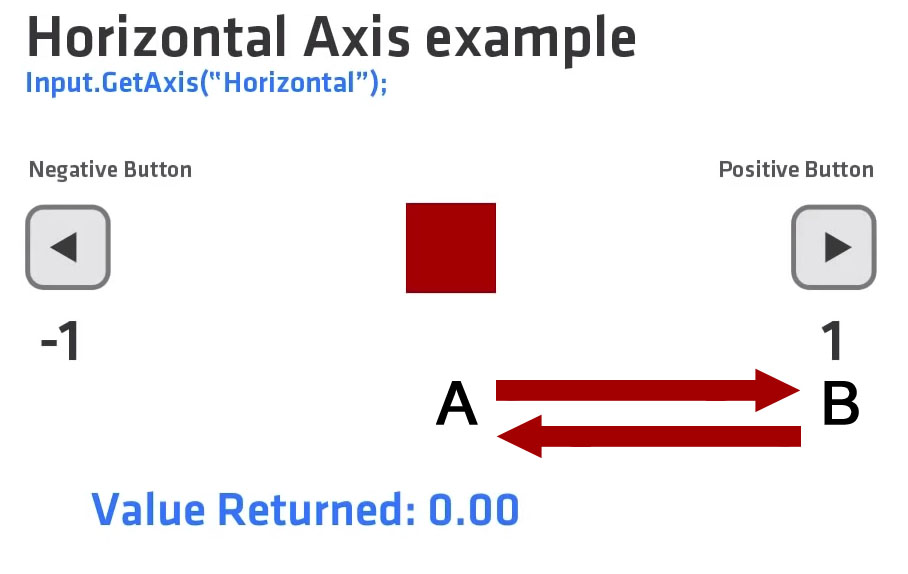
-> Input.GetAxis of keyboard and joystik -> return a VALUE from 1 to -1

The value will be in the range -1…1 for keyboard and joystick input. If the axis is setup to be delta mouse movement, the mouse delta is multiplied by the axis sensitivity and the range is not -1…1.

1. Create virtual Axes and buttons can be created in: MAIN TOP MENU> Edit> Project Settings> Input.

2. Setup Virtual Axis from right column.

unity-geyaxis

How does it works:
1. A position, the joy is not being pressed -> value returned 0.00
2. When we first press the key, in the first frame -> value returned is 0.01
3. We progress througth frames holding down the button (mantengo premuto) -> value returned increase
4. Holding down the button at the end -> value returned is 1
5. We release the button, in the first frame -> value returned is 0.99
6. We progress througth frames (button is released) -> value returned decrease
7. At the end -> value returned 0.00

Parameters of MAIN TOP MENU> Edit> Project Settings> Input> Horizon:

– Setup Axis
Positive Button: right ()

– Assign buttons:
Alt Positive Button: d
End users can configure Keyboard input in a nice screen configuration dialog

– Gravity, how fast the scale return to 0 after the button has been released (B -> A)
> gravity > fast return
< gravity < fast return 0.1: slow 3 : default 100: fast - Sensitivity, how fast the scale reaches 1 (A -> B) – unity x seconds
> sensitivity > responsive > fast
< sensitivity < resposnsive < fast 0.1: slow 3 : default 100: fast - Dead (to prevent unwanted little joystick movement) > dead zone < joystick sensibility < dead zone > joystick sensibility

– Snap
If enabled, the axis value will be immediately reset to zero after it receives opposite inputs. Only used when the Type is key / mouse button.

3. DRAG AND DROP the script over an object in the Hierarchy
Example: move an object using GetAxis – Horizontal

#pragma strict

function Start () {

}

function Update () {

 var horiz : float = Input.GetAxis("Horizontal");
 Debug.Log(horiz);
 transform.Translate(Vector3(horiz,0,0));
}

Statement: static function GetAxis(axisName: string): float;
axisName -> Virtual Axes names

Horizontal and Vertical Control – Complete Example

#pragma strict

function Start () {

}

var speed : float = 10.0; // to change speed

function Update () {

 var horiz : float = Input.GetAxis("Horizontal");
 var vert : float = Input.GetAxis("Vertical");

 // Make it move 10 meters per second instead of 10 meters per frame...
 horiz *= Time.deltaTime;
 vert *= Time.deltaTime;
 
 transform.Translate(Vector3(horiz*speed,vert*speed,0));
}
By |Unity3D|Commenti disabilitati su Unity – Input.GetAxis – Movement Behaviour

Unity – 2D Vector Math

Unity – 2D Vector Math

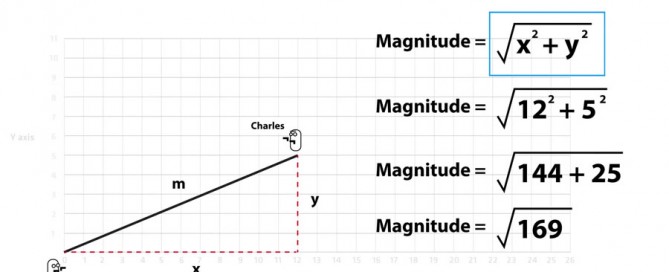
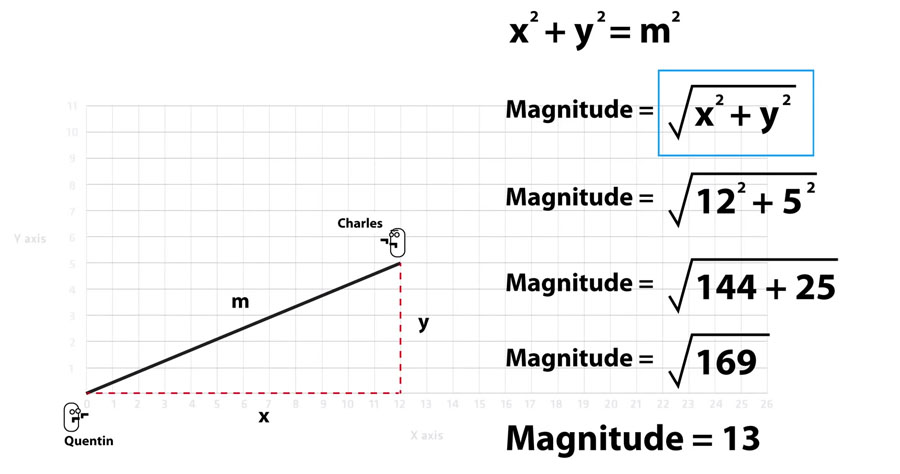
2D Vector Math uses Pythagoras’s Theorem.
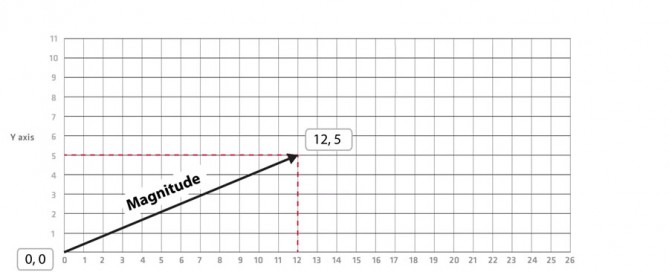
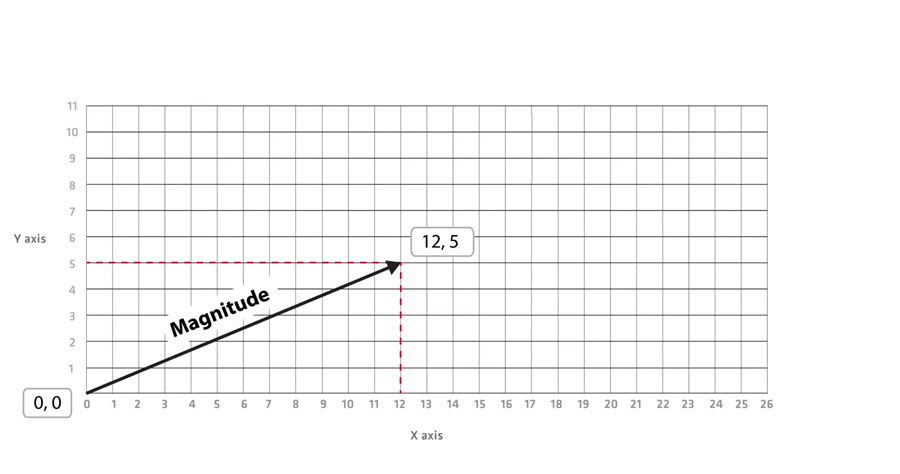
It has 2 components, x and y, that rapresent the point from origin 0,0 to any point on a 2D plane.

A vector has:
– Magnitude, it is the lenght of the vector
– Direction, it is the direction of movement

Below an example to calculate the distance between 2 characters

unity-vector-math-img-001

unity-vector-math-img-002

Vector Math can be used to predict position of moving objects.
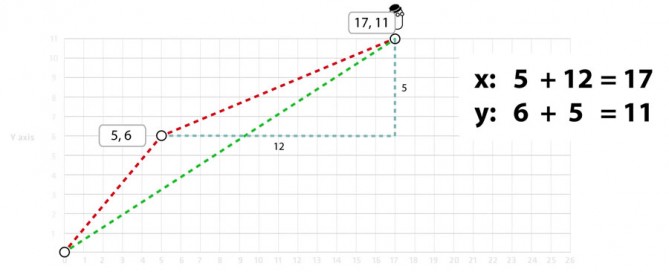
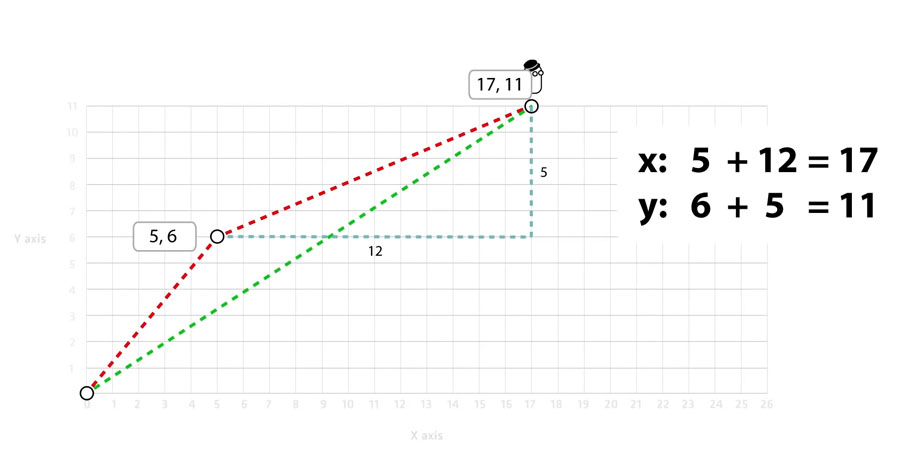
Below the character has a velocity o 12,5 per hour, it means it moves 12 units in x and 5 units in y per hour.
You can calculate the final position after one hour with vector math:

unity-vector-math-img-003

Unity has vector math functions.

Official guide at: http://docs.unity3d.com/Documentation/ScriptReference/Vector2.html

Calculate distance between two objects

var distance = Vector2.Distance(object1.transform.position, object2.transform.position);

Statement: Vector2.Distance(a,b) is the same as (a-b).magnitude.

By |Unity3D|Commenti disabilitati su Unity – 2D Vector Math