webdesign

Let’s start with node.js

This is a practical course using node.js anda localhost development environment.

With node.js you can use js syntax to drive a server backend.

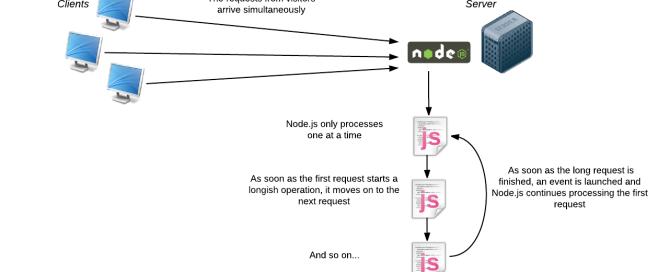
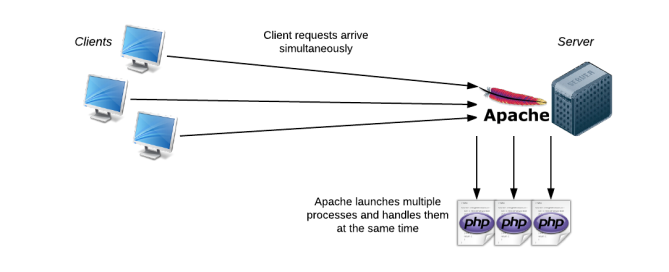
Under you can see the difference between node.js and PHP, PHP is multithread, node.js may be monothread, but it is flexible because of events.
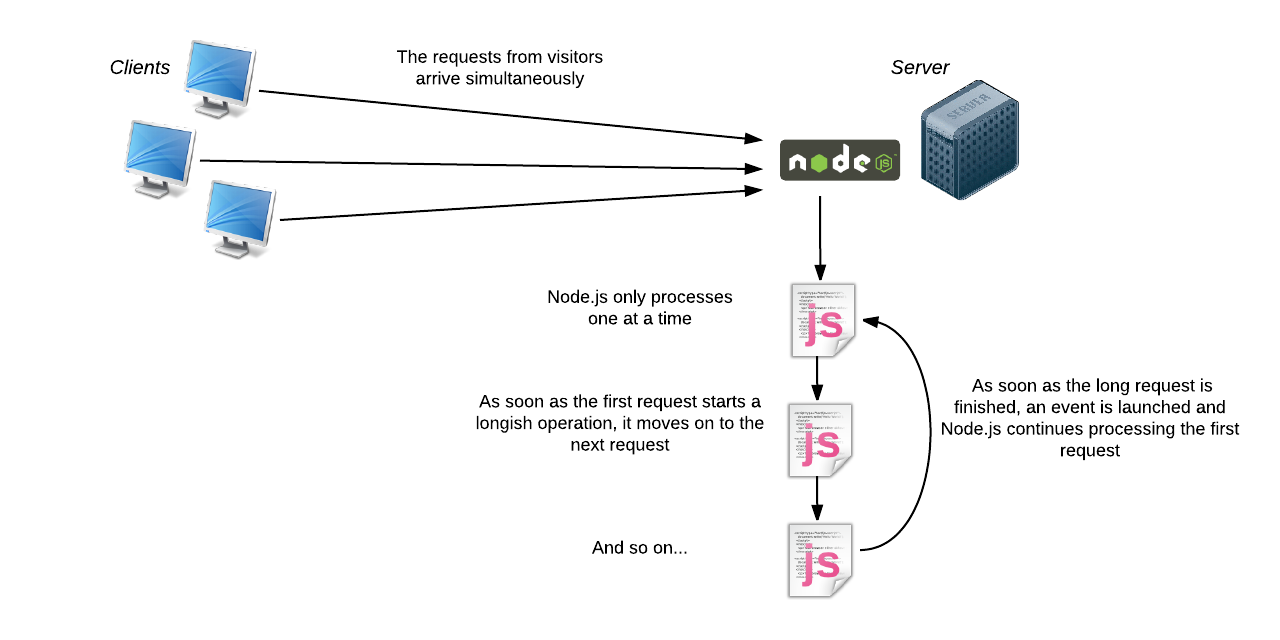
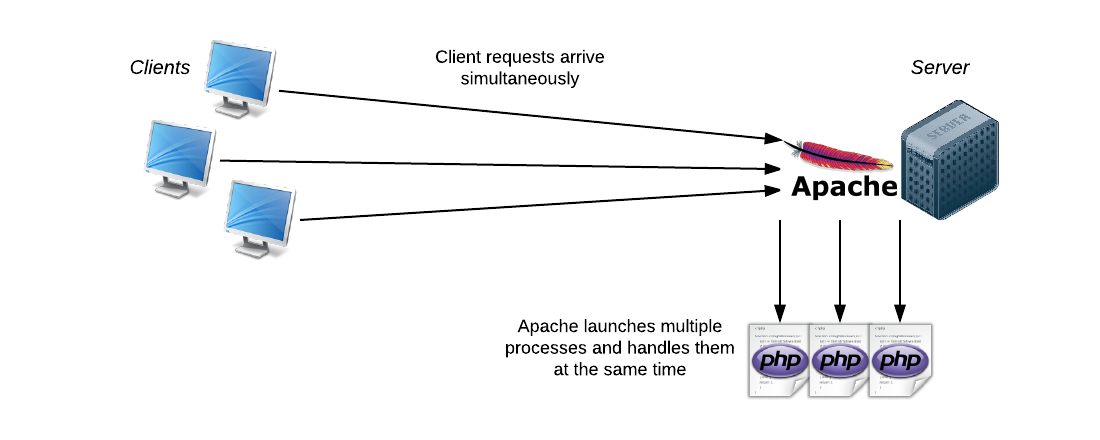
nodejs-monothread

php-multithead

For local development I use Laragon (https://laragon.org/), it is really well organized, easy to use and portable, there are alternative, you can try Bitnami (https://bitnami.com/) or if you are skilled Docker (https://www.docker.com/), this time I’ll proceed with Laragon.

Download Laragon – Full, is has already the latest node.js stabe edition inside, double click the Laragon icon and Start all services
If you are under Windows you will see a Windows Command Processor message, ignore it.

1. Create a new folder inside laragon/www directory, my folder is nodejs
2. Then go inside laragon/www/nodejs and create the file server.js

var http = require('http');

var server = http.createServer(function(req, res) {
res.writeHead(200, {"Content-Type": "text/html"});
res.write('<!DOCTYPE html>'+
'<html>'+
' <head>'+
' <meta charset="utf-8" />'+
' <title>My Node.js page!</title>'+
' </head>'+ 
' <body>'+
' <p>Here is a paragraph of <strong>HTML</strong>!</p>'+
' </body>'+
'</html>');
res.end();
});
server.listen(8080);

With node.js you need to initialize a server, follow me now:

Load the module using require(‘http’); and create a server using the module http.createServer, a module is the same as JavaScript libraries

var http = require('http');
http.createServer(function(req, res)...

The page in the server in a ime type html (https://developer.mozilla.org/en-US/docs/Web/HTTP/Basics_of_HTTP/MIME_types)

res.writeHead(200, {"Content-Type": "text/html"});

Write the content of the page

res.write('<!DOCTYPE html>'+
'<html>'+...

You set the server at port 8080, you can assign any number you want (https://en.wikipedia.org/wiki/Port_(computer_networking))

server.listen(8080);

3. Run the Laragon terminal console INSIDE laragon/www/nodejs and type:
node server.js
The console doesn’t display anything and doesn’t respond – that’s totally normal, we are just started the server

4. Open your browser and go to the address http://localhost:8080.
This connect your own machine to the 8080 port on which the Node.js program is running.
In the browser you will se the render of an html page 😀

5. Change the code of server.js

' <p>Here is a paragraph of <strong>HTML</strong>! I have just changed this code</p>'+

6. Run the Laragon terminal console INSIDE laragon/www/nodejs and type:
a. CTRL+C this will stop the server
b. node server.js restart the server to get the changes

7. Reload http://localhost:8080 to render in the page the changes

8. Change the code of node.js

var http = require('http');
var url = require('url');

var server = http.createServer(function(req, res) {
var page = url.parse(req.url).pathname;
console.log(page);
res.writeHead(200, {"Content-Type": "text/plain"});
if (page == '/') {
res.write('You\'re in the home page');
}
else if (page == '/pageone') {
res.write('You\'re in page one!');
}
else if (page == '/pageone/subpageone') {
res.write('Hey, this is a subpage of pageone');
}
res.end();
});
server.listen(8080);

I will explain:

a. Get the url from the browser var url…
b. Parse the url var page…
c. if page==… write different code

...
var url = require('url');
...
var page = url.parse(req.url).pathname;

Stop e restart the server, type in the browser:
http://localhost:8080
http://localhost:8080/pageone
http://localhost:8080/pageone/subpage

9. Change the code another time:

var http = require('http');
var url = require('url');
var querystring = require('querystring');

var server = http.createServer(function(req, res) {
var page = url.parse(req.url).pathname;
var params = querystring.parse(url.parse(req.url).query);
console.log(page);
res.writeHead(200, {"Content-Type": "text/plain"});
	// parse query ################################################################
    if ('firstname' in params && 'lastname' in params) {
        res.write('Your name is ' + params['firstname'] + ' ' + params['lastname'] + '\r\n');
    }
    else {
        res.write('You do not have name AND surname' + '\r\n');
    }
	// parse url ##################################################################
	if (page == '/') {
		res.write('You\'re in the home page');
	}
	else if (page == '/pageone') {
		res.write('You\'re in page one!');
	}
	else if (page == '/pageone/subpageone') {
		res.write('Hey, this is a subpage of pageone');
	}
res.end();
});
server.listen(8080);

Stop and restart the server and in the browser type http://localhost:8080?firstname=John&lastname=Doe to see the result:

Your name is John Doe
You’re in the home page

Stop and restart the server and in the browser type http://localhost:8080?firstname=John&lastname=Doe to see the result:

You do not have name AND surname
You’re in the home page

10. Now I’ll create my own personal module, then go inside laragon/www/nodejs and create the file dtmodule.js

// Use the exports keyword to make properties and methods available outside the module file
exports.myDateTime = function () {
  return Date();
}; 

Change server.js

var http = require('http');
var url = require('url');
var querystring = require('querystring');

var dtmodule = require('./dtmodule.js'); // require my personal module
// Notice that we use ./ to locate the module, that means that the module is located in the same folder as server.js

var server = http.createServer(function(req, res) {
var page = url.parse(req.url).pathname;
var params = querystring.parse(url.parse(req.url).query);
console.log(page);
res.writeHead(200, {"Content-Type": "text/plain"});
	// parse query ################################################################
    if ('firstname' in params && 'lastname' in params) {
        res.write('Your name is ' + params['firstname'] + ' ' + params['lastname'] + '\r\n');
    }
    else {
        res.write('You do not have name AND surname' + '\r\n');
    }
	// parse url ##################################################################
	if (page == '/') {
		res.write('You\'re in the home page');
	        res.write("\r\nThe date and time are currently: " + dtmodule.myDateTime());
	}
	else if (page == '/pageone') {
		res.write('You\'re in page one!');
	}
	else if (page == '/pageone/subpageone') {
		res.write('Hey, this is a subpage of pageone');
	}
res.end();
});
server.listen(8080);

a. Load my own personal module var dtmodule = require(‘./dtmodule.js’);
b. Use the function inside res.write(“\r\nThe date and time are currently: ” + dtmodule.myDateTime());

Stop and restart the server and you will see at http://localhost:8080/

You do not have name AND surname
You’re in the home page
The date and time are currently: Tue Mar 31 2020 13:13:58 GMT+0200 (GMT+02:00)

By |NodeJS|Commenti disabilitati su Let’s start with node.js

CGI Scripting – How it works

CGI Scripting – How it works

What is CGI Scripting and how can I use it on my site?
Common Gateway Interface (CGI) is a standard method used to generate dynamic content on Web pages and Web applications.
In plain words inside your web server you will find a folder www/cgi-bin, here you can store executable files.

An ultra simple example:

Browser send -> www.your.com/your.html -> Static Content
Browser send -> www.your.com/your.php -> Dynamic content PHP language
Browser send -> www.your.com/cgi-bin/your.cgi -> Dynamic Content PERL/C Language

CGI scripts can be PERL (.pl) or C (.c)

Your web hosting have to allow CGI scripts!

Hello there!

We will get the same output “Hello there!” using the codes below;

simplest.html:


<html>
  <body>
     <h1>Hello there!</h1>
  </body>
</html>

It prints:

Hello there!

simplest.c:


#include <stdio.h>

int main()
{
  printf("Content-type: text/html\n\n");
  printf("<html>\n");
  printf("<body>\n");
  printf("<h1>Hello there!</h1>\n");
  printf("</body>\n");
  printf("</html>\n");
  return 0;
}

I can use GCC (GNU Compiler Collection – https://gcc.gnu.org/) by saying: gcc simplest.c -o simplest.cgi, the output file is ‘simplest.cgi’.
I can upload simplest.cgi inside my server at www/cgi-bin and call it widt my browser typing www.your.com/cgi-bin/simplest.cgi

It prints:

Hello there!

Notice:


printf("Content-type: text/html\n\n");

The line “Content-type: text/html\n\n” is special piece of text that must be the first thing sent to the browser by any CGI script.
It sends: ‘Hey Browser, you have to consider that an html file’ :)
If you forget, the browser will reject the output of the script.

The perl code (http://perldoc.perl.org/index.html) here:

simplest.pl:


#! /usr/bin/perl
print "Content-type: text/html\n\n";
print "<html><body><h1>Hello World!";
print "</h1></body></html>\n";

Place the file into your cgi-bin directory. On a UNIX machine, it may help to also type:
chmod 755 simplest.pl

This tells UNIX that the script is executable.

Counter

count.c:


#include <stdio.h>

int incrementcount()
{
  FILE *f;
  int i;

  f=fopen("count.txt", "r+");
  if (!f)
  {
     sleep(1);
     f=fopen("count.txt", "r+");
     if (!f)
       return -1;
  }

  fscanf(f, "%d", &i);
  i++;
  fseek(f,0,SEEK_SET);
  fprintf(f, "%d", i);
  fclose(f);
  return i;
}

int main()
{
  printf("Content-type: text/html\n\n");
  printf("<html>\n");
  printf("<body>\n");
  printf("<h1>The current count is: ")
  printf("%d</h1>\n", incrementcount());
  printf("</body>\n");
  printf("</html>\n");
  return 0;
}

Compile it by typing: gcc count.c -o count.cgi

Create another text file named count.txt and place a single zero in it. By placing counter.cgi and count.txt in the cgi-bin directory, you can run the script. All that the script does is generate a page that says, “The current count is: X,” where X increments once each time you run the script. Try running it several times and watch the content of the page change!

The count.txt file holds the current count, and the little incrementcount() function is the function that increments the count in the count.txt file. This function opens the count.txt file, reads the number from it, increments the number and writes it back to the file. The function actually tries to open the file twice. It does that just in case two people try to access the file simultaneously. It certainly is not a foolproof technique, but for something this simple it works. If the file cannot be opened on the second attempt, -1 is the error value returned to the caller. A more sophisticated program would recognize the -1 return value and generate an appropriate error message.

Reference:
http://it.wikipedia.org/wiki/Common_Gateway_Interface
http://computer.howstuffworks.com/cgi.htm

By |Web Design|Commenti disabilitati su CGI Scripting – How it works

My Best Free Webmaster Tools

Hi All,
some free tools I made and I use every day to develop faster.
I hope it is useful :)

1. EasyColor Scheme Generator
2. Dummy Text Generator
3. HTML Color Names
4. HTML Symbol Entities
5. Iso Latin 1 Codes
6. Hiragana Codes
7. HTTP Status Codes

———————————————
1. EasyColor Scheme Generator
http://www.lucedigitale.com/blog/easy-color-scheme-generator-online/

Pic a color and get the color scheme!

Support:
-Triad
-Tetrad
-Analogous
-Monochromatic
———————————————
2. Dummy Text Generator
http://www.lucedigitale.com/blog/dummy-text-generator-online/

Ultra easy to use dummy text generator

Support:
-Lorem ipsum latin
-Cicero latin
-Kakfa en
-Kafka fr
-Kafka de
-Kafka es
-Kafka it

Characters Cutter Function.
———————————————-
3. HTML Color Names
http://www.lucedigitale.com/blog/html-color-names-complete-list/

Interactive table with seach function for HTML color names

Support:
-Color Name
-Hec Code
-Decimal Code
———————————————
4. HTML Symbol Entities
http://www.lucedigitale.com/blog/html-symbol-entities-complete-list/

Interactive table with seach function for HTML symbol entities

Support:
-Decimal
-Hexadecimal
-Entity number
-Entity name
-Symbol
-Description
———————————————
5. Iso Latin 1 Codes
http://www.lucedigitale.com/blog/html-character-entities-iso-latin-1-codes-extended-ascii-table/

Interactive table with seach function for HTML character entities

Support:
-Decimal
-Hexadecimal
-Binary
-Symbol
-HTML Number
-HTML Name
-Description
———————————————
6. Hiragana Codes
http://www.lucedigitale.com/blog/hiragana-syllable-entity-codes/

Interactive table with seach function for Hiragana syllable entity codes

Support:
-Character Name
-Character
-Entity
-Hex Entity
———————————————
7. HTTP Status Codes
http://www.lucedigitale.com/blog/http-status-codes/

Interactive table with seach function for HTTP status codes

Support:
-Error Number
-Description
———————————————

By |Web Design|Commenti disabilitati su My Best Free Webmaster Tools

Unity 3D – Key Sequence Input – Basics – JavaScript

Unity 3D – Key Sequence Input – Basics – JavaScript

NOTA BENE: in tutti gli script seguenti la sequenza NON VERRA’ RESETTATA in caso di errore!

Attach this script to a Gameobject in the scene

(KeyCode.) Sequence of 2 Keys – Basic

KeySequenceInput.js


// Key Sequence Input Controller
// Attach this script to a Gameobject in the scene

private var firstDown : boolean = false; // false at the beginning, I have no typed yet
private var allDown : boolean = false;   // false at the beginning, I have no typed yet
 
function Update() {

// Key sequence input controller START ######################
if(Input.GetKeyDown(KeyCode.UpArrow)) {
// highlight the button or play a sound
firstDown = true; //1. return true if you push first key
}
                  //2. if the first key is true 
if(firstDown) {
if(Input.GetKeyDown(KeyCode.RightArrow)) {
// highlight the button or play a sound
allDown = true;   //3. return true if you push first and second key
}                 
}

//4. if first and second key are true do someting...
if(allDown) {
Debug.Log ("Sequence OK!"); // Debug Code
//Do Something...
firstDown = false; // reset variables
allDown = false;   
}
// Key sequence input controller END ########################

}

Play the game and type the keys: UpArrow – RightArrow

(KeyCode.) Sequence of 4 keys – Basic


// Key Sequence Input Controller
// Attach this script to a Gameobject in the scene

private var firstDown : boolean = false;  // false at the beginning, I have no typed yet
private var secondDown : boolean = false; // false at the beginning, I have no typed yet
private var thirdDown : boolean = false;  // false at the beginning, I have no typed yet
private var allDown : boolean = false;    // false at the beginning, I have no typed yet
 
function Update() {

// Key sequence input controller START ######################
if(Input.GetKeyDown(KeyCode.UpArrow)) {
// highlight the button or play a sound
firstDown = true; //1. return true if you push first key
}
                  //2. if the first key is true 

if(firstDown) {
if(Input.GetKeyDown(KeyCode.RightArrow)) {
// highlight the button or play a sound
secondDown = true;//3. return true if you push first and second key
}                 
}

if(secondDown) {
if(Input.GetKeyDown(KeyCode.DownArrow)) {
// highlight the button or play a sound
thirdDown = true; //4. return true if you push first and second key and third
}                 
}

if(thirdDown) {
if(Input.GetKeyDown(KeyCode.LeftArrow)) {
// highlight the button or play a sound
allDown = true;  //5. return true if you push first and second key and third and fourth
}                 
}

//4. if all sequence is true do someting...
if(allDown) {
Debug.Log ("Sequence OK!"); // Debug Code
//Do Something...
firstDown = false; // reset variables
secondDown = false;
thirdDown = false;
allDown = false;   
}
// Key sequence input controller END ########################

}

Play the game and type the keys: UpArrow – RightArrow – DownArrow – LeftArrow

(KeyCode.) Sequence of 4 keys – Basic + CountDown


// Key Sequence Input Controller
// Attach this script to a Gameobject in the scene

private var firstDown : boolean = false;  // false at the beginning, I have no typed yet
private var secondDown : boolean = false; // false at the beginning, I have no typed yet
private var thirdDown : boolean = false;  // false at the beginning, I have no typed yet
private var allDown : boolean = false;    // false at the beginning, I have no typed yet

private var endTime : float; // countdown variable

function Start()
{
    endTime = Time.time + 3; // countdown variable: 3 seconds to type the right sequence!
}
 
function Update() {

    // COUNTDOWN START #########################
    var timeLeft : int = endTime - Time.time; 
    // We do not need negative time
    if (timeLeft < 0){ 
        timeLeft = 0;
    	        firstDown = false;   // reset variables, You Fail!
		secondDown = false;
		thirdDown = false;
		allDown = false;
		// Retry or Abort...
		}
    // COUNTDOWN END ###########################

// Key sequence input controller START ######################
if(Input.GetKeyDown(KeyCode.UpArrow)) {
// highlight the button or play a sound
firstDown = true; //1. return true if you push first key
}
                  //2. if the first key is true 

if(firstDown) {
if(Input.GetKeyDown(KeyCode.RightArrow)) {
// highlight the button or play a sound
secondDown = true;//3. return true if you push first and second key
}                 
}

if(secondDown) {
if(Input.GetKeyDown(KeyCode.DownArrow)) {
// highlight the button or play a sound
thirdDown = true; //4. return true if you push first and second key and third
}                 
}

if(thirdDown) {
if(Input.GetKeyDown(KeyCode.LeftArrow)) {
// highlight the button or play a sound
allDown = true;  //5. return true if you push first and second key and third and fourth
}                 
}

//4. if all sequence is true do someting...
if(allDown) {
Debug.Log ("Sequence OK!"); // Debug Code
//Next Level...
firstDown = false; // reset variables
secondDown = false;
thirdDown = false;
allDown = false;   
}
// Key sequence input controller END ########################

}

(KeyCode.) Sequence of 4 keys – Basic + CountDown – Separate function()


// Key Sequence Input Controller
// Attach this script to a GameObject in the scene

private var firstDown : boolean = false;  // false at the beginning, I have no typed yet
private var secondDown : boolean = false; // false at the beginning, I have no typed yet
private var thirdDown : boolean = false;  // false at the beginning, I have no typed yet
private var allDown : boolean = false;    // false at the beginning, I have no typed yet

private var endTime : float;

function Start()
{
    endTime = Time.time + 3; // 3 seconds to type the right sequence!
}// End Start()
 
function Update() {
	KeySequenceControl(); // call the function to control the sequence

}// End Update()

// KeySequenceControl() START ##################################################################
function KeySequenceControl(){

    // COUNTDOWN START #########################
    var timeLeft : int = endTime - Time.time; 
    // We do not need negative time
    if (timeLeft < 0){ 
        timeLeft = 0;
    	        firstDown = false;   // reset variables, You Fail!
		secondDown = false;
		thirdDown = false;
		allDown = false;
		// Retry or Abort...
		}
    // COUNTDOWN END ###########################

// Key sequence input controller START ######################
if(Input.GetKeyDown(KeyCode.UpArrow)) {
// highlight the button or play a sound
firstDown = true; //1. return true if you push first key
}
                  //2. if the first key is true 

if(firstDown) {
if(Input.GetKeyDown(KeyCode.RightArrow)) {
// highlight the button or play a sound
secondDown = true;//3. return true if you push first and second key
}                 
}

if(secondDown) {
if(Input.GetKeyDown(KeyCode.DownArrow)) {
// highlight the button or play a sound
thirdDown = true; //4. return true if you push first and second key and third
}                 
}

if(thirdDown) {
if(Input.GetKeyDown(KeyCode.LeftArrow)) {
// highlight the button or play a sound
allDown = true;  //5. return true if you push first and second key and third and fourth
}                 
}

//4. if all sequence is true do someting...
if(allDown) {
Debug.Log ("Sequence OK!"); // Debug Code
//Next Level...
firstDown = false; // reset variables
secondDown = false;
thirdDown = false;
allDown = false;   
}
// Key sequence input controller END ########################
}// KeySequenceControl() END ####################################################################

(Input Manager) Sequence of 4 keys – Basic + CountDown – Separate function()

Control Keys using Unity3D Input Manager, so end users can setup keys:

(Input.GetKeyDown(KeyCode.UpArrow) -> (Input.GetKeyDown(“up”)


// Key Sequence Input Controller
// Attach this script to a GameObject in the scene

private var firstDown : boolean = false;  // false at the beginning, I have no typed yet
private var secondDown : boolean = false; // false at the beginning, I have no typed yet
private var thirdDown : boolean = false;  // false at the beginning, I have no typed yet
private var allDown : boolean = false;    // false at the beginning, I have no typed yet

private var endTime : float;

function Start()
{
    endTime = Time.time + 3; // 3 seconds to type the right sequence!
}// End Start()
 
function Update() {
	KeySequenceControl(); // call the function to control the sequence

}// End Update()

// KeySequenceControl() START ##################################################################
function KeySequenceControl(){

    // COUNTDOWN START #########################
    var timeLeft : int = endTime - Time.time; 
    // We do not need negative time
    if (timeLeft < 0){ 
        timeLeft = 0;
    	        firstDown = false;   // reset variables, You Fail!
		secondDown = false;
		thirdDown = false;
		allDown = false;
		// Retry or Abort...
		}
    // COUNTDOWN END ###########################

// Key sequence input controller START ######################
if(Input.GetKeyDown("up")) {
// highlight the button or play a sound
firstDown = true; //1. return true if you push first key
}
                  //2. if the first key is true 

if(firstDown) {
if(Input.GetKeyDown("right")) {
// highlight the button or play a sound
secondDown = true;//3. return true if you push first and second key
}                 
}

if(secondDown) {
if(Input.GetKeyDown("down")) {
// highlight the button or play a sound
thirdDown = true; //4. return true if you push first and second key and third
}                 
}

if(thirdDown) {
if(Input.GetKeyDown("left")) {
// highlight the button or play a sound
allDown = true;  //5. return true if you push first and second key and third and fourth
}                 
}

//4. if all sequence is true do someting...
if(allDown) {
Debug.Log ("Sequence OK!"); // Debug Code
//Next Level...
firstDown = false; // reset variables
secondDown = false;
thirdDown = false;
allDown = false;   
}
// Key sequence input controller END ########################
}// KeySequenceControl() END ####################################################################


(Input Manager) Sequence of 4 keys – Basic + CountDown – Separate sequence variables


// Key Sequence Input Controller
// Attach this script to a GameObject in the scene

// Right Sequence
var firstKey  : String = "up";
var secondKey : String = "right";
var thirdKey  : String = "down";
var fourthKey : String = "left";

private var firstDown : boolean = false;  // false at the beginning, I have no typed yet
private var secondDown : boolean = false; // false at the beginning, I have no typed yet
private var thirdDown : boolean = false;  // false at the beginning, I have no typed yet
private var allDown : boolean = false;    // false at the beginning, I have no typed yet

private var endTime : float;

function Start()
{
    endTime = Time.time + 3; // 3 seconds to type the right sequence!
}// End Start()
 
function Update() {
	KeySequenceControl(); // call the function to control the sequence

}// End Update()

// KeySequenceControl() START ##################################################################
function KeySequenceControl(){

    // COUNTDOWN START #########################
    var timeLeft : int = endTime - Time.time; 
    // We do not need negative time
    if (timeLeft < 0){ 
        timeLeft = 0;
    	        firstDown = false;   // reset variables, You Fail!
		secondDown = false;
		thirdDown = false;
		allDown = false;
		// Retry or Abort...
		}
    // COUNTDOWN END ###########################

// Key sequence input controller START ######################
if(Input.GetKeyDown(firstKey)) {
// highlight the button or play a sound
firstDown = true; //1. return true if you push first key
}
                  //2. if the first key is true 

if(firstDown) {
if(Input.GetKeyDown(secondKey)) {
// highlight the button or play a sound
secondDown = true;//3. return true if you push first and second key
}                 
}

if(secondDown) {
if(Input.GetKeyDown(thirdKey)) {
// highlight the button or play a sound
thirdDown = true; //4. return true if you push first and second key and third
}                 
}

if(thirdDown) {
if(Input.GetKeyDown(fourthKey)) {
// highlight the button or play a sound
allDown = true;  //5. return true if you push first and second key and third and fourth
}                 
}

//4. if all sequence is true do someting...
if(allDown) {
Debug.Log ("Sequence OK!"); // Debug Code
//Next Level...
firstDown = false; // reset variables
secondDown = false;
thirdDown = false;
allDown = false;   
}
// Key sequence input controller END ########################
}// KeySequenceControl() END ####################################################################

(Input Manager) Sequence of 4 keys – Basic + CountDown – Arrays


// Key Sequence Input Controller
// Attach this script to a GameObject in the scene
     
    // array START #######################
    var i : int = 0; // array index start value
    var sequenceKey = new Array (); 
    // Right Sequence
    sequenceKey[0] = "up";
    sequenceKey[1] = "right";
    sequenceKey[2] = "down";
    sequenceKey[3] = "left";
    // array END #########################

private var firstDown : boolean = false;  // false at the beginning, I have no typed yet
private var secondDown : boolean = false; // false at the beginning, I have no typed yet
private var thirdDown : boolean = false;  // false at the beginning, I have no typed yet
private var allDown : boolean = false;    // false at the beginning, I have no typed yet

private var endTime : float;

function Start()
{
    endTime = Time.time + 3; // 3 seconds to type the right sequence!
}// End Start()
 
function Update() {
	KeySequenceControl(); // call the function to control the sequence

}// End Update()

// KeySequenceControl() START ##################################################################
function KeySequenceControl(){

    // COUNTDOWN START #########################
    var timeLeft : int = endTime - Time.time; 
    // We do not need negative time
    if (timeLeft < 0){ 
        timeLeft = 0;
    	        firstDown = false;   // reset variables, You Fail!
		secondDown = false;
		thirdDown = false;
		allDown = false;
		// Retry or Abort...
		}
    // COUNTDOWN END ###########################

// Key sequence input controller START ######################
if(Input.GetKeyDown(sequenceKey[0])) {
// highlight the button or play a sound
firstDown = true; //1. return true if you push first key
}
                  //2. if the first key is true 

if(firstDown) {
if(Input.GetKeyDown(sequenceKey[1])) {
// highlight the button or play a sound
secondDown = true;//3. return true if you push first and second key
}                 
}

if(secondDown) {
if(Input.GetKeyDown(sequenceKey[2])) {
// highlight the button or play a sound
thirdDown = true; //4. return true if you push first and second key and third
}                 
}

if(thirdDown) {
if(Input.GetKeyDown(sequenceKey[3])) {
// highlight the button or play a sound
allDown = true;  //5. return true if you push first and second key and third and fourth
}                 
}

//4. if all sequence is true do someting...
if(allDown) {
Debug.Log ("Sequence OK!"); // Debug Code
//Next Level...
firstDown = false; // reset variables
secondDown = false;
thirdDown = false;
allDown = false;   
}
// Key sequence input controller END ########################
}// KeySequenceControl() END ####################################################################

By |Unity3D, Video Games Development|Commenti disabilitati su Unity 3D – Key Sequence Input – Basics – JavaScript

htaccess – BlueHost – cPanel – Directory Password

Protect a Directory with a password using cPanel.

CREATE PROTECTION

1. Enter as administrator into cPanel

2. Security> Directory Password

3. Directory Selection> Web Root> Go

4. Click the Directory you want to protect

5. Check ‘Password protect this directory’
Name the protected directory: give it a name
Save

6. Go Back>
Create User:
Username: give it
Password: give it
Add/Modify Authorized User

Perfect, try to access the files inside the directory, now you need Username and Password

REMOVE PROTECTION

1. Enter as administrator into cPanel

2. Security> Directory Password

3. Directory Selection> Web Root> Go

4. Click the Directory you want to protect

5. Uncheck ‘Password protect this directory’

6. Remove active users if you want

By |Web Design, Web Security|Commenti disabilitati su htaccess – BlueHost – cPanel – Directory Password